RV Roof Replacement Matters: Why a Professional Seal Is Better Than a DIY Patch
Maintaining the integrity of a modern recreational vehicle requires more than just an occasional wash and wax. As an RVDA-certified facility with over 21 years of experience in high-stakes collision and structural repair, RVCCR has witnessed a significant shift in how exterior components: specifically roof systems: respond to environmental stressors. In the Inland Empire, where triple-digit summer temperatures and intense UV exposure are the norm, the roof is the most vulnerable point of failure on any motorhome, fifth wheel, or travel trailer.
The logistics of a roof failure are rarely simple. It often begins with a microscopic void in a sealant bead and ends with a complete structural overhaul that can sideline your travel plans for weeks. Understanding the complexity of these multi-layer systems is the first step in protecting your investment. While the temptation to climb a ladder with a roll of sealant tape and a "good enough" attitude is strong, the technical reality of 2026-standard RV construction tells a different story…
The 2026 RV Roof Crisis: Why Modern Materials Are Failing Faster
The RV industry has largely moved away from the heavy, high-maintenance EPDM (Ethylene Propylene Diene Monomer) rubber roofs of the early 2000s in favor of TPO (Thermoplastic Polyolefin) membranes like Alpha Systems’ SuperFlex. On paper, these materials are superior: they are lighter, more reflective, and theoretically more durable. However, in practice, we are seeing a "2026 RV Roof Crisis" where these membranes are failing at a rate faster than their predecessors.
The primary culprit is a combination of reduced material thickness and chemical incompatibility. Many modern manufacturers have moved toward 20-mil or 28-mil membranes to save weight and cost. While these meet minimum factory specs, they lack the structural "heft" to withstand the thermal expansion and contraction cycles of the Southern California climate. When a 20-mil TPO membrane expands in 110-degree heat and then rapidly cools at night, the stress on the lap sealant interfaces is immense.
Furthermore, materials like Alpha SuperFlex require very specific chemical bonding agents. According to Alpha Systems LLC Product Care standards, using any product containing petroleum distillates, citric acid, or certain solvents can cause the membrane to swell, delaminate, or lose its UV-resistant properties. We frequently see owners apply high-quality aftermarket sealants that were designed for EPDM, only to find the TPO membrane bubbling and pulling away from the decking six months later. This chemical mismatch creates a "false sense of security" where the roof looks sealed but is actually structurally compromised at the molecular level.
For those dealing with more than just roof issues, such as structural damage from a low-hanging branch or a rear-end collision, our RV collision repair team integrates roof restoration with full-body integrity checks to ensure the entire coach is factory-spec.
The DIY Trap: EternaBond vs. Professional Sealants
It is a Saturday morning, and you’ve noticed a small drip near the skylight of your Class A motorhome. Your first instinct is to head to a big-box store or an online retailer to grab a roll of EternaBond tape or a tube of Dicor 502LS. In the DIY community, these are often hailed as "permanent" fixes. However, from a certified repair perspective, these are often "The DIY Trap."
The issue with tape-based "patch" solutions like EternaBond is that they are incredibly effective at sealing moisture in as well as out. If the wood decking beneath the membrane has already absorbed even a small amount of humidity, applying a non-breathable tape over the leak creates a greenhouse effect. The trapped moisture, heated by the sun, accelerates the rot of the OSB or plywood decking. We have performed dozens of rv roof replacement jobs where the owner thought the leak was "fixed" two years ago, only to discover that the rot had spread three feet in every direction under the tape.
There is also the matter of Dicor 502LS vs. Alpha 5121. While Dicor is the industry standard for many, Alpha Systems explicitly states in their warranty documentation that only Alpha-branded sealants should contact their SuperFlex membranes. Mixing these chemistries can lead to a lack of adhesion. At RVCCR, we don't guess. We verify the membrane type and use the specific OEM-specified self-leveling lap sealant to ensure a true chemical bond. This level of precision is why we are a trusted certified auto body shop that handles both complex automotive finishes and heavy-duty RV structures.

The "Soft Spot" Reality: From $500 to $12,000
The economics of RV maintenance are unforgiving. A "soft spot" on your roof is not merely a cosmetic blemish; it is a signal of structural failure. When you walk on your roof and feel a slight "give" or "sponginess," the water has already bypassed the membrane and saturated the luan or plywood decking.
In 2026, the cost of a simple reseal: cleaning the roof and applying new Alpha 5121 or Dicor 502LS over existing joints: typically ranges from $500 to $1,200 depending on the size of the rig. However, once that water hits the decking, the clock starts ticking. Plywood rot is progressive. It migrates into the rafters, then down the wall studs, and eventually into the floor system.
We recently handled a case where a neglected $200 plumbing vent seal led to a total roof failure. By the time the owner noticed the interior ceiling staining, the mold had colonized the fiberglass insulation and the OSB decking had lost its structural load-bearing capacity. The resulting invoice for a full tear-off and deck replacement was over $12,000. This is why we emphasize that a professional RV collision repair is an investment in the vehicle's resale value and safety, not just a repair.
The Inland Empire Factor: Thermal Shock and UV Degradation
If you own an RV in Redlands, Yucaipa, Beaumont, or anywhere across the Inland Empire, your roof is living a harder life than the brochure ever mentioned. Ambient temperature is only part of the story. On a sunny summer afternoon, roof-surface temperatures can run dramatically hotter than the air around them, and dark trim pieces, sealant beads, and hardware bases often get hit even harder. That means the membrane and everything attached to it are baking all day, then cooling off overnight. Repeat that cycle enough times and materials start acting like tired rubber bands.
This is where thermal shock matters. The membrane, sealants, fasteners, rooftop accessories, and roof deck are all expanding and contracting at different rates. Aluminum moves differently than fiberglass. Fiberglass moves differently than wood. Wood also gains and loses moisture, which adds another layer of dimensional change. In a laminated RV roof assembly, that mismatch creates stress at the exact places owners usually worry about last: termination bars, vent flanges, skylight corners, antenna mounts, AC openings, and sidewall transitions.
In simple terms:
- Aluminum expands and contracts quickly with heat swings.
- Fiberglass is comparatively more stable, but it still moves and can telegraph stress into bonded joints.
- Wood decking, including luan and plywood products, responds not only to temperature but also to moisture cycling. It can swell, soften, and lose fastener hold when water intrusion joins the party.
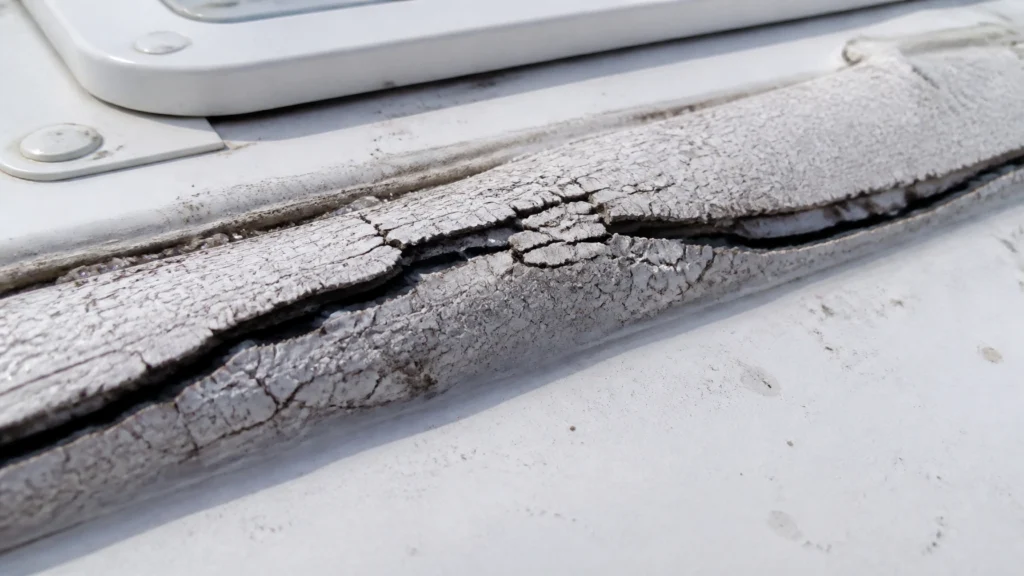
That mismatch is a big reason we see sealants crack in a pattern technicians often call "alligatoring." Instead of one clean split, the surface develops a network of tiny fractures that look like reptile skin. Under Inland Empire UV, those micro-cracks widen, oxidize, and lose elasticity. Once a self-leveling sealant loses elongation, it stops acting like a flexible weather barrier and starts acting like a brittle placeholder. It may still look attached from the ladder. It just is not doing the job anymore.
RCABC roofing standards repeatedly emphasize that roof membranes, flashings, penetrations, and rooftop-mounted components must be designed and installed with movement, compatibility, and long-term exposure in mind. That commercial mindset matters on RVs too. An RV roof is not static. It flexes going down the freeway, twists entering driveways, and bounces through campgrounds. Add Inland Empire heat to that motion and you get a much faster aging curve than a parked structure would experience. RVDA training materials also stress that water intrusion diagnosis often starts at sealant transitions and penetrations because movement and exposure combine there first.
The practical takeaway is pretty simple: in Redlands, "still looks okay from the ground" is not a maintenance strategy. We inspect for chalking, shrinkage, cracked shoulders around sealant beads, membrane tension near penetrations, and edge conditions that tell us the roof assembly is being overworked by heat. If that inspection reveals related sidewall or cap damage, our RV collision repair process lets us address the structural system as one whole envelope instead of pretending the roof lives in isolation.
The Invisible Threat: Mold, Mildew, and Interior Air Quality
A roof leak is not just a carpentry problem. It is also an indoor-environment problem, and that part tends to stay hidden longer than owners expect. Water intrusion can sit above the ceiling panel, inside insulation cavities, and around roof framing for weeks before a stain shows up inside. By then, the damage has usually moved beyond "a little damp."
That matters because mold and mildew do not need dramatic flooding to get started. They need moisture, organic material, and time. Unfortunately, RV roof assemblies often provide all three. Luan decking and interior paneling are porous wood-based materials. Once they get wet, they behave like sponges. They absorb, hold, and redistribute moisture into adjacent layers. Instead of water staying neatly at the original leak point, it can wick outward through fibers, adhesives, insulation facings, and wall transitions.
From a health standpoint, this is where things get serious. Stachybotrys chartarum, often discussed in water-damage and remediation circles, is associated with chronically wet cellulose-rich materials. We are careful not to play lab technician in the field, but the point is clear: prolonged moisture in porous building materials creates conditions where problematic microbial growth can develop. Even when the contaminant is not stachybotrys, general mold and mildew growth can still create musty odors, air-quality complaints, and contamination of soft goods inside the coach.
The bigger problem is that many RV owners focus on the visible drip and miss the assembly-wide damage:
- Wet luan loses structural integrity.
- Adhesive bonds weaken.
- Insulation can mat down and lose thermal performance.
- Ceiling panels stain, sag, or delaminate.
- Airborne odor complaints linger long after the "leak" appears sealed.
This is one reason professional tear-off matters so much. Industry guidance for moisture-damaged roof substrates consistently favors removal and replacement of wet, degraded materials rather than trapping them in place. That logic shows up in broader roofing and restoration standards, and it aligns with RVDA training principles around water intrusion diagnosis: identify the source, determine the migration path, evaluate the substrate, and replace compromised porous materials when they cannot be reliably dried and restored.
At RVCCR, if a roof leak has progressed into the deck, we do not just smear more sealant on top and call it a win. We inspect the decking, insulation, framing, and adjacent wall transitions. If the leak has affected other systems or if the coach also needs coordinated structural work, our mechanical and alignment services and RV repair capabilities allow us to keep the project under one roof instead of bouncing you between shops and explanations.
Technical Deep Dive: TPO vs. PVC vs. EPDM
When people say "rubber roof," they are usually lumping together very different materials. That shortcut causes a lot of expensive mistakes. TPO, PVC, and EPDM do not respond the same way to heat, contamination, adhesives, or repair chemistry, and the differences matter a lot once an RV starts seeing real-world use.
Material Science: TPO vs. EPDM vs. PVC: The 45-mil Standard
When we talk about rv roof replacement, the choice of material is the single most important decision you will make. Most factory roofs are fitted with "Economy" grade 20-mil or 28-mil membranes. At RVCCR, our standard for a professional replacement is a 45-mil or 60-mil commercial-grade TPO or PVC system.

Why the thickness matters:
- Puncture Resistance: Low-hanging branches that would tear a 20-mil factory roof will often just scuff a 45-mil reinforced membrane.
- Thermal Stability: Thicker membranes have a higher thermal mass, meaning they expand and contract more slowly, which puts less stress on the sealants at the roof's edge.
- Longevity: While a factory roof might last 8-10 years before requiring significant repair, a 45-mil PVC or TPO system, properly installed, can easily exceed 20 years.
Here is where the chemistry gets interesting:
TPO
- TPO is lightweight, reflective, and common on late-model RVs.
- It performs well in many standard applications, but thermoplastic roofs can be sensitive to chemical mismatch and contamination.
- RCABC guidance for thermoplastic systems specifically flags the need to consider exposure from bird droppings, oils, solvents, and rooftop equipment discharge. That matters on RVs because roofs see bug residue, tree sap, vent exhaust, airborne grime, and whatever mystery sludge the campground geese contribute for free.
- TPO can be a solid option when the membrane type is verified and the approved sealants and cleaners are used exactly as specified.
EPDM
- EPDM has been around forever in RV terms, which means owners trust it more than they should and fear it more than they should.
- It is flexible and proven, but it is a different chemistry with different detailing requirements.
- RCABC EPDM standards call for careful corner treatment and flashing discipline, which tells you something important: EPDM can work well, but it does not reward sloppy detailing.
- In the field, we often see EPDM roofs complicated by non-compatible patch products, heavy oxidation, and years of repeated surface coatings layered over original problems.
PVC
- PVC stands out when chemical exposure and seam performance matter.
- Industry chemical-resistance guides for thermoplastic roofing generally place PVC ahead of standard TPO when the roof may encounter acids, greases, oils, and harsher contaminants.
- That does not mean PVC is invincible. Nothing is. But it usually gives you a wider margin before contamination turns into membrane distress.
- For RVs with rooftop accessories, vent discharge, luxury finishes, and owners who expect longer-term durability, that extra margin is worth talking about.
So why does RVCCR often favor 45-mil PVC for luxury motorhomes? Three big reasons:
- Chemical resistance in the real world. Bird droppings, grease from vent discharge, fuel residue during service events, cleaners used by well-meaning owners, and rooftop fallout all create low-level chemical exposure. PVC generally handles that environment better than standard TPO.
- Heat-welded seam confidence. Properly installed thermoplastic seams are a huge advantage, especially on complex roofs with multiple penetrations.
- Better fit for higher-end coaches. Luxury motorhomes usually carry more rooftop equipment, more interior value beneath the roof, and higher owner expectations. A membrane with more robust chemical resistance and heavier thickness makes sense.
We follow the RCABC (Roofing Contractors Association of British Columbia) TPO and PVC Roof Systems Standards for our installation mindset, even though these are "commercial" standards rather than "RV" standards. RCABC also emphasizes roof penetrations, drainage details, rooftop traffic, and exposure conditions that can shorten membrane life if ignored. That is directly relevant to RV roof work. An RV is essentially a building that experiences constant vibration, repeated torsion, and freeway-speed wind loads. The roof needs to be tougher than a stationary building’s roof, not weaker. If your rig’s issues extend beneath the roof into the chassis or drive systems, our mechanical and alignment services team can address those needs simultaneously.
Solar Panel Integration & The Modern Roof
The 2026 roof conversation is not just about keeping rain out anymore. Modern RV electrical systems are getting heavier, smarter, and a lot more roof-dependent. Between larger solar arrays, upgraded charge controllers, Wi-Fi gear, Starlink hardware, antennas, and the growing popularity of LiFePO4 battery systems with higher daily energy demand, the roof has become an equipment platform instead of just a weather surface.
That changes repair strategy in a few important ways.
First, mounting point integrity matters more than ever. A solar panel bracket is only as trustworthy as the substrate beneath it. If the deck around a mounting fastener has softened from moisture, the hardware may still feel tight while the surrounding wood has already lost holding power. That is a recipe for movement, enlarged penetrations, cracked sealant, and repeat leaks. RCABC standards discuss the roof as a platform and repeatedly stress that rooftop-mounted equipment introduces load, traffic, and detail complexity that must be addressed by design rather than by wishful thinking.
Second, wire entry gland sealing is one of the most overlooked leak points on modern coaches. Owners often focus on the membrane seam and forget the cable penetration. A gland can be perfectly installed on day one and still fail years later if:
- the wrong sealant was used,
- the roof surface was contaminated at installation,
- the cable bundle shifts under travel vibration,
- or thermal movement slowly breaks the bond at the penetration base.
Third, more rooftop equipment means more shadow lines, more dirt accumulation, and more maintenance blind spots. Leaks often begin under panel edges, around mount feet, or at cable routing points where owners do not inspect as often. That is another reason we prefer a full professional roof evaluation instead of a quick tube-of-caulk approach. If your roof repair needs to account for electrical loads, accessory reinstallation, or post-repair system checks, our broader RV collision repair approach helps keep the coach functional instead of partially reassembled and waiting on the next shop.
Case Study: The $500 Seal vs. The $12,000 Rebuild
Here is a realistic version of how this escalates, because this is the part that tends to change minds fast.
Stage 1: The cheap fix
An owner of a 34-foot fifth wheel notices hairline cracking around a plumbing vent and a slight discoloration near an interior ceiling light. The roof still looks "pretty good," so the coach gets a basic reseal recommendation. If caught early, a professional clean-and-reseal around the vent cluster and adjacent seam might land around $500 to $1,200, depending on roof size, access, and how many details need attention.
Stage 2: Delay season
The owner waits through one summer. Inland Empire heat bakes the old sealant, the cracks widen, and thermal cycling pumps small amounts of water into the luan deck. There is no dramatic waterfall inside, just a faint odor and a slightly softer step near the vent opening. This is where people lose the game while thinking they are still tied.
Stage 3: Hidden migration
By the time the coach returns for inspection, the leak path is no longer limited to the original vent. Moisture has traveled laterally through porous wood products and along fastener paths. The insulation is damp. The luan has started to delaminate. A ceiling panel seam is stained, and one roof-mounted accessory now has compromised sealant because the surrounding substrate has shifted.
Stage 4: Tear-off reveals reality
The repair moves from "reseal" to "rebuild":
- Remove rooftop accessories
- Strip membrane
- Remove wet decking
- Inspect rafters and backing
- Replace compromised wood
- Dry and decontaminate affected cavities
- Reinstall substrate
- Install new membrane
- Reflash penetrations
- Reinstall accessories with proper sealing
Now the invoice is no longer a maintenance bill. It is a structural restoration project.
A realistic cost stack can look like this:
- Inspection and leak tracing
- Roof component removal and labeling
- Membrane tear-off
- Deck replacement materials
- Framing repair if needed
- Insulation replacement
- Interior panel access and repair
- New membrane installation
- Penetration flashing and sealants
- Solar/antenna/AC reinstallation labor
That is how a neglected seam can turn into a $8,000 to $12,000+ roof rebuild, especially on larger coaches or rigs with multiple accessories. The numbers vary by size, damage spread, membrane choice, and whether sidewall or interior finish work is involved. The point is not shock value. The point is math. Water is cheap. Water damage is not.
Insurance & Warranty: Why "Patching" Voids Your Protection
One of the most overlooked aspects of the DIY vs. Professional debate is the legal and financial fallout. Most RV roof membranes come with a "10 or 12-year limited warranty." However, if you read the fine print in the Dicor or Alpha Systems warranty documents, those warranties are almost always contingent on "regular documented maintenance" and the use of "approved materials."
If you file a claim for a roof failure and the insurance adjuster or manufacturer sees a layer of non-approved silicone or DIY tape, your claim will likely be denied. They will categorize the failure as "owner neglect" or "unauthorized modification."
When RVCCR performs an rv roof repair or replacement, we provide a paper trail. We document the tear-off, the condition of the decking, the materials used, and the certification of the technicians. This documentation is gold when it comes time to sell your RV or if you ever need to file an insurance claim for hail damage or a collision. We coordinate with all major insurance carriers to ensure that "like-for-like" replacement actually means "factory-quality or better."
The RVCCR Protocol: Tear-off and Decking Inspection
A professional rv roof replacement at our facility is a surgical process. We do not "skin over" old roofs. That is a shortcut that traps moisture and leads to premature failure. Our protocol is as follows:
- Complete Tear-off: Every component: AC units, vents, antennas, and ladders: is removed. The old membrane is stripped back to the raw decking.
- Decking Decontamination: We inspect every square inch of the plywood. If we find rot, we don't "patch" it. We cut back to the nearest rafter and replace the wood with marine-grade materials.
- Structural Reinforcement: We check the "truss-to-wall" connections. On many modern RVs, these can vibrate loose over time. We re-secure the skeleton of the roof before the new skin goes on.
- Membrane Application: Using industrial-grade water-based or solvent-based adhesives (depending on the membrane), we lay the new 45-mil skin.
- Triple-Seal Methodology: We don't just use lap sealant. We use a combination of butyl tape, non-sag sealant for verticals, and self-leveling sealant for horizontal surfaces to create a multi-layer defense against water ingress.

Protect Your Adventure with RVCCR
The difference between a "patch" and a "seal" is the difference between a stressful weekend dealing with a leak and a decade of worry-free travel. At RVCCR, we don't just fix vehicles; we restore the peace of mind that allows you to focus on the road ahead. Whether you are navigating the high deserts or the coastal winds, your roof should be the last thing on your mind.
Don't wait for the next rainstorm to reveal a hidden failure. Contact our team today for a comprehensive roof inspection. Schedule your certified repair and restore your coach to its factory-spec glory. Drive with the confidence that only a lifetime warranty and 21 years of family-owned experience can provide. Your next adventure is waiting: let’s make sure your roof is ready for it.
Need a repair estimate?
Skip the wait — send us a few photos and our team will get back to you fast.
Start a Photo Estimate →