RV Solar Panels After a Collision: Assessing Roof-Mounted Solar Damage and Protecting Your Warranty
Published August 13, 2026
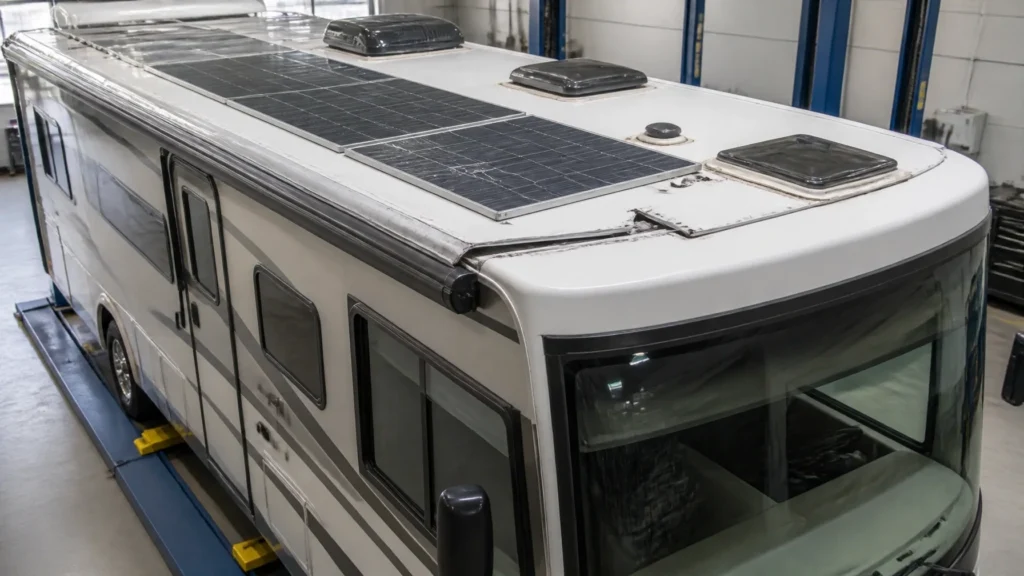
RVCCR is an RVDA-certified repair facility with more than 21 years of family-owned experience serving Redlands and the Inland Empire. Our team handles RV collision repair, motorhome collision repair, structural restoration, paint and body work, and related mechanical services under one roof. That combination matters after a crash because a motorhome roof can carry much more than a membrane and a few vents. It may also support rigid solar panels, mounting rails, cable-entry glands, antennas, skylights, air-conditioning equipment, and other accessories that are connected to the coach’s electrical and structural systems.
A collision does not need to strike the solar array directly to damage it. A rollover, jackknife, rear-cap impact, sidewall collision, low-clearance incident, or frame twist can transfer force into the roof assembly. The visible panel may look acceptable while the rails, adhesive, fasteners, cable insulation, roof deck, charge controller, or seals have already been compromised…
The safest approach is to treat the solar installation as part of the complete RV damage assessment: not as an optional accessory to inspect later.
Why a collision can damage RV solar without breaking a panel
Roof-mounted solar equipment is connected to several different parts of an RV:
- The panel itself, including glass, solar cells, frame, junction box, and factory leads
- Mounting feet, brackets, rails, fasteners, or approved adhesive systems
- Roof membrane, fiberglass, aluminum, or laminated roof decking
- Cable-entry plates, glands, conduit, and wiring routed through the roof
- Disconnects, fuses, combiner components, and charge controllers
- House batteries and the RV’s 12-volt electrical system
- Nearby vents, skylights, antennas, air-conditioning units, and roof trim
These components do not all respond to impact forces in the same way. A rigid glass panel may resist a light flexing load but crack when its frame is twisted. An aluminum rail may bend while the panel still appears intact. A cable gland may pull away from the membrane and create a leak path. A roof deck may lose fastener-holding strength if it was already weakened by moisture.
That is why a visual inspection limited to “the glass is not broken” is not enough.
The roof can also move independently from the chassis. RVs are built from multiple materials and assemblies, including fiberglass, aluminum, wood-based decking, foam insulation, adhesives, sealants, and structural framing. When a collision twists the body or shifts a cap or wall, those materials may move at different rates. The result can be stress at panel mounts, roof penetrations, seams, and accessory bases even when the damage is subtle.
Our RV collision repair team evaluates the roof as part of the vehicle’s complete load path. That means we look beyond the first damaged part and consider where the collision force traveled.
The four areas technicians should inspect after an RV collision
A proper inspection should separate solar damage into four related categories: the module, the mounting structure, the roof substrate, and the electrical system.
1. Solar panel and module damage
The panel is the part most owners notice first. Common signs of module damage include:
- Cracked or shattered tempered glass
- Visible lines across the solar cells
- A damaged aluminum frame
- A lifted or separated backsheet
- A cracked junction box
- Pulled or broken factory leads
- Burn marks, discoloration, or melted connector housings
- A panel that sits at a different angle from the others
- New movement, rattling, or vibration during travel
A panel can also suffer internal cell damage that is not obvious from the ground. A collision may create stress fractures across cells or damage electrical connections beneath the glass. The array may continue producing some power while operating below its expected output. That does not necessarily make it safe to keep using, and it does not prove that the module is suitable for reinstallation.
A damaged panel should be documented before it is moved. Photos should show the full roof layout, close-ups of each panel and mount, wire routing, connector condition, and nearby roof features. The panel’s model and serial information should also be recorded when possible. This documentation helps the repair shop, insurer, and component manufacturer understand what was installed before the loss.
2. Mounting structure and attachment points
The panel may be undamaged while its mounting system is not.
Technicians should inspect:
- Bent rails or brackets
- Elongated fastener holes
- Pulled or loosened screws
- Cracked mounting feet
- Failed adhesive bonds
- Distorted panel frames
- Contact between the panel underside and the roof
- Blocked drainage paths in the panel frame
- Mounts that are no longer evenly supported
- New gaps between hardware and the roof surface
Mounting hardware distributes the panel’s weight and travel loads into the roof. If one rail is bent or one foot has lifted, the panel may be carrying stress in a way the original design did not intend. Continued driving can worsen that stress. Vibration may enlarge a fastener hole, abrade a cable, or break a sealant joint that initially appeared acceptable.
Adhesive-mounted panels require the same level of caution. A bond can fail partially rather than separating completely. One corner may remain attached while another lifts. The panel may look secure until wind, vibration, or another temperature cycle exposes the failure.
A repair estimate should therefore identify whether the mounting structure can be safely reused, whether the manufacturer permits reuse after impact, and whether the roof beneath the attachment points remains structurally sound.
3. Roof membrane, deck, and structural stress
Solar equipment is only as secure as the roof supporting it.
A collision can create:
- Cracks or tears in the roof membrane
- Delamination around a mounting point
- Soft or weakened decking
- Compression damage beneath a bracket
- Pulled roof fasteners
- Cracks at the roof-to-wall or roof-to-cap transition
- Damaged sealant around cable-entry plates
- Water intrusion pathways beneath panels or rails
- Stress around vents, skylights, antennas, and air-conditioning openings
If the RV already had a leak, the roof deck may have been weakened before the collision occurred. In that situation, a mount that appears merely “loose” may actually be attached to deteriorated wood or compromised laminated material.
Roof twisting also matters. During a major impact, the body can rack or move out of square. That movement can pull on roof-mounted accessories and disturb seals across a broad area. The damage may appear on the opposite side of the initial impact because the roof and sidewalls carried the force through the structure.
Our article on RV roof replacement and professional sealing explains why roof work requires more than applying new sealant over an existing problem. When solar panels and vents must be removed, the condition of the membrane and deck needs to be evaluated before the equipment is put back.
4. Wiring, charge controllers, and battery connections
The roof array sends direct-current power through wiring to a charge controller and then into the RV’s battery system. Go Power!’s official RV Solar Reference Guide illustrates this basic system relationship: solar modules feed DC power through a cable-entry path and controller before reaching the batteries and other components.
After a collision, technicians should inspect:
- Positive and negative conductors
- Insulation for cuts, crushing, abrasion, or heat damage
- Connector housings and locking features
- Junction boxes
- Cable-entry plates and glands
- Roof-side wire clips and retainers
- Fuses, breakers, and disconnects
- Charge-controller mounting
- Controller terminals and strain relief
- Battery-side connections
- Grounding and bonding components where applicable
A cable can be damaged beneath its insulation without obvious external marks. It may also be pinched between a panel rail and the roof or stretched where the roof shifted. A wire that is still connected is not necessarily a wire that is safe to energize.
The charge controller deserves separate attention. It may be mounted inside a cabinet or compartment where an owner cannot see it. A collision can jar the controller loose, pull on its terminals, crack its housing, or damage the wiring leading to the battery bank. If the roof array was shorted or exposed to impact, the controller should not simply be reset and returned to service without testing.
Electrical safety: why damaged solar panels should be treated as energized
Solar panels generate electricity whenever they receive light. A damaged panel or array may still produce DC power even when the RV engine is off, shore power is disconnected, or the battery switch is turned off.
That creates a serious safety concern when glass, junction boxes, connectors, or wiring have been damaged. The exact voltage and current depend on the system design, panel configuration, controller, and battery setup. Some RV systems are relatively small, while others use multiple modules and higher-voltage strings. The safe assumption is that damaged equipment may remain energized until a qualified person isolates and verifies it.
The Occupational Safety and Health Administration’s electrical safety guidance addresses electrical shock and arc hazards, and PV safety guidance consistently warns that illuminated modules can remain live. Damaged wiring or loose connections can also create a path for arcing. Direct-current arcs may continue until the circuit is properly interrupted; turning off one switch may not eliminate energy at every part of the array.
Owners should not:
- Walk on cracked panels
- Touch exposed conductors
- Disconnect solar connectors under load
- Cut roof wiring
- Remove a panel in direct sunlight without a qualified procedure
- Place metal tools across terminals
- Cover or move damaged modules without knowing the system design
- Assume the battery disconnect isolates the solar array
- Reconnect a panel after a collision just to “see if it works”
Keep people away from the damaged roof area and contact a qualified RV electrical or collision-repair professional. If there is smoke, heat, sparking, a burning odor, bubbling, or other signs of an electrical event, move away and contact emergency services.
This warning is different from an EV traction-battery warning, but the safety principle is similar: do not rely on appearance or a silent vehicle to determine whether electrical equipment is safe. NHTSA’s electric and hybrid vehicle safety information states that high-voltage components should be serviced only by qualified technicians with appropriate training and equipment. RV solar arrays have different system designs, but damaged electrical equipment still requires controlled isolation and testing.
Broken panel versus damaged mounting structure: repair or replace?
The repair-versus-replace decision should be based on documented condition, manufacturer instructions, and the ability to restore a safe, reliable installation.
When replacement is usually the more defensible choice
Replacement may be appropriate when the panel has:
- Broken or cracked glass
- Cell fractures
- A damaged frame
- A cracked junction box
- Heat or burn damage
- Torn or compromised backsheet material
- Damaged factory leads
- Evidence of impact or twisting
- Unknown internal damage after a significant collision
A panel that still produces power may not be suitable for continued service. Output testing can help, but performance alone does not evaluate the physical integrity of glass, insulation, junction boxes, or connectors.
Replacement may also be needed when the original panel is no longer available. In that case, the replacement must be evaluated for dimensions, electrical characteristics, connector compatibility, mounting method, and controller limits. Installing a visually similar panel is not automatically a proper substitute.
When a panel may be eligible for reuse
A panel may be considered for reuse only after a qualified inspection confirms that:
- The glass, frame, junction box, and backsheets are intact
- The mounting points were not distorted
- The electrical leads and connectors are undamaged
- The panel passes appropriate testing
- The manufacturer’s instructions permit the handling and reinstallation
- The roof and mounting structure are sound
- The panel can be reinstalled without modification
Even then, the decision should be documented. “It looks fine” is not a test result.
When the mounting system must be replaced
Mounts, rails, brackets, or fasteners may require replacement when they are bent, stretched, cracked, pulled out, or attached to a damaged substrate. Reusing visibly deformed hardware can create uneven loading and future seal failure.
The repair shop should compare the mounting layout with the manufacturer’s installation instructions. Fastener spacing, approved holes, support, clearance, drainage, and adhesive requirements may all matter. If the original installation used a method that was not approved for the panel or roof, collision repairs are not the time to repeat it without review.
Solar panel removal during RV roof replacement
Roof replacement often requires the removal of solar panels and other accessories before the membrane can be removed. This is a coordinated process, not a simple unbolting operation.
A careful removal plan should include:
-
Photographing the original layout
Record panel positions, rail orientation, cable routes, entry points, vent locations, and clearance from other equipment. -
Identifying each component
Label panels, brackets, cables, connectors, controller wires, and fasteners. Components that look identical may have different positions or cable lengths. -
Isolating electrical sources
A qualified technician should follow the solar manufacturer’s and RV manufacturer’s procedures to isolate the array and battery system before disconnecting components. -
Testing before handling
The technician should use appropriate equipment and procedures to verify the condition of the electrical system before touching damaged connections. -
Removing panels without adding stress
Panels should be supported, protected from impact, and stored in a way that prevents additional glass, frame, or connector damage. -
Inspecting the roof beneath the equipment
Once panels, rails, vents, and cable-entry hardware are removed, the membrane and decking can be evaluated properly. -
Repairing the roof before reinstalling equipment
The new membrane, sealants, flashing, and roof penetrations must be compatible with the RV roof system and the equipment being returned. -
Reinstalling only approved components
Damaged mounts, cables, connectors, and panels should not be returned simply because they were part of the original installation. -
Testing after reinstallation
The final inspection should include electrical checks, securement, cable protection, seal inspection, and confirmation that the charge controller and battery system operate as intended.
The sequence matters. Reinstalling solar before the roof has been fully repaired can force technicians to work around equipment, increase the chance of damaging new materials, and make it harder to verify the roof’s weather seal.

Warranty implications: protect the panel, roof, and repair records
There may be several warranties involved in an RV solar claim:
- The solar-panel manufacturer’s limited warranty
- The charge-controller or inverter warranty
- The RV manufacturer’s roof warranty
- The installer’s workmanship warranty
- The collision-repair facility’s warranty
- Insurance requirements related to repair quality and documentation
These warranties do not necessarily cover the same things.
Solar-panel warranties commonly address defects in materials or workmanship and may include separate performance terms. They commonly exclude damage from impact, improper handling, unauthorized modification, or installation that does not follow the manufacturer’s instructions. Renogy’s official warranty information and solar-panel installation manual are examples of why owners should keep the exact documents for their panel model.
Do not drill into a panel, drill through its glass or frame, alter its construction, substitute unapproved connectors, or change its mounting method without checking the manufacturer’s requirements. A repair that makes the panel fit may create a warranty dispute later.
The roof warranty is separate. A roof manufacturer may have specific rules for sealants, fasteners, adhesives, penetrations, and accessory installation. A panel manufacturer’s approval does not automatically mean the RV roof manufacturer approves the same method.
Before authorizing work, gather:
- Panel make, model, and serial number
- Charge-controller information
- Invoices for the original solar installation
- Photos of the pre-collision layout
- RV purchase documents or build sheets
- Prior repair and maintenance records
- Manufacturer installation manuals
- Manufacturer warranty terms
- Photos of all collision-related damage
- The repair estimate and supplement documentation
Ask the repair facility to identify which parts are being repaired, which are being replaced, and why. Clear records help preserve warranty rights and make the insurance discussion more straightforward.
Insurance coverage for roof-mounted solar equipment
Insurance treatment depends on the policy, endorsements, declarations page, cause of loss, installation history, and the carrier’s definition of covered RV equipment. Do not assume that every solar component is automatically covered or automatically excluded.
Permanently mounted and hard-wired equipment may be treated differently from portable equipment. A rigid panel bolted or bonded to the roof, connected through a roof-entry gland, and wired to a charge controller is materially different from a portable folding panel stored inside a compartment. However, the classification and limits are policy-specific.
When reporting a collision, tell the insurer that the RV has a roof-mounted solar system and identify the complete affected equipment:
- Solar modules
- Mounting rails and brackets
- Cable-entry plate or gland
- Roof wiring
- Charge controller
- Fuses and disconnects
- Battery-side wiring
- Related roof accessories damaged by the same event
Provide photos and installation invoices if you have them. If the system was installed after the RV was purchased, explain when and by whom it was installed. If it was factory-installed, provide the build sheet or owner documentation if available.
The initial adjuster inspection may focus on visible body damage. A collision repair facility can identify additional damage during controlled teardown. If solar equipment, roof decking, wiring, or nearby vents were not visible during the first inspection, the repair estimate may need a supplement supported by photos, measurements, and testing.
Our travel trailer collision repair and insurance process explains why early estimates do not always capture hidden structural, electrical, or roof-related damage. The same principle applies to motorhomes: the first estimate is a starting point, not always the final scope.
Questions to ask an RV collision repair shop
Before approving repairs, ask:
- Will you inspect the entire roof, or only the visibly damaged panel?
- Will you document the panel model and original layout?
- How will the solar array be isolated before removal?
- Will you test wiring and the charge controller?
- Will you inspect the roof deck beneath each mount?
- Are the existing mounting methods approved by the panel manufacturer?
- Will damaged hardware be replaced rather than forced back into position?
- How will roof penetrations be resealed?
- Will the panels be tested before and after reinstallation?
- Will you provide photos and written documentation for the insurer?
- Does the repair include a written warranty?
- Can the shop coordinate collision, roof, paint, and mechanical work?
A general auto body shop may be experienced with vehicle paint but not with RV roof membranes, solar wiring, laminated construction, or accessory reinstallation. An RV paint and body shop should be prepared to manage the entire repair relationship, including structural inspection and communication with the insurance carrier.

What RV owners should do immediately after the collision
If the RV is safe to approach and no emergency condition is present:
- Keep people away from the roof and damaged wiring.
- Do not climb onto cracked or unstable panels.
- Do not reconnect the solar array.
- Do not cut or pull cables.
- Photograph the roof from a safe location.
- Photograph the sides, front, rear, vents, awnings, and visible body damage.
- Note whether the RV was plugged into shore power.
- Note whether the solar monitor or controller displayed an error.
- Contact your insurer and disclose the roof-mounted solar equipment.
- Arrange an inspection with a qualified RV collision repair facility.
If there is smoke, sparking, unusual heat, a burning odor, or visible electrical damage, move away and contact emergency services. Do not attempt to cover, disconnect, or remove the equipment yourself.
A professional restoration protects more than the roof
The goal after an RV collision is not simply to make the coach look straight again. The goal is to restore the systems that let you travel, camp, live comfortably, and rely on the RV away from home.
That requires attention to the roof structure, solar equipment, wiring, seals, vents, body panels, chassis, and mechanical systems as one connected repair. A cracked panel may be the obvious problem. A failed mounting point, stressed roof deck, damaged cable gland, or loose controller may be the issue that determines whether the repair remains reliable.
RVCCR combines RV collision repair, motorhome collision repair, RV paint and body work, roof restoration, mechanical repair, and insurance coordination in one facility in Redlands. Our certified team documents the damage, communicates with the carrier, follows manufacturer requirements where available, and backs completed work with a written lifetime warranty.

Your RV was built to take you beyond the driveway: to family campsites, open desert roads, mountain destinations, and weekends that do not fit on a calendar. Let RVCCR inspect the damage, protect your equipment and warranties, and restore the coach for the journey ahead.
Request a free RV repair estimate and let our team help you move from collision stress to confident travel.
Technical references
Need a repair estimate?
Skip the wait — send us a few photos and our team will get back to you fast.
Start a Photo Estimate →