Toy Hauler Collision Repair: Structural Restoration of Garage Doors, Ramp Systems, and Tie-Down Anchors
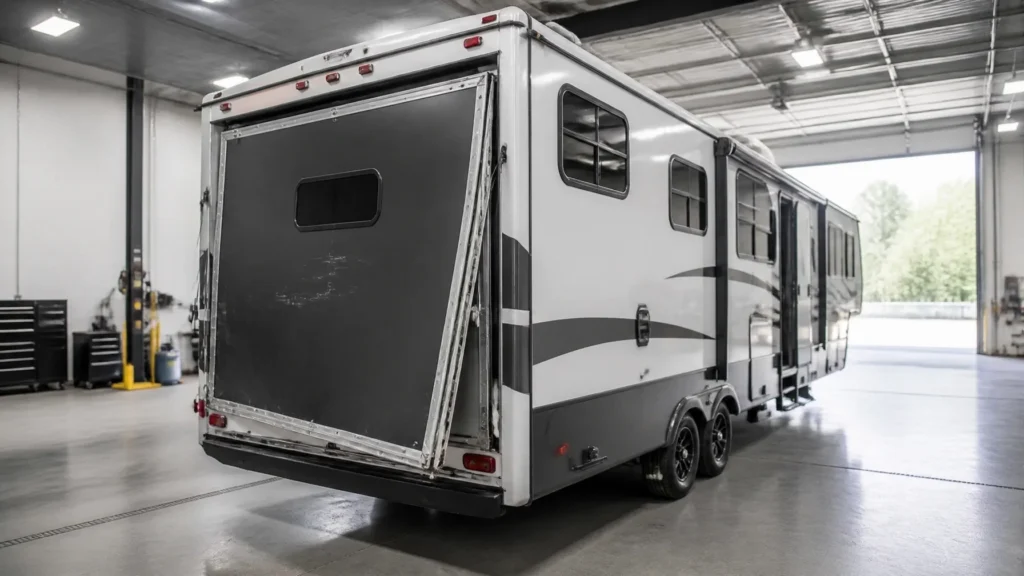
Published August 10, 2026 | RVCCR | Redlands, California
RVCCR is RVDA certified and has provided certified collision, paint, body, and mechanical repair in Redlands for 21 years. That experience matters when a fifth-wheel toy hauler is involved in a collision because the rear garage is more than an exterior storage area. It combines a large ramp door, hinges, latches, springs or hydraulic assists, floor reinforcement, tie-down anchors, electrical systems, fuel equipment, and sometimes an onboard generator in one concentrated section of the trailer.
A rear or side impact can therefore create damage that is not obvious from the outside. The ramp may close but fail to seal. A latch may engage while sitting out of alignment. A tie-down anchor may look intact while the floor beneath it has pulled apart. A fuel station or generator compartment may appear undamaged while brackets, lines, wiring, or exhaust components have shifted…
Why toy hauler collision repair requires more than exterior body work
A toy hauler is designed to transport motorcycles, ATVs, golf carts, tools, and other heavy recreational equipment inside a garage area. The garage must support cargo, resist road vibration, tolerate loading and unloading through the ramp, and maintain the trailer’s weather seal when the door is closed.
That combination creates several connected repair zones:
- The rear ramp door and its perimeter frame
- Hinges, hinge supports, and mounting fasteners
- Latch hardware, strikers, and hydraulic or mechanical assists
- Ramp springs, cables, brackets, and tensioning components
- Garage floor panels, joists, reinforcement plates, and frame connections
- Sidewall structure around the garage opening
- Tie-down anchors and the reinforced areas beneath them
- Fuel station tanks, filler necks, hoses, vents, pumps, and mounts
- Generator mounts, fuel lines, wiring, exhaust, and compartment barriers
- Seals, trim, flooring, cabinetry, and interior finishes
A general automotive body shop may be able to repair a bumper or paint a fender. A specialized rv collision repair facility must also understand how the trailer’s structure, cargo systems, and residential components interact.
That is why a toy hauler should not be evaluated only by asking whether the ramp opens and closes. The proper question is whether the garage area has been restored to a safe, weather-resistant, load-capable condition using the trailer manufacturer’s documentation and the component manufacturer’s procedures.
Start with documentation, photographs, and the correct manuals
Before disassembly, document the damage thoroughly. Take photographs of:
- The full trailer from every side
- The ramp door from the exterior and interior
- The hinge line and lower rear threshold
- Latches and striker plates
- Hydraulic cylinders, springs, cables, and mounting brackets
- Garage flooring and all tie-down anchors
- Fuel station and generator compartments
- Any leaking fluids, cracked seals, displaced wiring, or warning labels
- The interior cargo area before equipment is removed
This documentation supports the insurance claim and gives the repair team a reference for reassembly.
The next step is identifying the exact toy hauler make, model, model year, vehicle identification number, ramp-door supplier, and component part numbers. Toy haulers do not all use the same ramp construction or assist system. Some use torsion springs, extension springs, cables, gas struts, or hydraulic systems. The correct adjustment procedure depends on the specific design.
Lippert’s official toy hauler ramp door product information and ramp door spring product information can help identify component families. For service work, the repairer should also obtain the applicable RV manufacturer and ramp-door manuals. If the generator is a Cummins Onan unit, Cummins provides model-specific documentation through its RV generator manuals resource.
A manual is not a substitute for inspection. It is the reference that helps determine what the inspection must verify.
Ramp door damage: frame, skins, hinges, and alignment
Toy hauler ramp doors are large, heavy assemblies. Their exact construction varies, but many incorporate a perimeter frame, core material, interior and exterior skins, hinge components, seals, latches, and an assist system.
A collision can damage the ramp in several ways:
- The outer skin may be punctured, creased, or separated from the core.
- The perimeter frame may bend or twist.
- Corner joints may separate.
- The hinge beam may move or deform.
- Hinge fasteners may loosen or pull through their mounting points.
- The lower edge may no longer sit squarely against the threshold.
- The ramp may become racked, with one corner higher than the other.
- Latches may no longer meet their strikers evenly.
- Seals may be compressed on one side and loose on the other.
A door that is visibly dented does not automatically need replacement. A door with a distorted frame, compromised hinge attachment, damaged corner structure, or an altered load path may be a replacement candidate rather than a simple skin repair. The repair decision should be based on the manufacturer’s construction and repair guidance, not just the appearance of the panel.
The hinge area deserves special attention. The hinge line transfers the ramp’s weight into the rear structure every time the door is opened, lowered, loaded, and closed. After a rear impact, technicians should inspect the hinge tube or beam, mounting brackets, fasteners, surrounding frame members, and the trailer sill. Elongated holes, cracked welds, separated bonding material, bent brackets, or crushed structure can prevent a reliable repair even when the door itself appears serviceable.
Hydraulic latch and assist realignment
Some toy haulers use hydraulic components for ramp assistance, latch operation, or patio conversion systems. Others use mechanical latches and spring or cable assistance. Because these arrangements differ, hydraulic work must follow the manual for the specific equipment.
An inspection of a hydraulic ramp or latch system should consider:
- Bent cylinder rods
- Damaged cylinder bodies
- Fluid leakage
- Pulled or bent mounting brackets
- Cracked welds or torn fasteners
- Distorted latch arms
- Damaged hoses or fittings
- Air or pressure problems after component replacement
- A cylinder that reaches its stop before the latch is fully aligned
The cylinder may not be the original source of the problem. If the ramp frame or trailer opening is twisted, replacing the cylinder without correcting the structure can force the hydraulic system to operate against an incorrect geometry.
Realignment should confirm that the ramp sits square in the opening, latches evenly, maintains the intended seal compression, and does not bind during operation. A technician should not simply increase hydraulic pressure or force a latch into place to overcome structural misalignment.
Spring assembly tensioning and replacement
Spring-assisted ramp doors can use torsion springs, extension springs, cables, pulleys, or a combination of components. These parts counterbalance the door and make it possible to raise and lower the assembly with controlled effort.
A collision can affect the spring system even when the springs are not visibly broken. The impact may move an anchor point, bend a bracket, distort a cable path, or change the door’s effective weight and geometry. If the ramp door is rebuilt with a different core, skin, frame component, or reinforcement, its weight may also change.
That is why spring work requires caution. The correct spring type, location, preload, cable routing, and adjustment are specific to the door design. A heavier replacement panel may require a different approved spring arrangement. An incorrectly tensioned spring can make the ramp difficult to control, allow it to drop unexpectedly, or place excessive load on the hinge and mounting structure.
Technicians should inspect:
- Broken or deformed coils
- Stretched or frayed cables
- Displaced cable pulleys
- Damaged spring anchors
- Bent spring brackets
- Uneven tension from one side to the other
- Contact between moving components and the door frame
- Evidence that the door has been operating with excessive force
Spring tensioning is not a good trial-and-error repair. Stored energy in a spring assembly can cause serious injury if released unexpectedly. A qualified technician should use the exact procedure and adjustment limits for the identified ramp system. If the assembly is damaged or the correct specifications cannot be confirmed, replacement may be safer than attempting to reuse questionable components.

Garage floor reinforcement after a rear or side impact
The garage floor is one of the most important structural areas in a toy hauler. It supports cargo, distributes tie-down forces, connects with the rear opening, and may form part of the load path between the sidewalls and the trailer frame.
After a collision, inspect for:
- Crushed or buckled floor sections
- Separation between floor layers
- Cracking around anchor plates
- Soft or flexible areas
- Pulled fasteners
- Displaced floor coverings
- Distortion at the rear threshold
- Gaps between the floor and sidewall
- Damage to joists, crossmembers, or frame attachments
- Water intrusion through a damaged ramp seal
A floor can look acceptable while losing important load-bearing capacity beneath the surface. Conversely, a damaged finish layer may be repairable if the underlying structure remains sound. The distinction requires access to the floor assembly and, when necessary, removal of flooring or interior trim.
Tie-down anchors are structural inspection points
Tie-down anchors are not merely hardware attached to a decorative floor. Their installation varies by trailer, but they generally transfer cargo restraint loads into reinforced areas of the garage structure. The exact reinforcement may include plates, blocking, framing, or connections to a structural member.
A collision can pull an anchor upward, shear fasteners, deform the surrounding plate, or separate the reinforcement from the floor. Even if the eye or ring still looks straight, the structure beneath it may be compromised.
Technicians should compare each anchor with an undamaged location when possible and inspect for:
- Raised or tilted anchor bases
- Cracks radiating through the floor
- Pulled or elongated bolt holes
- Loose fasteners
- Separated reinforcement plates
- Delamination or crushed core material
- Movement when loaded or gently tested according to the manufacturer’s procedure
- Damage to the frame or substructure below the anchor
Do not reinstall a tie-down anchor into damaged flooring simply because the original fastener still fits. The repaired area must restore the intended attachment method and load path. Reinforcement should follow the RV manufacturer’s approved construction or a documented repair plan developed by a qualified RV structural technician.

Garage sidewalls and the rear opening
A rear impact can transfer force into the sidewalls around the garage opening. A side impact can do the same from a different direction. The visible result may be a cracked exterior panel, a displaced trim strip, or a door opening that no longer appears square.
The structural inspection should evaluate:
- The rear sidewall framing
- The header above the ramp opening
- The lower corners of the opening
- Sidewall-to-floor connections
- Interior wall panels and cabinets near the impact
- Exterior trim and sealant joints
- Electrical wiring routed through the damaged area
- Any signs of delamination or water entry
The opening must be returned to the geometry required for the ramp door and seal system. If the opening is out of square, the door may bind, latch unevenly, or leak. A new ramp door installed into a distorted opening does not solve the underlying problem.
This is a common reason to choose a specialized RV paint and body shop in the Inland Empire. Structural correction, composite repair, sealing, refinishing, and final fit checks need to be coordinated rather than treated as separate cosmetic tasks.
Fuel station safety inspections after a collision
Some toy haulers include an exterior fuel station for recreational equipment. After a rear or side impact, the fuel system must be inspected before the station is returned to service.
The inspection should cover:
- Tank mounting brackets and straps
- Tank position and surrounding structure
- Filler neck and cap
- Vent lines
- Fuel hoses and connections
- Pump mounting and wiring
- Shutoff or safety components
- Compartment panels and doors
- Seals and ventilation openings
- Evidence of abrasion, kinking, crushing, or leakage
Fuel lines may shift without visibly breaking. A hose can be pinched against a bracket, rubbed against a sharp edge, or pulled at a connection. A tank can remain intact while its mounting system is weakened. The compartment itself may also be distorted, affecting the way the tank, pump, and filler components are supported.
Any suspected fuel leak, damaged line, displaced tank, or compromised mounting point should be treated as a safety issue. Do not operate the fuel station until it has been inspected and repaired according to the RV and component manufacturer’s requirements.
Coverage is also important. A policy may treat a built-in fuel station differently from portable recreational equipment, personal property, or fuel contained in a tank. The policy language and endorsements control.
Generator compartment inspections
Toy haulers and fifth wheels may include onboard generators, and a crash can affect more than the generator’s exterior housing. The inspection should include:
- Generator mounting bolts and brackets
- Vibration isolators
- Fuel supply lines
- Electrical cables and connections
- Exhaust pipe and hangers
- Compartment floor and walls
- Exhaust seals and pass-throughs
- Ventilation openings
- Access doors and latches
- Any barrier separating the compartment from the living area
Cummins’ RV generator installation documentation addresses model-specific fuel, exhaust, compartment, and installation requirements. The applicable manual: not a general internet checklist: should determine the final repair and verification steps. The official Cummins RV generator installation manual library is a useful starting point for identifying the correct document.
A collision-damaged exhaust system deserves particular care. A crushed or shifted exhaust component can create heat, noise, or exhaust-routing concerns. Fuel lines and wiring should be checked for chafing, pulled connections, and contact with hot components. The generator must be securely mounted, and the compartment must retain the intended separation and sealing characteristics.
A generator that starts is not necessarily a generator that has passed a post-collision safety inspection.

Insurance coverage for specialized toy hauler features
Toy hauler claims can become complicated because the trailer may include features that are not present on a standard travel trailer. Coverage varies by policy, insurer, state, scheduled endorsements, and the way the equipment is described in the contract.
Before authorizing repairs, review or ask about coverage for:
- The ramp door assembly
- Hydraulic or mechanical ramp assists
- Garage flooring and tie-down anchors
- Built-in fuel stations
- Onboard generators
- Permanently installed tool cabinets or workstations
- Patio conversion hardware
- Exterior awnings and accessories
- Custom graphics or specialized finishes
- Cargo or recreational equipment stored inside
- Personal belongings
- Emergency towing and storage
- Temporary lodging or transportation benefits
Do not assume that every item in or attached to the toy hauler is covered under the same provision. A built-in generator may be treated differently from a portable generator. A permanently installed fuel station may be treated differently from fuel containers or recreational equipment. A motorcycle or ATV may require separate coverage from the trailer itself.
California’s Department of Insurance advises consumers to document the accident and damage, retain photographs, keep estimates and invoices, and maintain claim correspondence. Its accident and insurance claim guidance provides general documentation direction. The California Bureau of Automotive Repair also provides information about written estimates, authorizations, invoices, and repair records through its Write It Right resource.
For a toy hauler claim, keep:
- The declarations page
- Relevant endorsements
- The claim number
- The adjuster’s contact information
- Photos and videos from before disassembly
- The repair estimate
- Supplement requests
- Written approvals and denials
- Parts invoices
- Final repair invoices
- Inspection and testing records
- Any correspondence about specialized equipment
If the insurer’s first estimate does not include the garage floor, tie-down anchors, ramp system, fuel station, or generator compartment, that does not prove those items are excluded. It may mean the damage was not fully exposed or documented yet. A supplement should explain the additional damage and the repair method required.
California’s Auto Body Repair Consumer Bill of Rights also addresses the consumer’s ability to choose a repair facility. Always confirm current legal and policy questions with the applicable regulator, insurer, or qualified professional because insurance requirements can change and coverage is contract-specific.
A practical toy hauler repair workflow
A thorough repair commonly follows this sequence:
- Initial safety check: Secure the trailer, identify immediate hazards, and prevent use of damaged ramp, fuel, or generator systems.
- Photographic documentation: Record exterior, interior, structural, mechanical, and component damage before teardown.
- Manual and component identification: Confirm the RV manufacturer, model, ramp system, hydraulic components, generator, and fuel equipment.
- Teardown and blueprinting: Remove damaged trim, flooring, panels, and hardware as needed to expose hidden damage.
- Structural inspection: Measure the garage opening, inspect sidewalls and floor reinforcement, and evaluate tie-down attachment points.
- Ramp-system assessment: Check the door frame, hinges, latches, hydraulic components, springs, cables, and seals.
- Fuel and generator inspection: Verify mounts, lines, exhaust, wiring, barriers, and compartment integrity.
- Insurance supplement: Submit photographs, measurements, parts documentation, and OEM or component-manual support for additional operations.
- Structural restoration: Repair or replace damaged components according to the approved repair plan.
- Ramp installation and adjustment: Confirm door geometry, latch engagement, spring or hydraulic operation, and seal compression.
- Floor and anchor verification: Restore the load-bearing structure before reinstalling flooring and tie-down hardware.
- Paint and body restoration: Refinish repaired panels and blend surrounding surfaces as appropriate.
- Functional testing: Operate the ramp, latches, patio hardware, fuel station, generator, lights, and affected electrical systems.
- Final documentation: Provide the customer with the final invoice, warranty information, and relevant repair records.
The timeline depends on damage severity, teardown findings, parts availability, manufacturer response, insurance approval, and the extent of refinishing. A large toy hauler repair should not be promised as a quick cosmetic job before the structural inspection is complete.
Why specialized RV experience matters
A fifth-wheel toy hauler combines trailer structure, residential construction, cargo restraint systems, exterior body panels, mechanical equipment, and specialized hardware. The repair facility must have the space and process control to work on the entire unit, not just the damaged skin.
RVCCR combines collision, paint, body, and mechanical repair under one roof. Our team coordinates with major insurance carriers, provides free estimates, uses OEM parts when required and available, and backs our work with a written lifetime warranty. Our goal is not simply to make the ramp look straight. It is to restore the garage area so you can load, secure, tow, and use your toy hauler with confidence.
For more perspective on the broader inspection process, read our article about RV collision repair in the Inland Empire. If parts selection becomes part of the claim discussion, our article on OEM parts for motorhome collision repair explains why fit, material compatibility, and documented repair procedures matter. Owners of other towable RVs can also review our coverage of travel trailer collision repair.
A damaged toy hauler should not be judged by whether it can make the next trip. It should be judged by whether its structure, ramp system, cargo anchors, fuel equipment, generator compartment, seals, and finish have been restored responsibly.
If your fifth-wheel toy hauler has been involved in a rear or side collision, contact RVCCR in Redlands for a free repair estimate. Bring the rig back to a team that understands its structure, protects its specialized features, documents the claim, and restores the garage for the adventures ahead.
Inspect the structure. Restore the systems. Reclaim the road.
Need a repair estimate?
Skip the wait — send us a few photos and our team will get back to you fast.
Start a Photo Estimate →