Tesla Frame Sectioning: Why OEM Cut Lines Decide Whether a Structural Repair Is Safe
Published August 20, 2026
RVCCR is a Tesla-certified collision repair facility serving Redlands and the Inland Empire, with certified collision, paint, and mechanical repair performed under one roof. Tesla structural work requires more than experienced hands: it requires current vehicle-specific repair information, approved equipment, trained technicians, and documentation that shows each operation followed the manufacturer’s instructions.
When a Tesla’s structural component is damaged, a repairer cannot simply choose the most convenient place to cut, weld, or bond. Tesla’s repair procedures identify whether sectioning is permitted, where the cut may be made, which materials and fasteners are approved, and how the joint must be restored. Those details matter because a structural component is part of a larger system designed to manage loads and protect occupants during a collision…
The difference between a correct sectioning repair and an improvised one may be hidden beneath the paint. Here is what Tesla owners should understand before authorizing structural collision work.
What Tesla frame sectioning actually means
“Frame sectioning” is a common customer term, but Teslas use unibody construction rather than a separate traditional frame in the way many older trucks and body-on-frame vehicles do. In collision repair, structural sectioning means removing a damaged portion of an approved structural component and joining a replacement section at a location permitted by the manufacturer.
Depending on the Tesla model, year, and damaged component, the repair may involve:
- A body-side or quarter-panel section
- A sill or rocker-related component
- A rail or reinforcement
- An aluminum structural assembly
- A steel structural component
- A casting-adjacent or underbody component
- A bonded, riveted, or welded joint
Sectioning is not the same as pulling a damaged structure back into shape. Tesla’s Structural Repair Guidelines state that Tesla does not support pulling or pushing structural components with frame-straightening equipment, except for repairs specifically described in Tesla repair documentation.
The repair decision must begin with the exact vehicle and damaged part. A Model 3 procedure cannot automatically be applied to a Model Y. A procedure for one production generation may not apply to another. A visible quarter-panel impact may involve different underlying reinforcements depending on the vehicle configuration.
That is why a responsible estimate should identify the vehicle by VIN, review the current Tesla procedure, and determine whether the affected area is:
- Repairable through a permitted cosmetic operation
- Eligible for structural sectioning at a defined location
- Repairable only by replacing the complete component
- Subject to additional inspection because hidden damage may extend into adjoining structure
Why Tesla specifies exact cut lines
A cut line is not simply a place where two pieces of metal can be joined. It is a location selected within the design of the component and the surrounding structure.
Tesla’s sectioning guidelines require technicians to section a panel only when the specific repair procedure allows it. The same guidelines also state that technicians must not cut underlying panels, must not cut within 25 millimeters of the center of a bolt hole, and must install backing or reinforcement plates when the procedure calls for them.
These restrictions address several engineering concerns.
Preserving the designed load path
A vehicle structure transfers collision energy through connected rails, reinforcements, pillars, rockers, floor sections, and crossmembers. The exact path depends on the shape, material, thickness, joining method, and connection points of each component.
A manufacturer-approved cut line is selected so the replacement joint can be placed in an area where the surrounding structure can support the repair. Cutting outside that location may remove material that contributes to the joint, intersect a reinforcement, damage a flange, or create a joint in a region not intended to be repaired in that manner.
Tesla’s manuals do not authorize a shop to move a cut simply because a different location appears easier to access. If the damaged area extends into a prohibited zone, the procedure may require complete component replacement rather than sectioning.
Preserving energy-management zones
Tesla vehicles are engineered to manage crash energy through planned deformation and rigid occupant-protection areas. Exact repair boundaries help preserve the relationship between areas intended to deform and areas intended to remain stable.
It is more accurate to think of a cut line as part of a larger energy-management design rather than as a cosmetic seam. A sectioning joint that is too close to a mounting hole, reinforcement, bend, casting, or adjoining structural interface may change how forces are distributed through the repaired assembly.
No shop can determine the correct cut line by appearance alone. The line must come from the current Tesla procedure for that vehicle and part.
Protecting adjoining reinforcements
Some outer panels cover internal reinforcements, wheel-arch assemblies, foam, brackets, or other layered components. Tesla procedures may identify areas where the outer panel must not be cut directly over an underlying reinforcement.
This is one reason Tesla’s manuals may use color-coded repairability areas. Depending on the procedure, green areas may identify locations where sectioning is allowed, yellow areas may identify areas requiring additional conditions, and red areas may identify locations where sectioning is not permitted.
A technician must expose enough of the repair area to understand what lies beneath the intended cut. Cutting through an underlying panel or reinforcement can create damage beyond the approved repair scope.

The Tesla sectioning process at a high level
Structural sectioning is not a do-it-yourself procedure, and this overview is not a substitute for Tesla’s repair documentation. It explains the checkpoints an owner should expect from a qualified Tesla-certified collision center.
1. Vehicle identification and damage assessment
The shop should confirm the VIN, model, production information, and damaged component before choosing a repair method. Initial scanning, visual inspection, teardown, and structural measuring may be necessary to identify damage that is not visible from the exterior.
The first estimate is not always the final repair plan. A bumper cover, quarter panel, or rocker area can conceal damaged brackets, reinforcements, wiring, fasteners, adhesive joints, or adjoining structure.
Tesla’s collision-center operating standards emphasize repair planning and blueprinting so the vehicle can be fully evaluated before parts and procedures are finalized. This helps reduce the risk of discovering critical damage late in the process.
2. Procedure review before cutting
The technician should access the current Tesla Collision Repair procedure for the exact vehicle and component. Tesla’s operating standards specifically require collision centers to use the current version of a repair procedure rather than relying on saved or archived copies.
The procedure may specify:
- Whether sectioning is allowed
- The approved cut-line location
- Reference points or dimensions
- Areas that must not be cut
- Whether a backing plate is required
- Whether the joint is a butt joint or another joint design
- Which welds, fasteners, and adhesives are approved
- Whether a flange must be bonded instead of welded
- Corrosion-protection and seam-sealing requirements
- Additional parts or prerequisite procedures
If the manual says the component is replacement-only, the shop should not convert that operation into a custom sectioning repair.
3. Correct fixturing and measuring
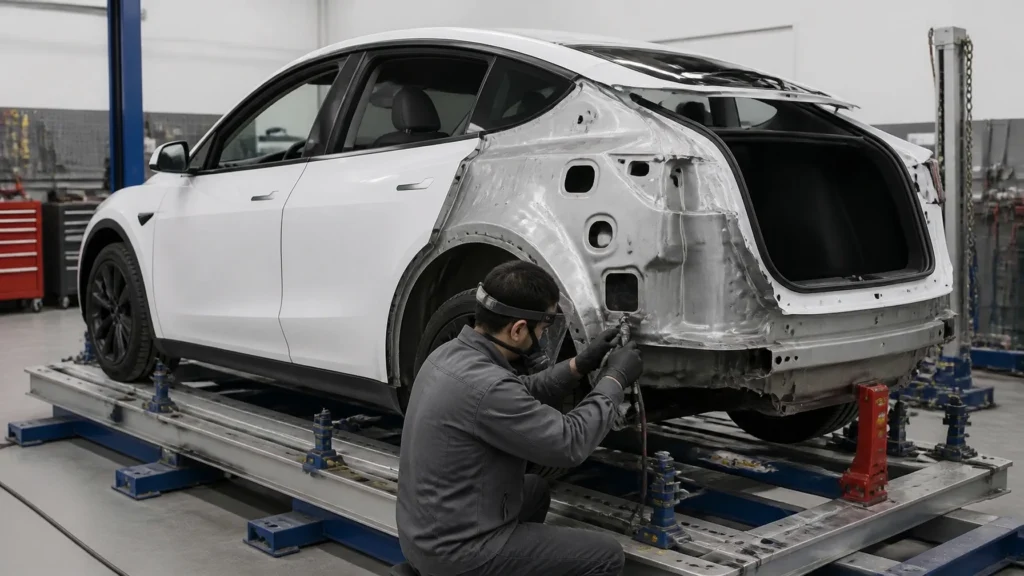
Tesla’s operating standards state that structural repairs require a frame bench or rack system with specific measuring and/or dedicated fixtures, except where an approved repair procedure provides another method.
The purpose of fixturing is to hold the vehicle in a controlled reference position while damaged material is removed and the replacement component is installed. The shop should be able to verify the relevant dimensions before and during the repair.
A vehicle can have acceptable-looking panel gaps and still have an incorrect structural relationship. Accurate measuring supports correct alignment of:
- Suspension attachment points
- Door and opening geometry
- Structural joints
- Sensor brackets
- Adjacent body panels
- Mounting points
- Sealing surfaces
4. Controlled removal and cut preparation
The damaged component is removed according to the manufacturer’s instructions. Where sectioning is allowed, the technician marks the approved cut line and prepares the joint without damaging underlying panels or nearby components.
Tesla’s general guidelines say that the gap between panels at a butt joint should be as small as possible to maximize joint strength. The technician may also need to prepare a backing plate or reinforcement plate if the specific procedure calls for one.
The joint preparation is important because a structural repair depends on fit, alignment, surface preparation, joining method, and corrosion protection working together. A replacement piece that is forced into position, left with an excessive gap, or joined with an unauthorized method is not equivalent to an OEM-directed repair.
5. Approved welding and fastening
Tesla’s procedures do not treat all welders, wires, rivets, or fasteners as interchangeable.
Tesla’s Structural Repair Guidelines require the use of approved GMA welders and squeeze-type resistance spot welders for structural repairs. They also require approved welding wire and approved fasteners where those methods are specified.
For permitted sectioning joints, Tesla’s guidelines state:
- Only GMA-weld section butt joints where the procedure explicitly directs it
- Do not weld a flange at a butt joint when the procedure specifies structural adhesive only
- Keep the butt-joint gap as small as possible
- Do not add fasteners at butt joints unless the procedure requires them
- Fill gaps with structural adhesive as directed
- Seal open seams after welding
These details explain why a shop should not describe structural joining simply as “we welded it.” The relevant questions are: Which weld? Which equipment? Which wire? At which locations? With what preparation? And what additional adhesive, fastener, and sealing steps did the procedure require?
6. Controlled use of structural adhesive
Structural adhesive is an engineered joining material, not body filler and not a universal substitute for welding or riveting.
Tesla warns against using non-approved structural adhesive and states that structural adhesive must not replace welds, rivets, or other listed fastening methods unless the specific repair procedure directs that use. Tesla also warns against using expired structural adhesive.
At a permitted joint, the procedure may require adhesive:
- On a flange
- On non-welded mating surfaces
- Between replacement and original panels
- Around a specified butt-joint area
- In combination with approved welds or fasteners
- Along a seam that must later be sealed
The shop should follow the product, preparation, application, working-time, and curing instructions in the applicable Tesla documentation. Applying more adhesive does not automatically make a joint stronger. Applying adhesive in the wrong location can interfere with a prescribed weld, alter joint geometry, or fail to provide the intended bond.

What can happen when a shop cuts outside the OEM line?
An unauthorized cut is not automatically visible after reassembly. The vehicle may look straight, the doors may close, and the paint may be polished. Those observations do not prove that the structural repair was performed correctly.
Cutting outside the OEM-approved line can create several risks.
The joint may sit in the wrong structural region
The approved line may have been chosen to avoid an underlying reinforcement, mounting hole, bend, heat-sensitive area, or load-bearing transition. Moving the cut can place the joint where the surrounding material is not designed to support the same repair method.
The joining method may no longer be valid
A procedure may authorize a GMA-welded butt joint in one location and require replacement of the complete assembly in another. If a shop relocates the joint, it may also be relocating the weld, adhesive, or fastener pattern to a place where Tesla has not approved that method.
The repair may change how loads travel
The structural behavior of the repaired area depends on the complete joint design. A change in cut location, gap, flange treatment, backing plate, weld pattern, adhesive placement, or fastener type can change the way forces move through the assembly.
It is not appropriate to claim a specific percentage loss in crash performance without testing data. The defensible point is simpler: Tesla requires specific repair boundaries and joining methods because the manufacturer has not approved arbitrary alternatives.
Manufacturer support may be affected
Tesla’s repair guidelines warn that non-approved fasteners may compromise repair integrity and vehicle safety and may affect whether Tesla supports the vehicle. The same general principle applies to unauthorized structural repair methods: an owner may have difficulty demonstrating that the repair followed Tesla requirements if the shop cannot provide the procedure and documentation.
That does not mean every non-Tesla repair automatically voids every vehicle warranty. Warranty coverage is specific and fact-dependent. Tesla’s collision support and warranty information should be reviewed for the vehicle and repair circumstances.
Tesla’s Parts, Body & Paint Repair Limited Warranty also has specific conditions. Owners should ask what warranty applies to the work, who provides it, and whether the shop is issuing a separate written workmanship warranty.
Structural sectioning versus cosmetic panel replacement
The terms “panel repair,” “panel replacement,” and “sectioning” can sound similar, but they describe different operations.
Cosmetic panel repair
A cosmetic repair addresses damage to an exterior panel when the underlying structure remains within the repair conditions described by Tesla. The work may involve carefully repairing a dent, crease, or surface imperfection without replacing a structural section.
Cosmetic repairs still require model-specific judgment. Aluminum, steel, plastics, adhesives, and coatings behave differently. A shop should not assume that a cosmetic operation is permitted simply because the damage is on an outer panel.
Full panel replacement
Full replacement removes the damaged component and installs a new component according to Tesla’s procedure. This may be required when damage extends into a prohibited sectioning zone, when a bonded panel’s factory bond is compromised, or when the component cannot be repaired within Tesla’s approved limits.
Structural sectioning
Structural sectioning removes only a permitted portion of the component and joins a replacement section at the manufacturer-defined location. It requires exact control of the cut line, joint preparation, equipment, joining materials, and finishing steps.
The outside appearance may be similar after all three operations. The underlying process is not.
How owners can verify that sectioning was done correctly
Vehicle owners do not need to become collision technicians to ask for meaningful documentation. A reputable shop should be able to explain the repair in plain language and identify the records supporting it.
Ask for the following.
1. The vehicle-specific Tesla procedure reference
Ask:
Which Tesla Collision Repair procedure was used for my VIN, model, year, and damaged component?
A general statement such as “we followed Tesla standards” is less useful than a procedure title, revision or access date, and component description.
2. Confirmation that sectioning was permitted
Ask whether Tesla allowed sectioning at the repaired location. If the damaged area was outside the permitted zone, ask why the shop chose replacement or another approved method.
The answer should connect the repair decision to Tesla documentation, not merely to technician preference.
3. Photos before closing the repair
Ask whether the shop has progress photos showing:
- The original damage after teardown
- The marked section line
- The exposed underlying structure
- The prepared joint
- The installed replacement section
- Welds, fasteners, or adhesive before final sealing
- Corrosion protection and seam sealing
Photos do not replace inspection or documentation, but they help establish what was actually done.
4. Measuring and alignment records
Ask whether the vehicle was measured on an appropriate bench or rack and whether the relevant reference points were verified after repair.
A shop may not provide every proprietary measurement page, but it should be able to explain how structural alignment was checked.
5. Welding documentation and technician qualifications
For a Tesla structural repair involving welding, ask:
- What approved welding process was used?
- Was approved equipment and wire used?
- Which technician performed the structural welding?
- Can the shop provide current welding or structural-repair qualifications applicable to the work?
Tesla’s operating standards state that technicians performing structural repair work at a Tesla Approved Collision Center must have current and valid I-CAR certificates for applicable aluminum and steel welding and/or structural repair. The standards also identify I-CAR aluminum and steel welding certifications among the training requirements for structural technicians.
The exact qualification needed depends on the operation and the facility’s current program status. The important point is that structural welding should not be treated as ordinary cosmetic welding.
6. Adhesive and fastener records
Ask what structural adhesive, fasteners, and welding wire were used. You do not need to evaluate the chemistry yourself. You should receive a clear answer that the materials were approved for the repair procedure and were not expired or substituted without authorization.
7. Final scans and required calibrations
Ask whether the shop performed the scans, calibrations, alignments, and functional checks required by Tesla’s procedures for the damaged area.
A road test alone does not prove that every required diagnostic or calibration operation was completed. The shop should explain which systems were checked and provide documentation when available.

Questions to ask a Tesla-certified collision center
Before authorizing repairs, ask these questions directly:
- Is your facility currently Tesla-certified for structural collision repair, or only cosmetic Tesla repairs?
- Will you use the current Tesla procedure for my specific VIN, model, year, and damaged component?
- Is sectioning permitted at the proposed cut location?
- What happens if teardown shows the damage extends into a prohibited sectioning zone?
- How will the vehicle be supported and measured during the repair?
- Which welding, fastening, and adhesive methods does the procedure require?
- Will you use approved Tesla fasteners, welding wire, equipment, and structural adhesive?
- Can you provide progress photos of the cut line and joint before refinishing?
- Which technician will perform the structural work, and what current qualifications apply?
- What scans, calibrations, alignments, and final functional tests are required?
- What written workmanship warranty do you provide?
- How will you coordinate supplements with my insurer if hidden damage is discovered?
A shop that welcomes these questions is more likely to have a documented process. A shop that dismisses them with “we do this all the time” has not answered the important part.
Why a Tesla-certified collision center matters
Searching for an EV repair shop near me is a useful starting point, but proximity alone does not establish capability. Tesla structural repair involves current repair information, high-voltage safety awareness, specialized materials, approved joining methods, measuring equipment, and post-repair verification.
When comparing a Tesla-certified collision center with a general facility, ask whether the shop can manage the complete repair rather than only the visible body damage. Our guide on how to choose the best EV repair shop near me offers a broader checklist for evaluating certification, equipment, documentation, and calibration capability.
Owners should also understand the difference between a certification claim and a verified program designation. Tesla’s official Approved Collision Center operating standards describe requirements involving current procedures, structural equipment, training, approved materials, technician qualifications, and written workmanship warranties.
At RVCCR, our team combines Tesla-certified repair capability with collision, paint, and mechanical services under one roof. We coordinate with major insurers, provide free estimates, use OEM procedures and parts where required, and back our work with a written lifetime warranty.
For more guidance on choosing a trustworthy facility in the Redlands area, read our article about certified auto collision repair in Redlands.
The repair is about more than the cut
A correct sectioning repair is not defined by the cut line alone. The result depends on the full sequence:
- Accurate vehicle identification
- Complete damage assessment and blueprinting
- Review of the current Tesla procedure
- Correct bench setup and measuring
- Approved cut location
- Proper joint preparation
- Correct welding, adhesive, and fastening methods
- Corrosion protection and seam sealing
- Post-repair measuring and alignment
- Required diagnostic scans and calibrations
- Functional testing and final quality control
- Complete repair documentation
Skipping one of these steps can leave the owner with an attractive exterior and an uncertain repair history. A trustworthy process makes the invisible work explainable.
Restore the vehicle for the road ahead
A Tesla collision is disruptive because the vehicle combines structural engineering, high-voltage systems, software, sensors, and specialized materials. The repair should be managed with the same level of care.
At RVCCR, we inspect the damage, review the applicable Tesla procedures, document the repair plan, coordinate with your insurance carrier, and restore the vehicle with certified technicians and OEM-directed methods. We focus on the result you need: a Tesla that is structurally sound, properly finished, fully checked, and ready to return to your daily drive.
If your Tesla has been involved in a collision in Redlands or the Inland Empire, start with a documented evaluation rather than a quick promise. Request a free photo estimate from RVCCR and send the VIN, vehicle photos, and damage details. Our team will help you understand whether the repair involves cosmetic work, structural sectioning, component replacement, or additional inspection.
Make the informed choice. Protect the structure beneath the paint. Then get back to the drives, plans, and adventures that matter.
Official sources
Need a repair estimate?
Skip the wait — send us a few photos and our team will get back to you fast.
Start a Photo Estimate →