RV Frame Crack and Weld Inspection After a Collision: Finding Failures Before They Find You
Updated September 2, 2026 | RVCCR, RVDA Certified Repair Facility in Redlands
RVCCR combines RVDA-certified experience with collision repair, paint and body work, and mechanical service for motorhomes, fifth wheels, travel trailers, toy haulers, popups, and other recreational vehicles. That combination matters after a collision because a frame inspection is not limited to the dent or cracked exterior panel you can see. Impact forces can travel through the tongue, frame rails, welds, spring hangers, crossmembers, outriggers, suspension attachments, and body mounts before the first obvious crack appears…
If your RV has been involved in a collision, jackknife, curb strike, severe pothole event, or abrupt impact while connected to a tow vehicle, treat any suspected structural damage seriously. A frame crack near a load-bearing weld can grow under repeated towing loads. A damaged hanger can change suspension geometry. A shifted crossmember can affect the way the RV tracks, brakes, and carries weight.
The safest approach is to stop towing until the structure has been evaluated by a qualified repair facility. That evaluation may begin with a careful visual inspection and frame measurement, then move to magnetic particle testing, dye penetrant testing, ultrasonic examination, or another suitable nondestructive testing method when the location and material require it.
Why RV frame cracks deserve a full inspection
A recreational vehicle frame experiences repeated loads during acceleration, braking, cornering, uneven-road travel, loading, and towing. A collision adds an unusual force that may not remain confined to the point of impact.
For a travel trailer, the force path may include:
- The coupler and A-frame tongue
- The tongue-to-frame transition
- Main frame rails
- Crossmembers
- Spring hangers and equalizer brackets
- Axle and suspension attachments
- Outriggers supporting the floor and sidewalls
- Body mounts and underbelly supports
For a motorhome, the inspection may involve:
- Chassis frame rails
- Front or rear extensions
- Crossmembers
- Suspension and steering attachments
- Body-to-chassis mounts
- Generator and equipment supports
- Rear receiver or tow-bar mounts
- Structural areas beneath the living compartment
A frame can be bent, twisted, or cracked without making the RV immediately undriveable. The vehicle may still move, the lights may work, and the doors may close. Those observations do not prove that the frame remains safe.
A responsible inspection looks for both visible damage and conditions that may indicate hidden movement:
- New cracks at weld toes or weld ends
- Rust lines or fresh discoloration extending from a weld
- Separating brackets
- Buckled or rippled steel
- Unequal gaps between frame components
- Bent or shifted crossmembers
- Changes in trailer tracking
- Uneven tire wear after the incident
- New suspension noise
- Doors, compartments, or slide-outs that no longer align
- A tongue or coupler that is no longer centered
- Fresh scrape marks showing that components moved against one another
The presence of one crack should not automatically lead to an inspection of only that crack. It should trigger a broader review of the surrounding load path and other similar attachments.
Where collision-related cracks commonly appear
Spring hangers and suspension attachments
Spring hangers transfer suspension loads into the frame. On a leaf-spring travel trailer, they are positioned near areas that experience repeated loading from the axles, springs, shackles, and equalizers.
A collision, hard curb strike, or severe suspension event can place unusual force into the hanger and the frame around it. Areas that deserve close attention include:
- The weld toe where the hanger meets the frame
- The top and bottom of the hanger bracket
- The hanger cross tube or reinforcement
- The frame web immediately above and below the bracket
- The opposite side of the frame rail
- Nearby equalizer and shackle attachments
- Any reinforcement plate or previous repair
Cracks may begin at a change in stiffness. For example, a thick bracket welded to a thinner frame section creates a transition in how the structure flexes. If the weld ends abruptly or the surrounding metal has already been stressed, repeated movement can concentrate load in a small area.
The inspection should include both sides of the frame rail when access allows. Underbelly material, insulation, tanks, wiring, and other components may need to be moved or removed to see the complete attachment.
Crossmembers
Crossmembers connect or support the main frame rails. They help maintain spacing and contribute to the frame’s ability to resist twisting.
A damaged crossmember may show:
- A visible bend
- A cracked weld
- Separation at the rail
- A shifted position
- A crushed or buckled section
- New contact marks against the floor or underbelly
- Distortion near an axle or suspension attachment
Crossmember damage can be easy to miss when the underbelly remains installed. The exterior may look relatively normal while the crossmember has shifted or broken behind the covering.
A technician may compare the damaged area with corresponding undamaged areas on the opposite side. Symmetry is not a substitute for manufacturer dimensions, but it can help identify an abnormal shift that warrants measurement.
Outriggers
Outriggers extend from the primary frame structure to support the floor, sidewalls, or exterior body. They are not always as substantial as the main rails, but they can be important to the relationship between the frame and the RV body.
After an impact, inspect outriggers for:
- Cracks around the welds
- Bending or twisting
- Separation from the main rail
- Damage where the floor attaches
- Contact with plumbing, wiring, tanks, or insulation
- Corrosion or section loss near the attachment
- New stress marks in the floor or wall above
An outrigger can also obstruct access to a frame crack or affect the repair method. Lippert’s official TI-570 Frames and Chassis procedure, for example, distinguishes between repair options for certain axle-area I-beam frame cracks based partly on the location of the crack and whether obstructions such as outriggers or support angles are present. That procedure is specific to the applicable Lippert frame design and should not be treated as a universal repair rule.
Frame-rail transitions
A frame-rail transition occurs where the shape, thickness, direction, or continuity of a structural member changes. Examples may include:
- A rail that changes profile
- A frame splice
- A bent or formed section
- A bracket welded to the rail
- A cutout or opening
- A transition near an axle or hanger
- A tongue joining the main frame
- A reinforcement ending along the rail
These locations can experience higher local stress because the structure does not behave uniformly along its length. If the collision changes the rail’s alignment, the transition may carry loads it was not intended to absorb.
Look for cracks that run:
- Along the weld toe
- Away from the weld into the base metal
- From a sharp corner
- From the end of a reinforcement plate
- From a bolt hole
- Across a flange
- Through the web of an I-beam
- Along a previous repair
A crack that appears short at the surface may extend farther beneath paint, undercoating, rust, or a weld repair. Surface preparation and appropriate testing are necessary before deciding how extensive it is.

How a crack near a weld can propagate
A crack is not simply a line in the metal. It is a discontinuity that can change how stress is distributed through the component.
Welded joints can be especially important because the joint contains several related zones:
- The base metal : the original frame material.
- The weld metal : the material deposited during welding.
- The heat-affected zone, or HAZ : the adjacent base metal whose properties or microstructure were changed by welding heat.
The weld toe, where the weld face meets the base metal, can act as a geometric transition. An abrupt profile, undercut, incomplete fusion, contamination, or an existing crack can make that location more vulnerable to repeated loading.
The HAZ also matters because welding changes the thermal condition of the surrounding steel. Welding procedure, heat input, preheat, interpass temperature, material chemistry, thickness, cooling rate, and restraint can influence the resulting weldment. That does not mean every HAZ contains a defect. It means the repair must control the welding process rather than treating the job as a cosmetic bead placed over a visible line.
Repeated towing creates cyclic loading. The frame flexes as the RV travels over uneven surfaces, brakes, turns, and carries changing loads. If a crack remains in a load-bearing area, those cycles can extend it. The rate and direction of growth depend on the material, crack geometry, loading, corrosion, weld quality, and surrounding structure.
This is why simply grinding away paint and applying another weld bead over the top is not a reliable structural repair. The original crack may remain beneath the new bead. The new weld may also create additional heat, restraint, or stress concentration.
The inspection process: from safe access to documented findings
A professional frame inspection should be systematic. The exact sequence changes with the RV design, the collision location, and the manufacturer’s information, but the following stages provide a useful framework.
1. Establish whether the RV can be moved safely
Before the RV is driven or towed, the repair facility should consider the visible damage and the possibility of hidden structural, suspension, braking, or coupling damage.
If a frame crack, bent tongue, damaged spring hanger, compromised pin box, or distorted receiver is suspected, the safest option may be transport on a suitable flatbed or other approved equipment. A short distance does not eliminate the risk of failure.
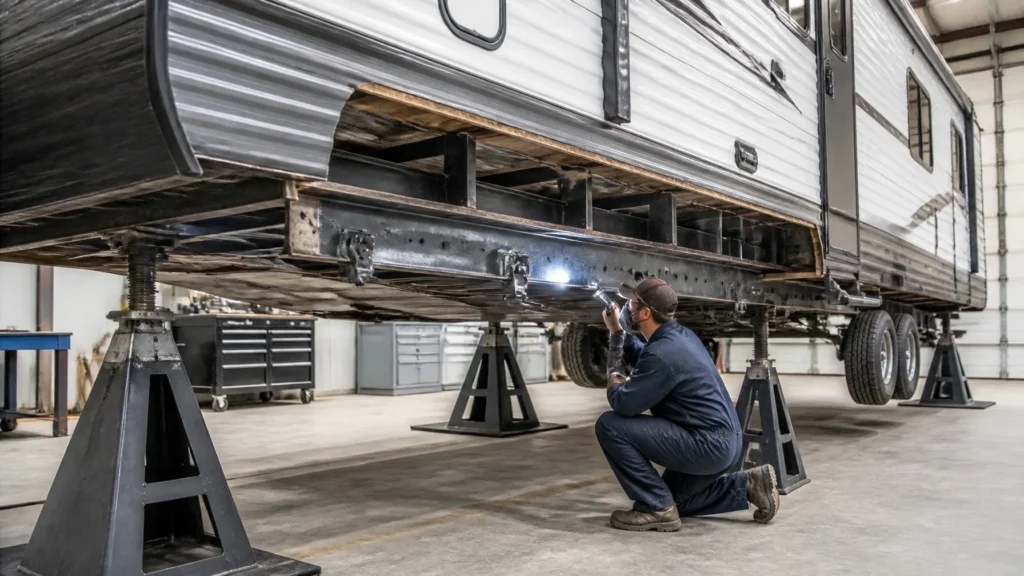
Do not crawl underneath an unsupported trailer. Lippert’s TI-570 safety instructions state that the trailer must be supported according to the manufacturer’s recommendations and warn that the frame, not the axle or suspension, must be supported with appropriately rated stands before anyone works underneath.
2. Document the condition before disassembly
Photograph the RV before components are removed. Include:
- The entire RV
- The point of impact
- The frame area from several angles
- The underside before cleaning
- Any visible crack or separation
- The coupler, pin box, hitch, or receiver
- The suspension and spring hangers
- Tire position and visible alignment
- Body damage above the suspected frame area
- Existing repairs or unrelated damage
Record the date, location of the collision, whether the RV was connected to a tow vehicle, and any symptoms noticed afterward.
3. Clean and expose the frame
Dirt, undercoating, rust, road debris, and paint can hide a crack. The affected area should be cleaned using a method appropriate for the material and nearby systems.
Access may require removal or loosening of:
- Underbelly panels
- Skirting
- Insulation
- Wheels
- Storage-compartment material
- Protective coatings
- Brackets or trim
- Components near a weld
- Selected interior or body panels
Cleaning should be controlled. A technician must account for wiring, propane components, tanks, plumbing, sealants, insulation, and other materials that could be damaged by heat, sparks, solvents, or pressure.
4. Perform a visual inspection
Visual inspection remains the first line of evaluation. Use adequate lighting and inspect both sides of the frame when possible.
The technician should look for:
- Open cracks
- Hairline cracks
- Weld separation
- Undercut
- Porosity or visible inclusions
- Distortion
- Buckling
- Sharp transitions
- Rust bleeding from a joint
- Fresh bare-metal marks
- Elongated holes
- Loose or missing fasteners
- Previous reinforcement
- Evidence of movement between parts
Magnification, inspection mirrors, straightedges, levels, calipers, and measurement equipment may help. A visual inspection can identify a likely problem, but it cannot prove that a concealed or subsurface flaw does not exist.
5. Measure frame geometry
A frame repair plan should consider alignment, not only crack length.
Depending on the vehicle, measurement may address:
- Rail-to-rail spacing
- Diagonal dimensions
- Height differences
- Axle and suspension relationship
- Tongue centering
- Crossmember position
- Body-to-frame location
- Slide-out opening alignment
- Hitch or coupler position
- Areas that are bent, twisted, or sagging
The reference should be the applicable manufacturer information, chassis specifications, or an appropriate repair datum. An owner should be cautious about any repair described only as “straighten frame” without a clear explanation of what was measured and what result is required.
Nondestructive testing methods for RV frame welds
Nondestructive testing, or NDT, evaluates a component without cutting it apart or destroying it. The method must match the material, geometry, surface condition, suspected flaw, and available access. NDT should be performed or supervised by appropriately qualified personnel.
Magnetic particle testing
Magnetic particle testing is generally used on ferromagnetic materials such as many steel frame components. The inspection area is magnetized, and magnetic particles reveal leakage fields associated with certain surface and near-surface discontinuities.
Magnetic particle testing can be useful around:
- Steel weld toes
- Spring hangers
- Crossmember welds
- Rail transitions
- Reinforcement ends
- Coupler or hitch attachments
- Previous structural repairs
It requires suitable surface preparation and the correct equipment and technique. It is not a universal test for every RV frame material. It does not replace measurement, visual inspection, or evaluation of the overall structure.
ASTM lists E3024/E3024M, Standard Practice for Magnetic Particle Testing for General Industry among its nondestructive testing standards. ASTM also lists E1444/E1444M, Standard Practice for Magnetic Particle Testing for Aerospace. The applicable standard and edition should be selected by the qualified inspection provider and the repair specification.

Dye penetrant testing
Dye penetrant, or liquid penetrant, testing is designed to reveal cracks and other discontinuities that break the surface of a clean, nonporous material.
The general sequence includes:
- Cleaning the surface
- Applying penetrant
- Allowing appropriate dwell time
- Removing excess penetrant
- Applying developer
- Examining and documenting indications
Penetrant testing does not reveal a crack that remains completely below the surface. It also requires careful cleaning. Paint, oil, rust, scale, and other contamination can interfere with the process.
It may be considered for suitable frame components when magnetic particle testing is not applicable or when a surface-breaking indication needs further evaluation. ASTM’s official catalog includes E165/E165M, Standard Practice for Liquid Penetrant Testing for General Industry and E1417/E1417M, Standard Practice for Liquid Penetrant Testing.
The inspection report should identify the tested area, surface preparation, method, findings, and any limitations. A statement that an area “passed dye test” is incomplete if the report does not identify what was tested and what acceptance criteria were used.
Ultrasonic testing
Ultrasonic testing uses high-frequency sound waves to evaluate material or weld conditions. It may identify certain subsurface discontinuities that cannot be seen from the surface.
Ultrasonic testing can be technically demanding on RV frames because:
- Frame geometry may be irregular
- Access may be limited
- Coatings and surface condition affect coupling
- Thin or complex sections can be difficult to evaluate
- Weld orientation matters
- The technician needs an appropriate calibration and examination procedure
- Results require interpretation by qualified personnel
ASTM lists E164-24, Standard Practice for Contact Ultrasonic Testing of Weldments. That standard is not an RV-specific repair manual, and its use does not automatically establish a pass-or-fail decision for every frame. The repair specification must define the applicable method and acceptance criteria.
Light hammer testing
A technician may use controlled light tapping as a screening aid when evaluating loose components, separation, or an unusual response around a joint. It can sometimes help identify a difference between sound and damaged areas.
Hammer testing has clear limits:
- It cannot prove that a weld is free of cracks.
- It may not reveal a tight crack.
- It can damage thin panels or nearby components if misused.
- The response depends on access, thickness, geometry, and the technician’s experience.
- It should not substitute for NDT or structural measurement.
A hammer test is best treated as one observation within a larger inspection, not as a certification of frame safety.
What welding standards and the heat-affected zone mean for an RV repair
The AWS D1.1/D1.1M:2025-AMD1 Structural Welding Code: Steel establishes requirements for structural-steel welding, including procedure qualification, welder qualification, fabrication, inspection, and acceptance criteria.
However, AWS D1.1 is not automatically the governing requirement for every RV frame repair. An RV frame may be covered by the frame or chassis manufacturer’s repair procedure, a component manufacturer’s instruction, an engineering repair design, a shop’s qualified welding procedure, or another applicable specification.
The important question is not whether a shop mentions the name of a welding code. The important questions are:
- What material is the frame made from?
- What welding process is appropriate?
- What filler metal matches the base material and procedure?
- What joint preparation is required?
- Does the repair require preheat?
- How will interpass temperature be controlled?
- How will distortion be limited?
- How will nearby wiring, plumbing, tanks, insulation, and coatings be protected?
- What inspection is required after welding?
- Does the manufacturer approve the repair method?
- Is reinforcement required?
- Does the completed repair restore the original load path and geometry?
Welding generates heat in the base metal. That heat can create distortion, residual stress, and changes in the HAZ. Excessive or uncontrolled heat may also damage nearby components or protective coatings. Insufficient preparation can leave an existing crack in place. Welding across a contaminated or corroded surface can produce an unreliable joint.
Lippert’s TI-570 instructions specifically warn that electrical power sources must be disconnected before welding because welding current can travel along the frame to batteries, solar equipment, or other grounded power sources. The document also instructs technicians to protect nearby underbelly features from excessive heat and sparks.
These precautions are not decorative details. An RV contains systems that are close to the frame and may be hidden from view. Structural welding should be planned around the entire vehicle, not only the steel being repaired.

Repair versus replacement: how the decision is made
There is no single crack length that determines whether every RV frame can be repaired. The decision depends on the frame design, material, crack location, distortion, corrosion, accessibility, manufacturer instructions, and the ability to restore the original geometry and load path.
A repair may be considered when:
- The frame manufacturer provides an approved repair method.
- The surrounding steel has adequate thickness and condition.
- The crack can be fully accessed and removed.
- The rail can be returned to the required alignment.
- The reinforcement can be installed without creating a new problem.
- The suspension and body attachments remain serviceable.
- The welding procedure is appropriate for the material.
- The completed work can be inspected and documented.
For certain Lippert I-beam frame cracks in the axle area, the official TI-570 procedure provides different reinforcement approaches based on crack position and obstructions. It identifies a preferred reinforcement-angle procedure when a crack extends more than two inches above the bottom flange and an alternative tube procedure when the crack remains within two inches of the bottom flange and there are no listed obstructions. Those dimensions apply only within the scope of that specific Lippert procedure and frame application.
They should not be copied onto a different brand, frame style, or repair situation without confirming the applicable manufacturer information.
Replacement or a more extensive structural solution may be considered when:
- The manufacturer requires replacement.
- The main rail has severe or widespread distortion.
- Multiple cracks indicate broader structural damage.
- Corrosion has reduced the section substantially.
- The material cannot be identified or safely welded.
- The crack extends through a critical attachment and cannot be properly accessed.
- The frame cannot be restored to the required geometry.
- A prior repair has failed or obscured the original structure.
- The repair would interfere with suspension, plumbing, wiring, tanks, or body attachments.
- The cost and scope approach the RV’s value or make a safe repair impractical.
A replacement decision is not based only on the visible crack. A rail that looks repairable may still be unsuitable if it is bent, thinned by corrosion, repeatedly repaired, or connected to other damaged components.
A trustworthy repair facility should explain the basis for the recommendation, provide photographs and measurements, identify the applicable procedure, and distinguish between a manufacturer-approved repair and a shop-developed repair plan.
Why reinforcement plates can fail when installed incorrectly
Reinforcement is intended to distribute load over a larger area. It is not a substitute for removing the original crack, restoring alignment, and selecting the correct material and geometry.
A reinforcement can create new problems if:
- It ends at a sharp corner.
- Its welds create a new stress concentration.
- It is placed over an unrepaired crack.
- It is too stiff for the surrounding structure.
- It does not extend far enough into sound material.
- It blocks inspection access.
- It traps moisture against the frame.
- It interferes with an outrigger or suspension component.
- It changes the way the rail flexes.
- It is welded without controlling heat and distortion.
The repair must be designed as a complete load path. Adding steel simply because it looks stronger does not guarantee that the repaired area will perform correctly.
Insurance documentation for a cracked RV frame
Frame damage can expand the scope of an insurance claim because the visible exterior damage may not show the structural work required underneath. Clear documentation helps the insurer evaluate the relationship between the collision and the repair recommendation.
A useful inspection package may include:
Pre-teardown photographs
Photograph the RV before underbelly panels, wheels, trim, or body sections are removed. Show the impact area and the complete vehicle.
Exposure photographs
Take photographs as the technician exposes the frame. Include the removed panel, its location, the surrounding structure, and the specific crack or deformation.
Close-up and wide-angle views
A close-up shows the crack. A wider image shows where the crack sits in relation to the axle, hanger, crossmember, outrigger, tongue, body mount, or impact point. Both are necessary.
Measurements
Document:
- Crack length and direction
- Frame-rail alignment
- Crossmember position
- Rail spacing
- Diagonal measurements
- Suspension location
- Tongue or coupler alignment
- Before-and-after geometry
- Material thickness where relevant
Measurements should identify the reference points and the equipment or method used.
NDT reports
If magnetic particle, dye penetrant, ultrasonic, or another NDT method is used, request a written report that identifies:
- The component and location
- The inspection method
- The surface preparation
- The equipment or process
- The findings
- The limitations
- The acceptance criteria or repair basis
- The inspector or testing provider
Manufacturer procedures
Include the relevant frame, chassis, suspension, hitch, or component procedure when available. For applicable Lippert frame systems, the repair facility may review the manufacturer’s current technical documentation, including TI-570 where appropriate.
Line-item estimate and supplement
The estimate should separate:
- Teardown
- Cleaning and access
- Measurement
- NDT
- Crack preparation
- Welding
- Reinforcement
- Replacement components
- Reassembly
- Corrosion protection
- Alignment
- Suspension work
- Brake or electrical testing
- Final inspection
A supplement should explain what was not visible during the original estimate and why the newly requested operation is necessary. Coverage and approval remain matters between the owner and insurer, but a clear technical file gives everyone a more reliable basis for review.
For more information about hidden damage and the supplement process, read RVCCR’s article on RV insurance supplements and hidden damage after a collision.
Towing safety after a frame-impact event
Do not tow a travel trailer, fifth wheel, or motorhome when a frame crack is suspected until a qualified professional determines that it is safe.
This includes cracks near:
- The coupler
- The A-frame tongue
- The spring hangers
- The axle mounts
- The pin box
- The receiver
- The main frame rails
- The crossmembers
- Safety-chain attachments
- Suspension brackets
Towing adds repeated loading to the structure. Braking transfers force through the frame and suspension. Turning can apply side loads. Uneven pavement can produce twisting. A repair that appears stable while parked may be exposed to very different forces on the road.
The same caution applies to related towing components. A frame inspection should be coordinated with an examination of the coupler, pin box, hitch receiver, safety chains, brakes, breakaway system, tires, wheels, and suspension. RVCCR’s article on RV hitch and coupler repair after a collision explains why a coupling part that still appears to latch may not be safe after an impact.
If the RV must be moved, ask the repair facility what transport method is appropriate. A flatbed, lowboy, or other specialized transport may be safer than towing the damaged unit behind another vehicle. Do not improvise a temporary frame or hitch repair simply to get the RV to a shop.
Questions to ask a repair facility
Before authorizing structural work, ask:
- Will you inspect the entire frame or only the visible crack?
- Will you remove the underbelly or other coverings to see both sides?
- Will you inspect spring hangers, crossmembers, outriggers, and frame transitions?
- Will you measure the frame before recommending repair?
- Which manufacturer or chassis procedure applies?
- Is the proposed method a manufacturer-approved repair?
- What material is the frame made from?
- What welding process and procedure will be used?
- How will the HAZ, heat input, preheat, and distortion be controlled?
- How will wiring, plumbing, tanks, insulation, and underbelly material be protected?
- Is NDT recommended for this location?
- Who will perform magnetic particle, penetrant, or ultrasonic testing?
- What are the acceptance criteria?
- How will the repaired frame be remeasured?
- Will the repair be photographed before coatings are applied?
- Will the repair be documented for the insurance claim?
- Will suspension, brakes, tires, and coupling components be inspected?
- Is towing the RV currently safe?
- What costs are associated with teardown and reassembly?
- What written warranty applies to the completed repair?
Be cautious if the answer is simply, “We can weld it,” without a discussion of access, alignment, material, procedure, inspection, and final testing.
Finding an RV collision repair facility near Redlands
When searching for travel trailer repair near me, distance should not be the only consideration. A travel trailer frame, fifth-wheel pin box, motorhome chassis, or toy-hauler suspension attachment requires more than ordinary exterior bodywork.
Look for an rv paint and body shop that can coordinate structural assessment with the rest of the restoration. Ask whether the facility understands:
- The differences among motorhomes and towable RVs
- Frame and suspension load paths
- Fiberglass, aluminum, and composite body construction
- Underbelly access and protection
- Insurance supplements
- Manufacturer repair information
- Mechanical and electrical testing
- Paint and finish matching after structural work
- Final alignment and safety checks
RVCCR is a family-owned Redlands business with 21 years of experience. Our facility combines rv collision repair, paint and body work, and mechanical service under one roof. We coordinate with major insurance carriers, provide free estimates, use appropriate OEM or manufacturer-specified parts when available, and back our completed work with a written lifetime warranty.
The exact inspection and repair plan depends on the RV’s year, make, model, frame design, collision location, and condition. No responsible shop should promise a repair method before examining those details.
Frequently asked questions
Can I tow my RV if the frame crack is small?
Do not tow with a suspected frame crack until a qualified repair professional evaluates it. Crack length alone does not establish safety. Location, direction, depth, material, nearby attachments, and frame alignment all matter.
Are cracks near welds more serious?
They can be. Weld toes, weld ends, brackets, and transitions can concentrate stress. A crack near a load-bearing suspension or frame attachment should be treated as a structural concern until inspected.
Can a frame crack simply be welded over?
A proper repair generally requires removing or preparing the crack, welding to sound material, addressing alignment, and following an appropriate repair procedure. Welding over an existing crack without preparation may leave the original defect in place.
Does every frame crack require a new frame?
No. Some frames can be repaired using an applicable manufacturer procedure or qualified structural repair plan. Others require replacement or a more extensive solution. The decision depends on the frame design and the full condition of the structure.
Is magnetic particle testing appropriate for every RV frame?
No. Magnetic particle testing is intended for suitable ferromagnetic materials. The inspection provider must select a method based on the frame material, surface condition, geometry, and suspected defect.
Can dye penetrant find a hidden crack?
Dye penetrant detects surface-breaking flaws on clean, nonporous surfaces. It does not reliably identify a crack that remains completely below the surface.
Can ultrasonic testing replace a visual inspection?
No. Ultrasonic testing and visual inspection answer different questions. A complete evaluation may use more than one method, along with measurements and manufacturer information.
What should I send with an insurance claim?
Send photographs from before and during teardown, measurements, repair recommendations, NDT reports when applicable, manufacturer procedures, part information, and a line-item estimate that explains why each operation is necessary.
Inspect the frame before the road tests it for you
A collision can leave a travel trailer or motorhome looking usable while the frame, welds, spring hangers, crossmembers, outriggers, or rail transitions remain compromised. Finding the damage in the shop is safer than discovering it during braking, turning, or towing at highway speed.
Stop towing when structural damage is suspected. Photograph the condition. Arrange safe transport. Have the entire affected load path exposed, measured, and inspected. If advanced testing is appropriate, use qualified personnel and a documented method. If repair is possible, insist on a procedure that addresses the crack, the HAZ, the reinforcement, the surrounding structure, and the final geometry.
At RVCCR, we help RV owners move from uncertainty to a documented repair plan. Our Redlands team can coordinate the inspection, estimate, insurance communication, structural work, mechanical evaluation, and paint restoration your RV needs after a collision.
Restore the frame. Recheck the connection. Protect the suspension. Then get back to the road, the campsite, and the next adventure with confidence.
Request a free RV collision repair estimate from RVCCR and let our team help identify structural damage before it finds you on the highway.
Technical and manufacturer resources
- Lippert TI-570 Frames and Chassis technical procedure
- AWS D1.1/D1.1M:2025-AMD1 Structural Welding Code: Steel
- ASTM nondestructive testing standards
- ASTM E3024/E3024M, Magnetic Particle Testing for General Industry
- ASTM E165/E165M, Liquid Penetrant Testing for General Industry
- ASTM E164, Contact Ultrasonic Testing of Weldments
Need a repair estimate?
Skip the wait — send us a few photos and our team will get back to you fast.
Start a Photo Estimate →