RV Hitch and Coupler Repair After a Collision: When the Tongue Takes the Hit
Updated August 20, 2026
RVDA-certified staff and technicians at RVCCR have spent 21 years repairing motorhomes, fifth wheels, travel trailers, toy haulers, popups, and other recreational vehicles in Redlands and the Inland Empire. When a collision reaches the front of a towable RV or the towing equipment on a motorhome, the visible damage may be limited to a bent coupler, scraped pin box, or distorted hitch mount: but the actual inspection can extend into the frame, welds, fasteners, safety-chain attachments, wiring, and tow vehicle structure…
The coupling system is a safety-critical connection. It transfers braking, acceleration, turning, and road forces between two vehicles. After a collision, continuing to tow before that connection is professionally inspected can create a risk that is not obvious from the outside. A coupler may still fit over the ball while its latch, body, welds, or tongue attachment has been compromised. A fifth-wheel kingpin may look usable while the pin box mounting plates or surrounding frame have shifted. A motorhome tow-bar mount may appear intact while its bolts or vehicle-frame attachment points have been stretched.
This article explains what to look for, why a damaged coupler should not be straightened, how the three major coupling systems differ, and what documentation can help support an insurance claim.
The three RV coupling systems are not interchangeable
Before discussing repairs, it helps to identify which part was damaged. The terms “hitch,” “coupler,” “kingpin,” “pin box,” and “tow-bar mount” are often used together, but they describe different components.
Travel trailer: ball coupler and A-frame tongue
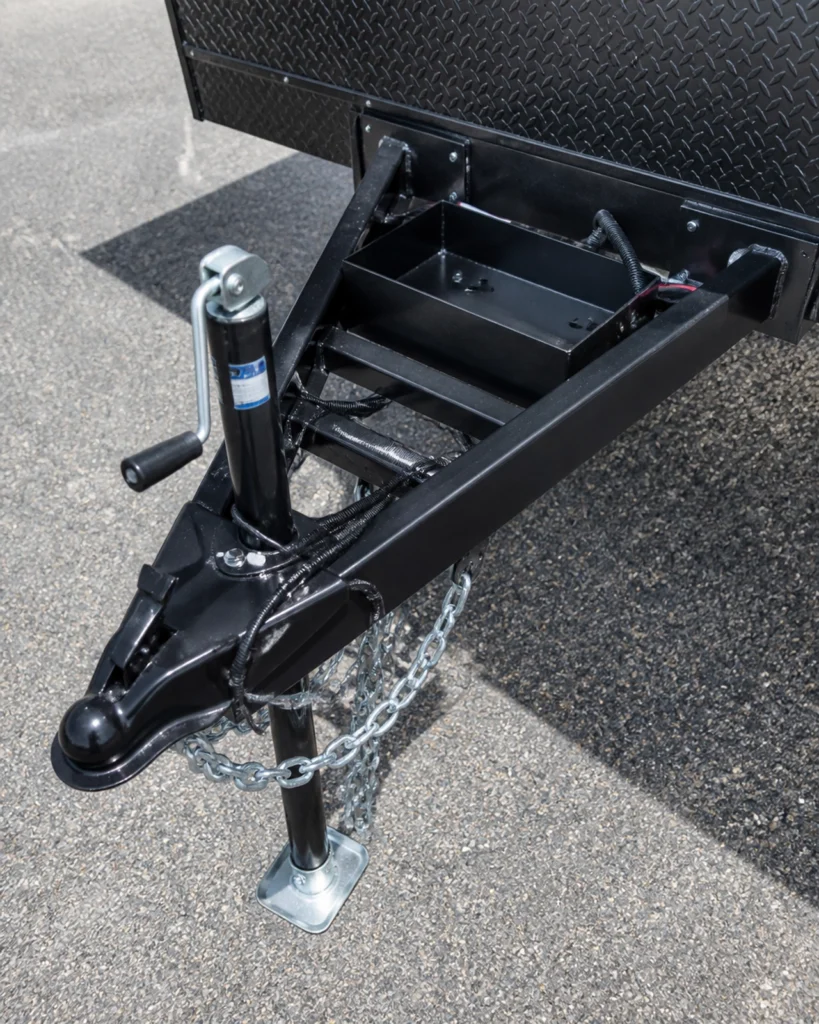
A conventional travel trailer, including many toy haulers and smaller campers, normally connects to the tow vehicle through a ball coupler. The coupler is mounted at the forward end of the trailer tongue, often on an A-frame made from two angled steel members.
The coupler fits over a correctly sized hitch ball mounted in the tow vehicle’s receiver. A latch or locking mechanism holds the coupler around the ball. Safety chains connect the trailer tongue to rated attachment points on the tow vehicle. A breakaway cable, electrical connector, and trailer-brake system complete the towing connection.
The coupler and tongue work as one load path. A collision can damage the coupler itself, the tongue members, the crossmember where the A-frame meets the main chassis, the jack, the safety-chain mounts, or several of these parts at once.
Fifth wheel: kingpin and pin box
A fifth-wheel trailer does not use a ball coupler. It uses a kingpin mounted in a pin box. The kingpin engages a fifth-wheel hitch installed in the bed of a pickup truck.
The pin box is attached to the front structure of the fifth wheel through mounting plates, bolts, brackets, and frame members. It transfers forces into the trailer’s front structure and then through the kingpin into the truck-mounted fifth-wheel hitch.
Because this connection is structurally different from a travel-trailer coupler, the repair process is different as well. A fifth-wheel collision inspection should include the kingpin, kingpin plate, pin box housing, mounting hardware, bolt holes, front frame structure, and any visible movement or cracking around the upper deck.
Motorhome: tow-bar mount and vehicle-specific baseplate
A motorhome may tow a car, Jeep, or other vehicle behind it using a tow bar. In that arrangement, a motorhome-mounted receiver or tow-bar mount connects to a vehicle-specific baseplate installed on the vehicle being towed.
The baseplate attaches to the towed vehicle’s frame or unibody structure. The tow bar, safety cables, electrical wiring, and supplemental braking equipment connect the two vehicles.
After a collision, both sides of this system require attention. Inspecting only the tow bar is not enough. The motorhome receiver, tow-bar arms, attachment tabs, pins, safety-cable brackets, baseplate, mounting bolts, and the towed vehicle’s frame or unibody should all be evaluated.
What collision forces can do to a travel-trailer tongue
The front tongue of a travel trailer can be exposed to vertical, longitudinal, and side-loading forces during a collision, jackknife, abrupt stop, backing incident, or impact while the trailer is connected.
The exact damage depends on the direction and severity of the event. A rear impact to the tow vehicle can load the receiver and ball mount. A sharp turn or jackknife can push the trailer tongue sideways. A curb strike can apply a twisting force through the coupler and A-frame. A collision involving the trailer itself can drive force directly into the coupler and its mounting welds.
Common results include:
- A coupler body that is bent upward, downward, or sideways
- A latch that no longer closes or locks smoothly
- A deformed ball socket
- Cracked welds around the coupler
- Torn or elongated bolt holes
- A bent or kinked A-frame tongue
- A shifted tongue-to-frame junction
- Stretched or cracked safety-chain attachments
- A damaged tongue jack or jack mounting plate
- A twisted or misaligned trailer frame
- Damage to weight-distribution brackets or sway-control mounts
The damage may not be symmetrical. One A-frame rail can move while the other remains close to its original position. That can leave the coupler visually close to center while the trailer’s front structure is twisted.
A professional inspection therefore does more than measure whether the coupler can be placed over a hitch ball. It evaluates whether the coupling system remains aligned, securely attached, and capable of carrying the loads specified by the trailer and component manufacturers.
Why a damaged coupler should not be straightened
A bent coupler should be replaced rather than heated, hammered, pulled, or bent back into position.
The reason is not simply cosmetic. The coupler is a load-bearing and locking component. Its shape determines how it seats on the hitch ball, how the latch engages, and how towing forces travel into the tongue. Changing that shape can affect the fit and function of the locking mechanism even if the coupler looks straight afterward.
Manufacturer guidance consistently treats bent or broken coupler parts as a replacement condition. Dutton-Lainson’s coupler documentation warns against using a coupler with bent or otherwise damaged parts. Trailer owner manuals from manufacturers such as PJ Trailers and ATC similarly instruct owners to replace bent or broken coupler parts before towing.
A collision can also create damage that is not visible after straightening. Applying heat or force may alter the metal, disturb the latch alignment, enlarge a crack, or conceal the original failure area beneath a new weld or coating. A repair that makes the outside look better does not establish that the coupler still meets its original design requirements.
This does not mean every coupler-related problem requires replacing every component. Some manufacturers provide service parts for a latch handle, spring, underjaw, or related hardware when the coupler body is straight and undamaged. That is a limited, manufacturer-approved latch repair: not an authorization to reshape a collision-damaged coupler body.
The practical rule is straightforward:
If the coupler body is bent, cracked, deformed, or suspect after an impact, stop towing and have it replaced with a correctly rated component.
The replacement must match the trailer’s coupler style, ball size, mounting method, and required load rating. A replacement part should be selected by its actual specifications and the trailer manufacturer’s requirements: not only by appearance.

Travel-trailer inspection points after a collision
A thorough travel-trailer inspection should begin at the coupler and continue rearward through the frame. The following points deserve specific attention.
1. Coupler body and socket
Inspect the outside and underside of the coupler for:
- Bends or changes in the original shape
- Cracks, especially near corners and welds
- Dents that interfere with the latch
- A ball socket that appears oval, distorted, or excessively worn
- Sharp edges or stretched metal around the opening
- Corrosion or pitting that weakens the component
- A latch that is difficult to operate or fails to engage fully
The coupler should fit the correct hitch-ball size. A mismatch between ball and coupler is unsafe even if the latch appears to close.
2. Latch and locking hardware
The latch should operate according to the coupler manufacturer’s instructions. Look for:
- A latch handle that binds
- A locking pin that will not pass through the designated holes
- A latch that does not fully engage the ball
- Excessive movement between the ball and socket
- Broken springs or damaged underjaw components
- Missing hardware
- Evidence that the latch was forced during the collision
A latch problem may be repairable only when the coupler body and cross shaft remain undamaged. If the body is distorted, replacing only the latch may not restore a safe connection.
3. A-frame tongue
Inspect both tongue members from the coupler back to the main trailer frame. Look for:
- A visible bend or kink
- Unequal spacing between the tongue rails
- Cracked welds
- Torn steel near gussets or brackets
- Buckling or rippling in the metal
- Separation at the tongue-to-frame junction
- Fresh scrapes that indicate movement
- A tongue that is no longer centered with the trailer body
A bent A-frame should not be corrected by simply forcing it back without a documented structural repair plan. The repair may involve controlled section replacement, alignment, welding, or replacement of the affected assembly, depending on the trailer design and manufacturer requirements.
4. Safety-chain attachments
Safety-chain attachment points are part of the emergency connection between the trailer and tow vehicle. After an impact, inspect for:
- Stretched or elongated attachment holes
- Cracked welds
- Bent chain loops
- Torn metal around the mounting point
- Missing or damaged hardware
- Chain links that are bent, cracked, or excessively worn
A chain can remain attached while its mounting point has been weakened. The attachment must be evaluated as part of the structure, not treated as a separate cosmetic accessory.
5. Frame and crossmembers
Inspect the frame around the front of the trailer for:
- Twisting or misalignment
- Cracks near welds
- Bent rails
- Corrosion perforation
- Shifted crossmembers
- Damaged weight-distribution brackets
- Stress marks in the floor, front wall, or exterior skin
Frame damage can extend beyond the area that first made contact. Fiberglass, aluminum skin, and interior finishes may hide movement in the steel structure, so a complete assessment may require access from underneath or removal of selected components.
Fifth-wheel pin box and kingpin damage
A fifth-wheel pin box requires a different inspection strategy because its connection is made through a kingpin and a truck-bed fifth-wheel hitch rather than a ball coupler.
The inspection should include the entire pin box assembly and the trailer structure where it is attached.
Kingpin and plate
Look for:
- A kingpin that is no longer straight
- Wear, scoring, or deformation on the kingpin
- Cracks around the kingpin plate
- A plate that is bent or uneven
- Abnormal hitch engagement or release
- Damage that prevents the fifth-wheel jaws from closing normally
A kingpin that does not engage correctly is a reason to stop towing until the system is evaluated.
Pin box housing
Inspect the pin box for:
- Cracked welds
- Buckled or distorted plates
- Bent sidewalls
- Damage around gussets
- Cracks near the kingpin plate
- Loose or missing hardware
- Corrosion that weakens the assembly
- Evidence that the pin box shifted in the mounting structure
Manufacturers’ replacement instructions for pin boxes emphasize recording the original pin height and bolt-hole positions, using appropriate replacement hardware, and following the specified torque requirements. Those details matter because a replacement pin box must restore the correct geometry: not merely occupy the same general location.
Mounting plates and frame
The trailer-side mounting area should be checked for:
- Elongated bolt holes
- Cracked or shifted mounting plates
- Bent frame members
- Loose bolts or damaged washers
- Cracks in welds
- Distortion around the front structure
- Movement between the pin box and frame
If the pin box has been significantly loaded in a collision, the correct repair may be replacement of the pin box, repair of the trailer structure, or both. The decision should follow the applicable trailer and component manufacturer requirements.

Motorhome tow-bar mounts and baseplates
Motorhome towing systems have two primary structural interfaces.
The first is the motorhome’s receiver or tow-bar mount. The second is the baseplate attached to the vehicle being towed. A collision involving either vehicle can load both components.
Inspecting the motorhome receiver
The receiver and its mounting points should be checked for:
- Cracks in the receiver tube
- Bent side plates or brackets
- Cracked welds
- Distorted safety-chain loops
- Damaged hitch-pin holes
- Loose, missing, or stretched fasteners
- Movement between the receiver and chassis
- Damage to the motorhome frame or rear structure
The receiver should not be used if it is damaged. Ford’s towing guidance emphasizes matching towing equipment to the vehicle and its ratings, while hitch manufacturer instructions commonly require inspection and prohibit use of damaged equipment.
Inspecting the tow bar
The tow bar should be evaluated for:
- Bent arms
- Damaged telescoping sections
- Cracked welds
- Deformed attachment tabs
- Damaged pins or locking mechanisms
- Abnormal looseness
- Damaged safety-cable connection points
- Binding during operation
A tow bar that was loaded sideways or forced during an accident may have internal or attachment damage that is not immediately visible.
Inspecting the towed vehicle’s baseplate
The baseplate connects the tow bar to the towed vehicle’s frame or unibody. Inspect:
- Mounting brackets
- Attachment tabs
- Bolts and backing plates
- Frame or unibody around the mounting points
- Cracks, bends, or deformation
- Elongated holes
- Impact damage behind the bumper or fascia
Blue Ox, Roadmaster, Demco, and other manufacturers produce vehicle-specific baseplates with model-specific installation instructions. If a baseplate has been involved in a collision, identify its brand and part number and follow the manufacturer’s technical guidance. A damaged structural mount should not be straightened or improvised into service.
The tow vehicle’s hitch receiver matters too
Owners sometimes focus on the RV and overlook the tow vehicle. A collision can damage the receiver, ball mount, hitch ball, frame attachments, safety-chain loops, or rear frame structure.
Inspect the tow vehicle for:
- A receiver tube that is bent or no longer square
- Cracked welds or brackets
- Distorted frame attachment points
- A hitch ball with flat spots, cracks, or deformation
- A ball nut or mounting stud that has loosened
- A ball mount that is bent or twisted
- Damaged hitch pins or clips
- Stretched safety-chain loops
- Wiring or brake-controller damage
The receiver’s rating is not automatically the same as the tow vehicle’s maximum towing capacity. The complete system must be compatible, including the receiver, ball mount, hitch ball, coupler, trailer weight, tongue weight, and any weight-distribution equipment.
If the impact occurred while the trailer was attached, the tow vehicle and RV should be assessed together. Replacing the trailer coupler without checking the receiver can leave a damaged connection in service.
OEM replacement versus structural repair
The correct repair depends on which component is damaged.
Coupler body
A collision-damaged coupler body should generally be replaced with a properly rated, compatible assembly. Do not straighten or weld over damage unless the component manufacturer provides a specific approved procedure: and for many coupler bodies, the manufacturer guidance is replacement.
Latch components
A latch handle, spring, or underjaw may be serviceable if the coupler body remains straight and the manufacturer provides the correct repair parts and instructions. The latch must fully engage and lock as designed.
A-frame tongue
A damaged A-frame may be repairable if the trailer manufacturer’s design and the condition of the steel support a documented structural repair. This may involve cutting out damaged material, replacing sections, aligning the structure, and completing qualified welding. A repair should restore the original geometry and load path, not simply hide the visible bend.
Fifth-wheel pin box
A pin box with structural deformation, cracked welds, or damaged mounting areas may require replacement. The surrounding frame and mounting plates must be inspected before a replacement is installed.
Motorhome tow-bar mount or baseplate
A damaged receiver, tow-bar mount, tow bar, or baseplate should be inspected according to the component manufacturer’s instructions. If the part is bent, cracked, or its mounting has been compromised, replacement is generally the safer path.
A qualified repair facility should document why a component was replaced or repaired and identify the part used. That information is valuable for future maintenance, resale, and insurance review.
What to document for an insurance claim
Documentation can help establish the scope of damage and explain why a towing component requires replacement rather than cosmetic repair.
Before moving or disassembling anything, take clear photos when it is safe to do so. Include:
- Wide photos showing the complete RV and tow vehicle
- Four-corner photos of each vehicle
- Close-ups of the damaged coupler, pin box, receiver, or tow-bar mount
- Photos of cracked welds, bent metal, stretched chain attachments, and damaged fasteners
- Photos from multiple angles showing alignment
- Photos of the hitch ball, ball mount, kingpin, or tow-bar connection
- Photos of the trailer and tow-vehicle VIN labels
- Photos of manufacturer labels and component part numbers
- Photos of load-rating labels and rating plates
- Photos of any installed weight-distribution or sway-control equipment
- Photos of the safety chains, breakaway cable, and electrical connector
- Photos of damage inside the front wall, floor, storage compartment, or frame access areas
Also gather:
- The trailer year, make, model, and VIN
- The tow vehicle year, make, model, and VIN
- The coupler, pin box, receiver, tow-bar, or baseplate part number
- The manufacturer’s installation or owner manual
- Load ratings and capacity labels
- The date, location, and description of the collision
- Towing configuration at the time of the incident
- Any police or incident report
- Towing and storage invoices
- The repair estimate and parts documentation
When sending photos for a preliminary review, RVCCR’s free RV collision repair estimate process requests vehicle identification and multiple damage views. The more complete the photo set, the easier it is to identify obvious damage before an in-person inspection.
Insurance carriers may request additional information. A repair facility can help organize photographs, part numbers, and line-item repair documentation, but coverage decisions remain with the applicable insurer and policy.
How RVCCR approaches hitch and coupling damage
At RVCCR, our RV repair and collision service covers motorhomes, fifth wheels, travel trailers, toy haulers, popups, and other RV types. The inspection begins with the visible damage and continues into the structure and systems that affect safe use.
For a travel trailer, that may include the coupler, A-frame tongue, safety-chain attachments, frame junction, tongue jack, receiver, ball mount, and weight-distribution hardware.
For a fifth wheel, it may include the kingpin, pin box, mounting plates, fasteners, front frame, upper-deck structure, and hitch interface.
For a motorhome towing system, it may include the motorhome receiver, tow bar, safety cables, baseplate, mounting hardware, towed vehicle structure, wiring, and supplemental braking equipment.
We coordinate with major insurance carriers, provide written estimates, use OEM or appropriate manufacturer-specified parts when available, and complete collision, paint, and mechanical work under one roof. Major RV collision repairs commonly take longer than a simple exterior repair because parts availability, structural access, insurance approvals, and finishing requirements can affect the schedule. RVCCR’s published guidance identifies approximately two to six weeks for many major collision or full-repaint projects, with the actual timeline depending on the repair scope, parts, booth scheduling, and approvals. The estimate should explain those variables rather than promise an arbitrary completion date.
For a more detailed comparison of towable RV structures, see our article on fifth-wheel versus travel-trailer collision repair. Owners dealing specifically with a larger coach can also review our information on motorhome collision repair timelines in 2026.
Manufacturer and government resources
The following sources provide primary guidance relevant to couplers, towing equipment, and replacement procedures:
- PJ Trailers Inspection, Service and Maintenance Manual
- Dutton-Lainson coupler owner manual
- CURT coupler latch repair instructions
- Ford RV and Trailer Towing Guide
- NHTSA fifth-wheel pin box recall documentation
- Demco official flat-towing baseplate information
- Roadmaster official baseplate information
These resources do not replace the installation manual for the specific RV, hitch, coupler, pin box, receiver, tow bar, or baseplate involved. Component designs and requirements vary.
Frequently asked questions
Can I tow a trailer to a repair shop if the coupler is only slightly bent?
Do not tow with a coupler that is bent, cracked, deformed, or unable to lock correctly. Arrange transport or have a qualified professional determine the safest way to move the trailer.
Can a repair shop weld a cracked coupler?
A cracked coupler is a safety-critical defect. The appropriate action is usually replacement with a compatible, correctly rated coupler. Any exception would need to come from the component manufacturer’s approved repair procedure and a qualified structural repair plan.
What if the coupler still latches after the collision?
A latch that closes does not prove that the coupler body, socket, welds, tongue, or frame remain safe. The entire coupling area should be inspected before towing.
Does a fifth wheel have a coupler?
A fifth wheel uses a kingpin and pin box rather than the ball coupler found on a conventional travel trailer. The kingpin engages the fifth-wheel hitch in the tow vehicle.
Should I replace the hitch receiver after a collision?
If the receiver is bent, cracked, loose, or otherwise damaged, it should not remain in service. The receiver, mounting hardware, vehicle frame, hitch ball, and ball mount should be inspected together.
What photos should I send for an estimate?
Send wide views of the RV and tow vehicle, close-ups of the coupling damage, photos of the VIN labels, rating plates, part numbers, safety-chain attachments, and any visible frame or weld damage. More complete photos help identify the likely repair scope.
Protect the next trip by repairing the connection first
The goal of RV collision repair is not simply to make the front of the trailer look straight again. The goal is to restore the complete connection between the RV and tow vehicle so the owner can tow, camp, and travel with confidence.
Do not ignore a bent coupler, stretched safety-chain mount, cracked weld, shifted pin box, or damaged tow-bar bracket. Stop towing, document the damage, identify the component ratings and part numbers, and arrange a professional inspection.
RVCCR’s RVDA-certified team can evaluate the coupling system, frame, body, paint, and related mechanical damage, coordinate with your insurance carrier, and provide a written estimate. Send photos through our estimate page or contact the Redlands shop to discuss the next step.
Restore the connection. Rebuild the structure. Get your RV ready for the road: and back to the adventure waiting beyond it.
Need a repair estimate?
Skip the wait — send us a few photos and our team will get back to you fast.
Start a Photo Estimate →