RV Paint and Body Shop in the Inland Empire: What to Look for Beyond the Price Quote
Choosing an RV paint and body shop in the Inland Empire is a decision that extends far beyond the bottom line of a repair estimate. When dealing with a vehicle that serves as both a high-value asset and a mobile home, the technical specifications of the facility, the certifications of the technicians, and the specialized equipment on-site are the true metrics of a successful restoration. At RVCCR, our 21-year history as a family-owned operation in Redlands has been built on the understanding that RV collision repair is a distinct discipline from standard automotive work, requiring oversized infrastructure and a deep mastery of complex composite materials.
The complexity of modern motorhomes: ranging from Class A diesels with full-body paint to fifth wheels with intricate TPO roofing systems: means that a standard "one-size-fits-all" auto body shop is often ill-equipped to handle the scale and structural requirements of these vehicles. From the moment an RV enters a repair facility, the physical constraints of the building itself begin to dictate the quality of the final result. If a shop attempts to squeeze a 40-foot coach into a 30-foot bay, or relies on cross-contaminated tools for aluminum repairs, the structural integrity and aesthetic longevity of the vehicle are immediately compromised. Establishing a baseline of trust requires a look into the specialized engineering and rigorous standards that define a certified RV repair environment…
The Physics of Paint: Why RV Booth Dimensions Determine Your Finish Quality
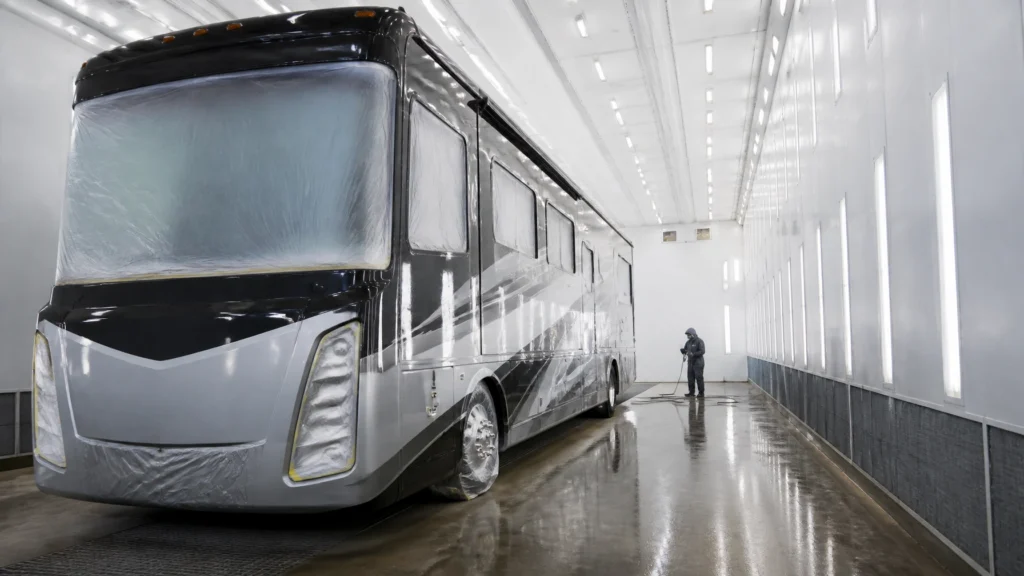
The most significant physical barrier to quality RV refinishing is the size of the paint booth. A standard automotive paint booth is typically designed for passenger cars and light trucks, measuring roughly 24 to 30 feet in length and 9 to 12 feet in height. While these dimensions are perfect for a sedan or a standard SUV, they are entirely insufficient for a modern motorhome or a large travel trailer. A Class A motorhome can easily reach 45 feet in length and over 12 feet in height, requiring a specialized oversized booth that provides at least 5 to 10 feet of clearance on all sides for proper airflow and technician movement.
At RVCCR, we utilize oversized booths that accommodate the massive scale of these vehicles. According to industrial spray booth standards (often guided by NFPA 33 and IBC regulations), a booth must not only fit the vehicle but also allow for a specific volume of air to move across the surface to ensure proper atomization and curing of the paint. If the booth is too small, the "overspray": fine particles of paint that do not land on the target: cannot be effectively evacuated by the ventilation system. This results in "dry spray" or a textured, orange-peel finish that lacks the mirror-like clarity of a factory coat.
Furthermore, the clearance provided by a 60-foot booth allows technicians to use professional scaffolding and specialized lighting. This ensures that the roof lines and high sidewalls receive the same level of attention as the lower panels. Without this space, technicians are forced to work in cramped conditions, increasing the risk of accidental contact with wet paint and preventing the even application of clear coats that are essential for protecting an RV from the intense Southern California UV rays.
Paint Booth Specifications: What the Numbers Actually Mean
Spray booth discussions often sound abstract until you translate the numbers into what technicians are physically trying to control. NFPA 33, the standard that governs spray application using flammable or combustible materials, is a key reference point for booth airflow and safety design. For open-face spray application, the benchmark many shop owners and booth manufacturers work from is a minimum average air velocity of 100 feet per minute across the booth face. That number matters because paint quality depends on moving atomized material away from the vehicle fast enough to limit overspray buildup while still keeping the application pattern stable.
In practical terms, airflow is not just a comfort feature. It affects how evenly basecoat lands, how consistently metallics orient, and how reliably moisture and solvents evacuate during the finishing process. If airflow falls below the required threshold, overspray can hang in the air, settle back onto the panel, and create texture defects that become obvious on the long, flat sidewalls of a motorhome. On an RV, those sidewalls act like giant billboards for every inconsistency in the finish. A minor airflow issue that might be tolerable on a compact car becomes highly visible on a 40-foot coach.
Booth design also changes how that air moves. In a cross-draft booth, air enters from one end of the enclosure and travels horizontally across the vehicle before exiting through filters at the opposite end. Cross-draft systems can work well when they are engineered correctly, but they are more sensitive to how a large RV blocks airflow. A tall motorhome can create dead zones where overspray circulates instead of clearing cleanly. In a downdraft booth, filtered air enters from the ceiling and moves downward around the vehicle before exiting through pits or low wall exhaust. That vertical movement generally gives technicians better control over contamination, especially on full-body paint jobs where roof edges, upper radiuses, and long side panels all need a consistent finish.
Bake cycles are another part of the specification sheet that owners rarely hear explained clearly. After application, many modern paint systems rely on controlled heat to accelerate cure and stabilize the finish. For waterborne refinish systems, booth bake settings commonly fall in the 140°F to 160°F range, depending on the paint manufacturer's process and the substrate involved. The point is not just to "dry" the paint. The point is to help basecoat and clearcoat reach a predictable cure window so the finish can be handled, polished if necessary, and returned to service without trapping moisture or under-curing the film.
Dimensions matter just as much as airflow and heat. A 45-foot motorhome cannot be refinished correctly in a booth that only barely matches its body length. A 60-foot booth with 14-foot ceilings gives the shop enough room for front and rear clearance, technician access, scaffolding, lighting spread, and proper airflow management around the entire shell. Height is just as important as length because roof caps, air-conditioning units, and upper body lines all need working room and safe access. If the ceiling is too low, technicians lose the ability to move equipment properly and air distribution suffers near the highest points of the coach.
A simple example makes the geometry easier to picture. A 40-foot Class A requires a booth that is at least 50 feet long if the goal is to preserve a minimum 5 feet of clearance in front of and behind the vehicle. That extra space is not wasted square footage. It is what allows air to travel properly, gives technicians room to mask, blend, inspect, and move safely, and reduces the chance of contamination from working too close to the booth walls. Once you understand those measurements, it becomes easier to see why true RV refinishing is a facility question first and a paint question second.
The Cost of a 60-Foot Booth: Why Most Shops Don't Have One
Oversized RV refinishing capacity is not rare because owners do not need it. It is rare because the infrastructure cost is substantial. A commercial-grade downdraft paint booth large enough for motorhomes commonly falls into an installed cost range of roughly $80,000 to $150,000, depending on the manufacturer, airflow package, ducting complexity, foundation work, and regional code requirements. That figure is before you account for the facility modifications that often have to happen around the booth itself.
Electrical demand is one of the first hurdles. A booth this size can require 400 to 600 amp electrical service to support the intake and exhaust motors, make-up air unit, burner or heating system, control package, and high-output lighting. Many general auto body shops were never built around that level of utility capacity because their business model centers on passenger vehicles. Upgrading service is not a minor add-on. It can mean panel upgrades, utility coordination, conduit runs, transformers, and inspection delays before the booth ever sprays a single panel.
Fire protection is another major barrier. Large spray environments need dedicated fire suppression integrated into the booth design and installed to code. Lighting also is not standard shop lighting. Spray areas require explosion-proof or hazardous-location-rated fixtures designed for an environment where paint vapors and combustible residues are a real concern. When owners ask why a typical neighborhood body shop does not simply "make room" for an RV, this is the answer. The issue is not only square footage. The issue is whether the building, power, safety systems, and ventilation package were ever engineered for that purpose.
The result is straightforward: many auto body shops physically cannot perform proper RV refinishing, even if they are highly competent with cars and light trucks. They may be able to prep a small camper shell or repair a simple panel, but full-scale motorhome paint work requires a capital investment that most shops have not made. That matters for customers because the estimate process often hides the infrastructure gap. A shop may price an RV job without discussing booth length, airflow design, or cure capability, yet those factors determine whether the finish will hold up over time.
For an owner comparing quotes in the Inland Empire, this is one of the clearest examples of why a lower number on paper does not always reflect an equivalent repair path. If a facility lacks the booth size, power capacity, and safety systems to process an RV correctly, the shop is forced to compromise somewhere: in prep, in airflow, in access, in cure, or in scheduling. Those compromises are not always visible on delivery day, but they tend to surface later in the form of texture issues, premature finish problems, or extended delays when the shop has to outsource a critical step.
Aluminum and Steel Segregation: Preventing Invisible Corrosion in Your RV
Modern RV construction has moved toward lightweight, high-strength materials, with many premium coaches utilizing aluminum for sidewalls and structural framing. However, many RV owners are unaware of the extreme risks associated with repairing aluminum in a facility that also handles steel vehicles. When steel dust particles from grinding or sanding come into contact with bare aluminum, a process called galvanic corrosion is triggered. This "invisible" corrosion can occur deep within the repair layers, eventually leading to paint bubbling, structural weakening, and total finish failure months after the vehicle has left the shop.

To mitigate this risk, a professional RV paint and body shop must maintain a dedicated aluminum clean room or a strictly segregated repair bay. This area must be equipped with its own set of tools: including dedicated welders, grinders, and sanders: that never touch a steel vehicle. Cross-contamination is so critical that even the dust extraction systems must be separate. At RVCCR, our commitment to OEM parts vs aftermarket which is better for your motorhome collision repair philosophy extends to the very tools we use; we follow the same rigorous segregation standards required for our Tesla and Rivian certifications, ensuring that your RV's aluminum components are handled with the highest level of metallurgical integrity.
RVDA Certification: The Standards of Professional Motorhome Restoration
While many shops claim to "work on RVs," few hold the certifications necessary to prove they understand the unique systems within them. The Recreational Vehicle Dealers Association (RVDA) and the RV Learning Center provide the industry-standard training for RV technicians. Unlike standard auto body repair, RV collision work often involves complex plumbing, high-voltage electrical systems, propane lines, and slide-out mechanisms that must be safely decommissioned and reinstalled during the body repair process.
An RVDA-certified shop has invested in the specialized training required to handle these integrated systems. For example, if a collision affects the rear corner of a motorhome, the repair may involve more than just fiberglass and paint. The technician may need to inspect the black water tank mounts, verify the integrity of the shore power inlet, and ensure that the structural framing for the rear slide-out remains within factory tolerances. Without RVDA-certified staff, an Inland Empire shop might deliver a vehicle that looks beautiful on the outside but harbors dangerous mechanical or electrical faults beneath the surface.
Our 21 years of experience in the Redlands area has taught us that RV owners value peace of mind over a quick fix. This is why we combine our RVDA-specific knowledge with our certifications from manufacturers like Ford, Honda, and Tesla. Whether you are dealing with a Class A diesel pusher or a lightweight travel trailer, the intersection of automotive structural safety and RV-specific system repair is where our expertise shines. This level of certification is often the difference between a vehicle that is merely "fixed" and one that is truly restored to its factory-safe condition.
Recalibrating Safety: Why ADAS Matters After an Inland Empire RV Collision
Advanced Driver Assistance Systems (ADAS) are no longer exclusive to luxury sedans. Modern RV chassis from manufacturers like Ford, Freightliner, and Mercedes-Benz now feature adaptive cruise control, lane-keep assist, and autonomous emergency braking. These systems rely on sensitive cameras and radar sensors typically mounted behind the front bumper, grille, or windshield. Even a minor low-speed impact or a seemingly simple paint job that requires removing these components can knock these sensors out of alignment.

Following a collision, it is statistically likely that your RV's safety sensors require recalibration. In the Inland Empire, where mountain passes and heavy freeway traffic are common, a misaligned lane-departure sensor could provide false warnings or fail to intervene in a critical moment. Proper ADAS recalibration requires a perfectly level floor and a specialized suite of targets and diagnostic software. Many standard body shops lack the square footage or the technology to perform these calibrations on a long-wheelbase motorhome.
As experts in ADAS recalibration after an EV collision, we apply the same precision to our RV customers. We verify the sensor alignment against factory specifications, ensuring that your home on wheels is just as safe as it was the day it left the showroom. If a shop does not discuss ADAS calibration with you during the estimate process for a 2020 or newer RV, they are missing a critical safety component of the modern repair workflow.
ADAS Calibration for RVs: The Bendix Wingman and Ford Co-Pilot360 Specifics
The phrase "ADAS calibration" can sound like a single scan-tool step, but on an RV it is usually a measured setup process that depends on floor level, ride height, target placement, and a successful confirmation drive. Two examples show why this matters. On many diesel coaches and commercial-style motorhome platforms, Bendix Wingman Fusion uses forward radar and camera inputs to support collision mitigation functions. On Ford-based gas motorhomes built on the F-53 chassis, Co-Pilot360-related features can require camera and radar verification procedures after front-end repairs, windshield work, alignment changes, or sensor bracket replacement.
For Bendix Wingman Fusion, the static calibration procedure is precise. The radar target setup typically uses a corner reflector positioned exactly within the OEM-specified window, commonly 10 to 20 feet in front of the bumper, centered on the sensor's centerline height. That means the technician is not estimating by eye. The coach must be parked on a verified level surface, the front suspension condition must be correct, and the reflector must be aligned so the radar sees a known reference point where the manufacturer expects it. If the target is too high, too low, or offset laterally, the calibration result can be rejected or, worse, accepted with an incorrect sensor aim.
Ford Co-Pilot360 calibration on an F-53 chassis can involve a dynamic road procedure after repairs that affect the front camera or related ADAS components. In simple terms, the vehicle is driven on a straight, level road with clearly marked lane lines at speeds above 40 mph so the system can relearn or confirm its forward reference. That drive route matters. If the road crown is excessive, the markings are poor, traffic interrupts the process, or weather obscures the lane edges, calibration may not complete successfully. On a large motorhome, even finding an appropriate route can be more complicated than it is for a standard passenger car.
The risk of skipping or mishandling this work is not theoretical. If a radar or camera calibration fails, the system may provide false alerts, delayed alerts, or no warnings at all. That can mean nuisance warnings in traffic, adaptive cruise behavior that does not match conditions, or collision-mitigation features that are not operating as designed. For an RV owner traveling through crowded Southern California interstates, mountain grades, or unfamiliar highways, those errors matter because the stopping distances and visibility constraints of a motorhome are already less forgiving than those of a sedan.
The equipment list is one reason many shops avoid the subject. A proper calibration environment starts with a floor that can be checked using a digital inclinometer so the technician knows the setup surface is within specification. Laser targeting tools help establish centerlines, confirm target distances, and reduce setup errors on wide-body coaches where small measurement mistakes multiply across the vehicle's width. Beyond the physical tools, shops also need access to OEM-compatible software and service information. Manufacturer software subscriptions commonly run in the $2,000 to $5,000 per year range per brand, which is a meaningful ongoing expense for any facility that wants to follow documented procedures rather than generic shortcuts.
For the customer, the takeaway is simple. If a repair affects the bumper, grille, windshield area, ride height, front structure, steering angle, or wheel alignment on a late-model RV, calibration should be part of the repair conversation. A trustworthy shop should be able to explain whether the unit needs a static setup, a dynamic drive, or both, and how that determination is made from the chassis and OEM procedure rather than guesswork.
Material Science in Modern RVs: Fiberglass, TPO, and Composite Repair
The exterior of an RV is a patchwork of different materials, each requiring a specific chemical approach to repair and painting. A single side of a fifth wheel might consist of a high-gloss fiberglass gelcoat, aluminum trim, plastic fender flares, and a TPO (Thermoplastic Polyolefin) roof edge. Understanding the bonding properties of these materials is essential for preventing delamination: a common failure where the repair material peels away from the original surface over time.
Fiberglass repair, in particular, is an art form. It requires meticulous layering of resin and glass matting to restore structural strength, followed by a precision sanding process to match the original contours. If the resin is not mixed at the correct temperature and humidity: environmental factors we control carefully in our Redlands facility: the repair will eventually "ghost" or become visible through the paint.

Fiberglass Repair Layup Schedule: How It's Actually Done
When an RV sidewall or cap suffers structural fiberglass damage, a proper repair is built in stages rather than filled in one visit. The first critical step is damage preparation. The technician grinds the damaged area back to sound material and creates approximately a 12:1 taper around the repair zone. That taper ratio matters because it gives each new layer of reinforcement enough surface area to bond gradually into the surrounding laminate instead of ending at a sharp edge that can print through later. On a three-square-foot repair, the visible damage footprint may look modest, but the prepared area is often significantly larger once the taper is established correctly.
After the substrate is prepared and cleaned, the next step is applying a barrier coat as part of the rebuild process. That barrier helps isolate the repair interface and supports adhesion before structural layers are added. From there, the layup schedule becomes the heart of the repair. A traditional structural rebuild may use alternating layers of 1.5 oz chopped strand mat and 24 oz woven roving. The mat helps the laminate conform and build uniform bonding between layers, while the woven roving contributes directional strength and stiffness. The goal is not simply to "fill" the area. The goal is to recreate the strength and thickness of the original panel in a controlled sequence.
Each fiberglass layer must be fully wetted out so resin saturates the reinforcement without leaving dry pockets or trapped air. After application, the layer needs time to cure before the next stage proceeds. In 70°F conditions, that cure schedule is measured in hours that add up quickly across a multi-layer repair. A shop that rushes the process by stacking materials too quickly can trap solvents, distort the panel, or create future print-through under the finish. On a proper repair, the laminate schedule is controlled, inspected, and allowed to stabilize before shape correction and finishing work continue.
Once the structural layup is complete, technicians move into contouring and surface refinement. Sanding usually progresses through a deliberate grit sequence such as 80 grit for initial shaping, 180 grit for surface refinement, and 320 grit for final pre-prime preparation. That progression helps remove coarse scratches from the previous step while preserving the panel shape. Skipping from very coarse to very fine paper may save time in the moment, but it often leaves hidden texture that shows up after primer and paint are applied, especially on high-gloss RV sidewalls where reflections are unforgiving.
After the panel is straight and the surface profile is correct, the finishing stack follows: primer, sealer, basecoat, and clearcoat. Each of those materials has its own flash times, temperature windows, and compatibility requirements. That is one reason a structural fiberglass repair does not move like a simple cosmetic bumper repair on a car. The bodywork and paint stages are connected, and the quality of the final finish depends heavily on whether the laminate beneath it was allowed to cure and stabilize first.
Time is where many expectations break down. If each structural layer adds roughly 24 hours of cure time in 70°F conditions before the next major step can proceed safely, the calendar expands quickly. A proper fiberglass repair on a three-square-foot area can realistically take 5 to 7 days minimum, even before broader scheduling factors are added. That timeline is not evidence that the shop is slow. It is evidence that the shop is allowing the material to do what it needs to do before locking the repair under primer and paint.
Roofing materials like TPO and EPDM also demand specialized knowledge. Many RV owners seek body shop help after a branch scrape or hail damage. As we detail in our guide on hail damage on rv roofs repair vs replacement options, the seal between the roof and the sidewall is the most common point of failure for water intrusion. A professional RV body shop won't just patch a hole; they will ensure the entire transition from the roof to the painted sidewall is chemically bonded and waterproofed according to manufacturer standards.
Navigating Insurance Claims for RV Paint and Body Work
Insurance claims for RVs are notoriously more complex than standard auto claims. Because RVs are often insured through specialized policies (like those from Progressive, GEICO, or USAA RV divisions), the adjusters may not be local, and the valuation of the repair can be highly technical. A shop that is experienced in the Inland Empire market knows how to document "hidden damage" that often occurs in RV collisions, such as tweaked frame rails or compromised interior cabinetry.
At RVCCR, we act as a liaison between the owner and the insurance carrier. We provide detailed, photo-documented supplements that explain exactly why a specific repair method or OEM part is required. For example, if your vehicle is a Tesla-certified repair candidate, we ensure the insurance company understands the Tesla certified collision repair what EV structural safety actually requires so that no safety corners are cut. Our goal is a hassle-free experience where the only thing you have to worry about is planning your next trip.
We provide free estimates and work with all major carriers, but we never sacrifice the quality of the repair for the sake of the insurance company's bottom line. Our written lifetime warranty is our commitment to you that the work was done correctly, regardless of the complexity of the claim.
The 2026 RV Insurance Claim Timeline: What to Expect
One of the most helpful things a repair facility can do for an RV owner is replace vague promises with a realistic sequence of events. In 2026, a moderate RV collision repair usually moves through a claim timeline that is measured in weeks, not days. That does not automatically mean the shop is delaying your vehicle. It usually means the claim, parts, booth access, structural work, and final verification all have to line up in the right order.
The first step is the initial adjuster visit, which commonly happens around day 1 through day 3 after the claim is opened, depending on the carrier and whether the inspection is in person or based on photo documentation. For RVs, this early estimate is often only a starting point. Large coaches hide damage behind baggage doors, molded caps, interior panels, and mechanical compartments, so the first estimate frequently does not capture the full scope.
That is why teardown and blueprinting typically follow around day 3 through day 7. During this phase, the shop removes damaged trim, opens affected areas, verifies parts needs, and documents any hidden structural or systems-related damage. Blueprinting is where the repair plan becomes real. It is also where many timelines shift because the shop now has evidence for items that were not visible during the initial insurance inspection.
Once teardown is complete, supplement submission commonly lands around day 7 through day 10. A supplement is the shop's formal request for approval of additional operations, parts, labor, or materials that were not included in the original estimate. On an RV claim, that can include hidden fiberglass damage, mounting structure issues, compartment hardware, lighting components, or sublet calibrations that only became clear after disassembly. Carrier response times vary, but this approval stage is one of the most common reasons customers feel a repair has "stalled" when the vehicle is actually waiting on claim authorization.
Parts ordering often begins in earnest after approvals are in place, and this is where 2026 timelines can widen dramatically. Depending on the part, ordering can run from roughly day 10 out to 18 weeks. Commodity items may arrive quickly. RV-specific panels, molded caps, baggage doors, graphics, lighting assemblies, or chassis-related components can take much longer, especially when they come from low-volume suppliers or require manufacturer release. This is one of the central reasons why a moderate RV collision repair can stretch well beyond a standard passenger-vehicle timeline.
Paint scheduling is another step owners do not always see coming. Even after body and parts are ready, an oversized booth often has its own queue. For a shop handling full-size RV refinishing correctly, a 2- to 3-week lead time to secure a large-booth slot is not unusual. That is especially true when the repair involves full-side paint, cap refinishing, or extensive blend work that ties up the booth longer than a standard car cycle.
Repair execution itself may take 1 to 2 weeks depending on the damage. That window can include structural repair, fiberglass layup, panel fitting, primer work, paint application, cure cycles, and any mechanical or electrical reinstallation tied to the damaged area. After the main repair is complete, final reassembly and testing commonly add another 3 to 5 days. This is the point where lights, cameras, radar systems, compartment seals, trim fit, slide function if affected, and finish quality all need to be verified before delivery.
The delivery date therefore varies based on how each earlier stage moved. For a moderate RV collision repair in 2026, a realistic total timeline is often 6 to 14 weeks. Some jobs land near the short end when parts are available and damage is straightforward. Others move toward the longer end when supplements, specialty parts, booth scheduling, or calibration steps add time. The most trustworthy shops are the ones that explain this sequence clearly at the beginning instead of offering an unrealistic promise that creates frustration later.
Turnaround Realities: Managing Expectations for Large-Scale RV Repairs
One of the most difficult conversations in the RV repair industry involves timelines. Because of the size of the vehicles and the complexity of sourcing specialized parts, RV repairs naturally take longer than standard car repairs. However, a trustworthy shop will provide a realistic timeline rather than an overly optimistic one just to get the job.
Factors that influence RV repair turnaround times include:
- Parts Availability: Many RV components are manufactured in small batches or are specific to a particular model year.
- Curing Times: The sheer surface area of an RV means that paint and clear coats require more time to flash and cure in a controlled environment.
- System Testing: After the body work is complete, we must test all integrated systems (lights, sensors, slide-outs) to ensure everything is functioning correctly.

While we strive for efficiency, we prioritize a "right the first time" approach. A rushed repair on a motorhome is a recipe for future leaks and structural issues. We keep our Inland Empire customers updated throughout the process, providing transparency on parts delivery and repair stages so you can plan your travels with confidence.
Choosing the Right Partner for Your RV Restoration
The Inland Empire offers many choices for vehicle repair, but for the RV owner, the stakes are significantly higher. You are looking for a shop that has invested in the infrastructure of 60-foot booths, the technology of ADAS calibration, and the specialized training of RVDA-certified technicians. You are looking for a partner that understands the difference between a "repair" and a "restoration."
At RVCCR, we bring 21 years of family-owned integrity to every job, combining the precision of a high-end auto body shop with the specialized knowledge of an RV service center. We don't just fix fiberglass and spray paint; we restore the safety, value, and beauty of your mobile sanctuary.
Your next great adventure shouldn't be sidelined by a subpar repair. Contact our Redlands team today to schedule your free estimate and experience the difference that certified expertise makes. Let’s get your RV back to factory specifications so you can focus on the road ahead.
Drive your restored motorhome toward the horizon with total peace of mind. Reclaim your travel freedom with a repair that stands the test of time. Reach out to RVCCR today and let us bring your RV back to its pristine, road-ready condition.
Need a repair estimate?
Skip the wait — send us a few photos and our team will get back to you fast.
Start a Photo Estimate →