RV Underbelly Repair After a Collision: What’s Hidden Beneath the Protective Layer
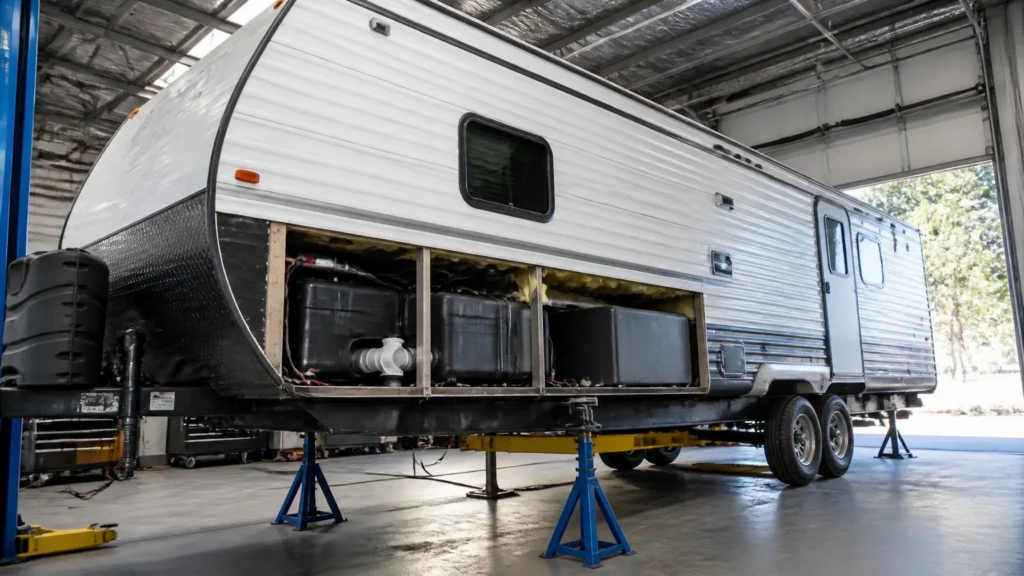
RVCCR is an RVDA-certified, family-owned collision and repair facility serving Redlands and the Inland Empire for 21 years. Our team handles RV collision repair, paint, structural work, and mechanical inspections under one roof, with a written lifetime warranty and coordination with major insurance carriers. When a motorhome or travel trailer is involved in a collision, our inspection goes beyond the visible fiberglass, trim, bumper, or frame damage. The protective layer beneath the RV may be hiding damage to tanks, wiring, plumbing, insulation, and support components…
That hidden area is easy to overlook because the underbelly is designed to keep systems enclosed and protected from road debris, weather, and exposure. After an impact, however, a torn or displaced underbelly can allow moisture, dirt, and road spray to reach components that were never intended to remain exposed. The right repair begins by determining what happened behind the membrane: not by simply covering the tear and sending the RV back to the road…
Why the RV underbelly deserves a complete collision inspection
The RV underbelly is the protective enclosure installed beneath portions of the floor and frame. Depending on the RV’s design, it may be made from corrugated polypropylene commonly called Coroplast, a fabric-like membrane, fiberglass or composite panels, metal, or a combination of materials. The exact construction varies by manufacturer, model, floor plan, production year, and optional cold-weather package.
The underbelly itself is not automatically a structural frame component. Its job is generally to enclose and protect the systems routed beneath the floor. Those systems can include:
- Fresh-water, gray-water, and black-water tanks
- Water lines and drain plumbing
- Electrical wiring and sensor harnesses
- Tank-heater wiring or other freeze-protection equipment
- Insulation and reflective barrier materials
- Furnace ducting or other system-specific components
- Tank straps, brackets, crossmembers, and support hardware
- Portions of the frame, suspension, and body mounting structure
Manufacturer documentation shows why the construction should not be assumed. A Forest River training manual, for example, describes an enclosed underbelly with insulation and explains that tanks, plumbing, and wiring may be positioned within protected layers. Keystone’s owner resources separately address water systems, holding tanks, winterization, and model-specific features. The important point is simple: the visible membrane does not tell the whole story.
A minor-looking impact can push the underbelly upward, tear it open, deform a tank support, or pull a wiring harness tight. A collision near the front of a travel trailer can transfer force through the A-frame and crossmembers. A side impact can affect the floor edge, wheel-well area, tank supports, and wall-to-floor connection. A rear impact can damage the frame extension, bumper structure, sewer outlet, and plumbing routed nearby.
That is why RV collision repair in the Inland Empire should include a documented underbody inspection whenever the impact reaches the lower body, frame, wheel area, hitch, or floor…
What the underbelly protects
Plumbing and holding tanks
RVs commonly use separate tanks and plumbing systems for fresh water and wastewater. The tank material, shape, support method, and location vary by unit. Some tanks are held by straps, brackets, crossmembers, or a shaped support structure. Others may be supported by a combination of the floor, frame, and surrounding components.
A collision can cause damage that is not immediately visible from outside. Possible findings include:
- A cracked or punctured tank
- A pulled tank fitting
- A damaged drain valve
- A shifted tank support
- A broken or stretched water line
- A drain pipe pulled away from its connection
- A plumbing line pinched against the frame
- A damaged sewer outlet or termination assembly
- A tank heater pad or wiring connection pulled loose
A tank may not leak while the RV is parked if it is empty. The damage may become apparent only after the tank is filled, the water pump is used, or the unit is driven over uneven pavement. For that reason, a proper inspection considers both physical condition and system operation.
A repair facility should identify the tank locations before removing support hardware. Tanks can be heavy when filled, and the underbelly may share fasteners with brackets or crossmembers. Removing panels without understanding how the components are supported can create additional damage.
Owners can review manufacturer-specific tank and plumbing information through resources such as Keystone’s official owner manuals or Forest River’s owner manual and component resources. These resources are useful for understanding operation and equipment, but they may not provide the exact collision-repair layout for a particular VIN.
Wiring and sensor harnesses
Electrical wiring under an RV may serve lighting, tank-level sensors, brakes, slide systems, leveling equipment, furnace components, tank heaters, or other systems. The wiring may be routed along the frame, through protected spaces, or between insulation layers.
A collision can:
- Stretch a harness
- Pull a connector from its mounting point
- Cut wiring against a sharp edge
- Crush a conduit or loom
- Separate a ground connection
- Damage wiring near the tank or wheel area
- Expose conductors to water and road debris
- Leave a harness hanging near a tire, suspension part, or exhaust component
A wire that still powers a light may not be fully undamaged. Some circuits can remain functional while the insulation has been cut or a connector has been weakened. A proper inspection documents the routing, checks for abrasion and crushing, and verifies affected functions before the underbelly is closed.
Wiring should also be secured away from moving suspension components, hot exhaust parts, sharp frame edges, and areas where a new panel or fastener could pinch it. The final routing must match the RV’s original design or an approved repair plan for that model.
Insulation and thermal protection
Many RVs use insulation, reflective barriers, heated enclosures, furnace ducting, or tank-heater systems beneath the floor. These features differ widely. A collision may crush, tear, wet, or displace the insulation without producing a visible problem inside the living area.
Crushed insulation may no longer occupy the intended cavity. Wet insulation can retain moisture against wood, metal, wiring, or other materials. A torn reflective layer may leave a section less protected than it was when manufactured. If a tank-heater wire or pad is damaged, the owner may not know until cold-weather use.
The repair should identify the original materials and restore the system in a way that is compatible with the RV’s construction. “Adding more insulation” is not always the correct answer. Insulation must not block required ventilation, interfere with furnace ducting, trap water, cover a service access point, or contact components that require clearance.
Frame and support components
The underbelly can conceal portions of the frame, crossmembers, tank brackets, suspension attachments, and body supports. These parts deserve attention because the membrane may be damaged as a result of movement underneath it.
Signs that the underlying structure needs more investigation include:
- A panel pushed upward or downward
- Torn fastener holes
- A crossmember that is bent or displaced
- New contact marks on the tank or plumbing
- A tank that sits lower or at a different angle
- Cracked welds or pulled brackets
- Uneven gaps between the underbelly and frame
- Tire, suspension, or exhaust contact marks
- A trailer that no longer tracks properly
For motorhomes, the underbelly inspection may connect to a broader chassis and body evaluation. For towables, it may connect to the trailer frame, axles, spring hangers, tongue, and body structure. Our previous article on motorhome frame straightening and chassis inspection explains why frame condition should be addressed before cosmetic work is treated as complete.
Common types of underbelly collision damage
Torn or crushed Coroplast
Corrugated polypropylene panels are lightweight and practical, but they can tear around fasteners, split at folds, or deform when struck by road debris or collision forces. A small puncture may be repairable if the surrounding panel remains secure and the material has not lost its shape. A broad tear, crushed section, or stretched mounting edge may require panel replacement rather than tape alone.
Tape can be useful for limited, clean, dry repairs. It is not a substitute for correcting a bent support, replacing damaged insulation, or repairing a tank leak. A patch installed over a loose or wind-catching panel may fail during travel.
Displaced insulation
Insulation can be pushed out of position when the underbelly is torn or when an impact shifts a tank or support. It may also become contaminated with water, oil, or road debris. A technician should determine whether the material can be dried and repositioned or whether it needs to be replaced.
The repair should preserve access to components that may require future service. Closing the underbelly permanently over a damaged valve, disconnected wire, or leaking fitting can make the next repair more invasive and expensive.
Damaged tanks and tank supports
Tanks can crack from direct impact, movement against a sharp bracket, or stress at a fitting. Supports can bend or pull loose even when the tank shell appears intact. If the support geometry changes, the tank may sag, rub against the frame, or place stress on connected plumbing.
The tank, mounting hardware, plumbing, and surrounding frame should be evaluated together. Replacing only the visible panel does not restore the system if the tank or support is compromised.
Moisture intrusion
An open underbelly can allow water to enter from rain, washing, road spray, or condensation. A damaged panel can also direct water toward insulation, floor materials, wiring, and tank supports.
Moisture inspection should look beyond the outer panel. The technician may need to examine the underside of the floor, insulation, wood or composite components, fastener areas, and nearby electrical connections. If water damage is found, the repair plan should separate collision damage from pre-existing deterioration and document both conditions accurately.
Displaced or exposed wiring
A collision can pull wiring from its original clips or leave it resting against the underside of the new panel. Before closure, the harness should be inspected for cuts, crushed sections, loose terminals, and grounding concerns. A final test should cover all affected circuits rather than relying on one light or one switch.
Damage around the wheel and suspension area
The wheel area experiences road spray, movement, and heat. If the impact occurred near a wheel well, the underbelly should be checked for tire contact, broken fasteners, torn panels, damaged brake wiring, shifted plumbing, and suspension-related movement.
A panel that appears to fit while the RV is stationary may contact a tire or suspension component once the unit moves. Clearance must be evaluated under appropriate operating conditions.
The inspection and repair process
A proper underbelly restoration is a sequence of inspection, documentation, repair, testing, and closure. The exact steps vary by RV design and collision severity, but owners should expect a process similar to the following.
1. Initial safety and damage assessment
The repair team first evaluates whether the RV can be moved safely. This may include checking tires, wheels, suspension, hitch components, frame condition, fluid leaks, electrical hazards, and loose exterior material.
An RV should not be driven simply because it still starts or can be pulled a short distance. A loose underbelly, leaking tank, damaged brake wire, or compromised frame component can worsen during transport.
2. Photographs and pre-teardown documentation
Before removal, the shop should photograph the damaged areas and record the location of visible tears, fasteners, wiring, plumbing, supports, and impact marks. This documentation helps establish the relationship between the collision and the hidden damage found later.
Good photographs should show:
- The overall underside and affected area
- Damage in relation to the frame and axle
- Torn or missing fasteners
- Tank and plumbing locations
- Wiring routing and connector condition
- Insulation displacement or moisture
- Contact marks and deformation
- Manufacturer labels or component identification where available
This record supports both repair planning and insurance communication.
3. Controlled removal of the damaged membrane
The underbelly may be removed completely, dropped in sections, or opened only where access is needed. The approach depends on the damage and the construction.
A technician should identify fasteners and support points before cutting or loosening the panel. Careless removal can damage wiring, plumbing, insulation, or the membrane that could otherwise have been reused. If the panel is being replaced, the original piece may still be useful as a template for shape, penetrations, and fastener locations.
4. Inspection of hidden components
Once access is available, the shop documents damage to the frame, supports, tanks, plumbing, wiring, insulation, and adjacent floor structure. The inspection should distinguish:
- Collision-related damage
- Pre-existing wear or deterioration
- Damage caused by exposure after the collision
- Components that remain serviceable
- Components requiring repair or replacement
- Items requiring manufacturer-specific instructions
This is the point at which the initial estimate may change. A visible lower-panel repair can become a more extensive restoration if the tank support, wiring, or floor area was also affected.
5. Repair or replacement of damaged components
The repair plan may include:
- Straightening or replacing damaged supports
- Replacing cracked tanks or fittings
- Repairing or replacing affected plumbing
- Repairing or securing wiring and connectors
- Replacing wet, crushed, or contaminated insulation
- Restoring tank-heater components when equipped
- Repairing frame or crossmember damage
- Replacing damaged fasteners and mounting hardware
- Correcting sharp edges or contact points
Component replacement should be based on the RV’s design and available manufacturer information. A universal part may not be appropriate for every tank, fitting, bracket, or insulation system.
6. Restoring the protective membrane
The replacement panel or membrane should fit the original area without creating new contact or drainage problems. The shop should account for:
- Panel thickness and material
- Existing bends and contours
- Fastener locations
- Access panels and service openings
- Plumbing and wiring penetrations
- Clearance from tires and suspension
- Drainage and water-shedding paths
- Seams and overlaps
- Protection from wind lift during travel
The goal is not merely to make the underside look closed. The repaired panel must remain secure and protect the systems it encloses.
7. Sealing and finishing penetrations
Any opening around plumbing, wiring, drains, or fasteners should be addressed with compatible materials. Sealants and tapes vary in adhesion, flexibility, temperature resistance, and compatibility with the membrane or adjacent surfaces.
The correct product depends on the RV manufacturer’s materials and the location of the joint. The repair should avoid sealing water into a cavity or blocking an intentional drain path. Sealant should not be used to conceal an unsecured panel or replace missing structural support.
8. System testing and final inspection
Before the underbelly is closed: and again afterward: the affected systems should be checked. Depending on the RV, this may include:
- Fresh-water system pressure and leak checks
- Drain and holding-tank inspection
- Tank-level sensor operation
- Exterior lighting
- Brake and running-light wiring on towables
- Furnace or underbelly heat operation where applicable
- Tank-heater operation where equipped
- Slide, leveling, or generator-related systems if affected
- Clearance from tires, suspension, and exhaust
- Securement of all restored panels and fasteners
The final inspection should confirm that the repaired underbelly does not sag, flap, rub, expose wiring, obstruct service access, or leave unsealed openings.
Coroplast versus fiberglass underbellies
Owners often ask whether Coroplast or fiberglass is better. In collision repair, the more useful question is which material the RV was designed to use and what condition the surrounding structure is in.
Corrugated polypropylene or Coroplast
Corrugated polypropylene is lightweight, flexible, and commonly used as an underbelly panel. It can be cut and formed around components, and individual sections may be replaceable. It can also tear around screws, deform from impact, and separate at unsupported seams.
A proper repair may involve replacing a whole panel, installing a correctly sized section, restoring support at the edges, and sealing penetrations. The panel must be fastened so the material does not pull through or become loose under road airflow.
Fiberglass or composite panels
Fiberglass or composite underbelly materials may provide a more rigid enclosure and can be integrated with other body or floor structures. They can crack, delaminate, splinter, or break around mounting points after an impact. A cosmetic patch may not restore the panel’s original strength or weather protection.
The technician must determine whether the panel is an independent protective cover or part of a larger floor or body assembly. If it is bonded, laminated, or connected to adjacent structure, repair methods and materials become manufacturer- and construction-specific.
Fabric and other membrane systems
Some RVs use flexible fabric-like materials or layered membranes. These may require different repair tapes, adhesives, fasteners, or replacement methods than rigid plastic or fiberglass. The material should be cleaned, dried, and repaired with products compatible with its surface.
The underbelly material is not interchangeable simply because two products appear similar. Replacing a factory system with an unsuitable material can affect clearance, sealing, drainage, access, and durability.
Why hidden underbelly damage matters to an insurance claim
Collision estimates are often prepared in stages. The initial inspection may identify visible body damage, but underbelly components may not be accessible until trim, panels, or damaged exterior sections are removed.
When hidden damage is found, the shop may prepare a supplement for the insurer. A supplement is not automatically an inflated estimate. It is a request to account for additional collision-related damage or necessary operations discovered during a documented teardown.
Useful supplement documentation can include:
- Before-and-after photographs
- Teardown photographs
- Measurements
- Part identification
- Descriptions of broken or displaced components
- Plumbing or pressure-test findings
- Wiring-test results
- Tank and support condition
- Insulation and moisture findings
- Labor required to remove and reinstall access panels
- Manufacturer instructions or model-specific information
- Reasons a patch is insufficient
- Final testing and quality-control notes
Insurance coverage, deductibles, policy language, and claim decisions vary. The repair facility can document the physical condition and communicate the repair requirements, but the insurer determines coverage and authorization under the applicable policy.
Owners should avoid authorizing closure of the underbelly before hidden-damage questions are resolved. Once the area is closed, additional inspection may require more disassembly and can make it harder to show what was found.
What owners should expect from a proper restoration
A professional underbelly repair should leave the RV ready for its intended use: not merely presentable in a parking lot. Before accepting the completed repair, ask whether the shop can explain:
- What underbelly material was used originally?
- Which portions were repaired, and which were replaced?
- Were the tanks and tank supports inspected?
- Was the plumbing checked for leaks or pulled fittings?
- Was the wiring inspected and secured away from hazards?
- Was damaged or wet insulation replaced?
- Were frame, crossmember, axle, or suspension areas examined?
- Were seams, penetrations, and fasteners restored?
- Were affected systems tested after the repair?
- Are photographs and supplement documentation available?
- Which manufacturer information was used for model-specific components?
- What written warranty applies to the completed work?
A reputable repair plan should also explain what could not be verified without additional manufacturer information or further disassembly. Clear limits are better than unsupported assurances.
If you are searching for travel trailer repair near me after a collision, choose a facility that understands the trailer as a complete system. The right shop should be prepared to evaluate the hitch, frame, body, tanks, plumbing, wiring, insulation, and protective enclosure together. Our guide to the travel trailer collision repair and restoration process explains why towable RV repairs often involve more than exterior fiberglass and paint.
When to stop using the RV
Do not continue towing or operating the RV if you notice:
- A loose or dragging underbelly
- Water, sewage, or fresh-water leakage
- Exposed wiring
- A panel touching a tire
- A damaged hitch or tongue
- A sagging tank or support
- New tire contact marks
- A trailer that tracks unevenly
- A frame member that appears bent or cracked
- A strong electrical, fuel, or burning odor
- A slide, leveling system, or door that changed operation after the impact
For commercial motor vehicles, federal regulations address the requirement that frames and chassis remain in safe structural condition. The relevant standards in 49 CFR § 393.201 apply in their defined regulatory context and should not be treated as a universal private-RV collision manual. For any RV, however, a suspected structural or underbody problem deserves professional evaluation before the unit returns to the road.
Owners can also check the NHTSA safety-issue search for recalls or investigations involving a specific RV, trailer, or chassis. Recall information is model-specific; it does not replace a collision inspection.
The goal is a safe return to the road
Your RV’s underbelly may be out of sight, but it is connected to the systems that make the unit usable, comfortable, and towable. A torn membrane can be the first visible sign of damage to a tank, support, wire harness, plumbing line, insulation layer, or frame component. Covering that opening without investigating what moved underneath can turn a collision repair into a leak, electrical problem, towing concern, or second repair later.
RVCCR combines RV collision repair, body and paint work, structural inspection, and mechanical service in one facility in Redlands. Our team works with major insurance carriers, provides free estimates, and backs completed work with a written lifetime warranty. We document what we find, explain what the repair requires, and restore the protective layer only after the hidden components have been evaluated.
Bring your motorhome or travel trailer to a certified team that looks beneath the surface. We will inspect the damage, identify the necessary repairs, and help you move toward the next trip with confidence: so your RV can protect the adventure instead of becoming the reason it stops.
Need a repair estimate?
Skip the wait — send us a few photos and our team will get back to you fast.
Start a Photo Estimate →