Tesla-Certified Collision Repair: What EV Structural Safety Actually Requires After a Crash
When a Tesla enters a collision, the physics of the impact differ fundamentally from those of a traditional internal combustion engine vehicle. It isn’t just the lack of a heavy engine block in the front or the presence of a massive battery pack in the floor: it is the way the entire aluminum and cast-steel architecture is designed to shed energy. If that structure is compromised, simply pulling the metal back into shape with a traditional frame machine isn't just difficult; it is technically prohibited by the manufacturer.
The integrity of a modern Electric Vehicle (EV) relies on a rigid safety cell and highly specific "crush zones" that must be restored to exact factory tolerances to ensure that, in the event of a second accident, the car performs exactly as the engineers at Tesla intended. For owners in Redlands and the wider Inland Empire, understanding what happens beneath the paint after an accident is the difference between driving a safe vehicle and a rolling liability. Because when it comes to the structural safety of an EV, "close enough" is never good enough…
Tesla owners also face a second layer of complexity after a crash: the repair process has to protect not only visible fit and finish, but also the exact structural pathways that manage battery protection, occupant survival space, and sensor alignment. A vehicle can look repaired on the outside while still being wrong underneath. That is why Tesla collision work is not simply "body work" with a different badge on the hood. It is a tightly controlled structural and electronic restoration process that depends on model-specific procedures, approved parts replacement methods, correct joining techniques, and post-repair verification.
That matters because Tesla designs its vehicles around controlled energy management. The front and rear structures, rocker areas, floor sections, crossmembers, and suspension attachment points are engineered to deform in a planned sequence. The battery enclosure adds stiffness to the body, but it also raises the stakes: if impact loads are redirected the wrong way in a future collision, the vehicle may not behave the way it did when it met factory safety performance targets. The Insurance Institute for Highway Safety (IIHS) evaluates crashworthiness and crash avoidance based on how a vehicle performs as designed. A repair that changes structural geometry or joining strength can undermine that intended performance even if the car drives straight and the panels line up.
For that reason, Tesla-certified repair is about restoring measured dimensions, approved attachment methods, and validated system functionality, not guessing. The difference sounds subtle until you see what modern Tesla construction actually involves…
The Anatomy of an EV: Why Aluminum and Castings Change Everything
Traditional cars are largely made of high-strength steel. When steel is bent in an accident, it can often be "pulled" back to its original dimensions using hydraulic rams and chains. Steel has a memory, and while it loses some strength when bent, it is a relatively forgiving material for traditional body shops.
Tesla, however, has pioneered the use of aluminum extrusions and, more recently, massive "Giga-Castings." These components are designed for extreme rigidity and weight savings, but they behave very differently under stress.
Tesla’s Structural Design: Traditional Framing vs. Cast Architecture
A conventional unibody vehicle typically uses many stamped pieces that are welded together to form rails, aprons, pillars, floor sections, and reinforcement zones. That older approach gives repairers more sectional options because the structure is built from numerous smaller parts with more conventional replacement seams. Tesla moved much of its engineering in a different direction. Depending on model and production generation, the vehicle may combine aluminum sheet, aluminum extrusions, ultra-high-strength steel in select areas, and very large cast nodes or underbody castings that consolidate what used to be dozens of separate components.
That casting-based strategy changes how crash energy is routed and how repairs must be planned. When many pieces become one integrated casting, the number of joints goes down, manufacturing consistency can improve, and overall stiffness can increase. But the repair tradeoff is obvious: if a single large casting is damaged, the shop cannot treat it like a collection of small, replaceable steel stampings. Damage assessment becomes more exacting, replacement planning becomes more model-specific, and the need for factory procedures becomes non-negotiable.
This is where the difference between a general body shop and a Tesla and EV certified facility becomes real. Tesla structural repair procedures are built around how each section was designed to perform in a crash, not around what a shop would prefer to do for speed or convenience. Cast structures, bonded joints, and mixed-material assemblies do not leave much room for improvisation.
The Problem with "Pulling" Aluminum
Tesla’s official body repair manuals are explicit: you cannot pull or push structural body components back into place using traditional frame-straightening equipment. Aluminum is a "work-hardening" material. This means that once it is deformed in a crash, the molecular structure changes. If a shop attempts to pull it back, the material becomes brittle or may even develop microscopic cracks that are invisible to the naked eye.
In a subsequent collision, these weakened areas will not manage energy correctly. Instead of folding and absorbing the impact, a "pulled" aluminum rail might snap, sending crash forces directly into the passenger cabin. This is why a certified collision repair shop will always follow Tesla’s mandate: if a structural aluminum component is bent beyond very specific, minor tolerances, it must be replaced, not repaired.
The same logic applies to mixed-material joining zones. If a section was originally engineered to work with a precise combination of geometry, adhesive thickness, rivet spacing, and heat-controlled joining methods, then restoring shape without restoring material integrity does not return the vehicle to pre-loss condition. It only makes the damage less visible.
The Rise of the Giga-Casting
One of the most significant advancements in automotive manufacturing is the Tesla Giga-Press, which creates massive single-piece front and rear underbody castings. In a traditional car, these areas might be made of 70 or 80 individual stamped steel pieces welded together. In a Model Y or Model 3, it’s one giant piece of cast aluminum.

If this casting is cracked or significantly deformed, it cannot be "straightened." There is no factory-approved method to weld a cracked structural casting or to pull a deformed one. This requires a shop that is not only Tesla and EV certified but also equipped with the specialized heavy-duty lift and bench systems required to replace such a massive, integral part of the car's spine.
Just as important, large castings change the way damage propagates. A visible hit at the rear body may transfer energy into suspension pickup points, battery-adjacent structure, or adjoining bonded sections that are not obviously wrinkled at first glance. Proper blueprinting means measuring the entire repair zone, checking factory reference points, identifying whether adjacent service parts are available as replaceable sections, and following Tesla’s cut-and-replace boundaries exactly. On a cast-intensive vehicle, there is less tolerance for "we can make that work."
Why Tesla’s Structural Layout Raises the Stakes for Safety
Tesla’s battery pack sits low in the chassis and contributes to overall rigidity, center of gravity, and crash behavior. That design has clear benefits, but it also means collision damage can involve a larger system than just the visible impact area. Deformation around rocker panels, side structures, lower rails, and underbody areas can influence how loads travel around the battery enclosure. The repair plan therefore has to protect both occupant safety and the battery’s structural environment.
That is one reason post-repair structural accuracy matters so much in relation to IIHS crashworthiness concepts. IIHS testing looks at occupant protection, roof strength, side impact performance, head restraint effectiveness, and crash avoidance technologies as part of a broader safety picture. Those outcomes depend on the vehicle retaining its intended structural pathways and sensor functionality. A repair that departs from OEM procedures can compromise the very systems and structures that helped the vehicle perform well in the first place.
In practical terms, that means owners should ask hard questions after a crash:
- Is the damaged section repairable under Tesla procedure, or replacement-only?
- Does the repair involve a casting, an extrusion, a bonded joint, or a conventional stamped service part?
- Is the vehicle being measured on approved equipment with model-specific reference data?
- Will the shop perform Tesla-required diagnostic steps before, during, and after repair?
Those are not technical niceties. They are the difference between cosmetic restoration and true structural restoration.
The Invisible Safety Net: Structural Adhesives and Specialized Welding
Beyond the metal itself, the way a Tesla is held together is a masterclass in modern engineering. While traditional shops rely heavily on MIG welding (Metal Inert Gas), a Tesla is largely a "rivet-bonded" structure. This means the car is held together by a combination of high-strength aerospace-grade adhesives and specialized self-piercing rivets.
Why Adhesive Matters
When we perform a collision repair on a Tesla at RVCCR, we aren't just looking at the bolts. We are looking at the "bond line." Structural adhesives distribute the load of a crash across the entire surface of the joint, rather than concentrating it at a single weld point.
Tesla is incredibly strict about the adhesives used. Using a generic shop adhesive could lead to "bond failure" during a collision. Our technicians are trained to use only Tesla-approved structural adhesives, ensuring that the chemical bond between new and existing parts is identical to the one created on the assembly line in Fremont or Austin.

Structural adhesive use is also more technical than many drivers realize. It is not enough to choose the right product name. The repair has to follow the approved substrate preparation, corrosion protection steps, bead location, adhesive thickness, open time, clamp or fixture strategy, and cure requirements. If the mating surfaces are contaminated, if the adhesive is applied outside temperature limits, or if the panel is moved before full cure, the resulting joint may not deliver the designed load distribution.
In mixed-material vehicles, adhesives do more than hold parts together. They can reduce galvanic corrosion risk between dissimilar metals, limit localized stress concentration, contribute to stiffness, and support energy management across a broader section of the body. That is why Tesla-specific repair procedures define where structural adhesive is mandatory, where it must be paired with rivets or welds, and where replacement seams are allowed. Skipping or substituting these steps is not a harmless shortcut.
Bonding, Riveting, and Sectioning Have to Work Together
On many Tesla repairs, the joint design is a system. The adhesive provides continuous load sharing. The self-piercing rivets provide mechanical retention and immediate positioning. In permitted areas, welds may supplement the assembly where the procedure calls for them. But those joining methods are not interchangeable. A shop cannot simply decide that more weld is better, or that a universal adhesive is close enough, or that one fastener pattern can replace another.
Correct bond-line management includes:
- Cleaning and preparing the mating surfaces exactly as specified
- Applying the approved structural adhesive in the proper location and amount
- Installing rivets in the prescribed sequence and spacing
- Observing working time and cure time requirements
- Protecting the repaired area from corrosion and contamination
- Verifying that adjoining panels, reinforcements, and sealing materials are restored correctly
That level of control is one reason Tesla certification matters. Shops need the training, tooling, and procedural discipline to reproduce the OEM joining strategy instead of substituting generic body shop habits.
Specialized Welding Requirements
In the few areas where welding is permitted, Tesla requires specific GMA (MIG) and STRS (spot) welders that meet their power and precision standards. Using an underpowered or non-approved welder can lead to "cold welds" that look fine on the surface but lack the structural penetration needed to hold up under the massive torque and weight of an EV’s battery-heavy frame.
Welding on a modern Tesla is also constrained by material type and heat sensitivity. Aluminum, ultra-high-strength steel, and adjoining bonded structures each react differently to heat input. Too much heat can distort panels, damage coatings, weaken nearby material properties, or interfere with surrounding adhesives and sealers. Too little heat can leave incomplete fusion. That is why OEM repair procedures define where welding is allowed, what equipment is acceptable, what preparation steps are required, and which areas are replacement-only.
For owners, the takeaway is simple: if the structure originally depended on adhesive bonding, rivets, and carefully controlled replacement seams, the repair has to replicate that system. There is no safe version of "close enough" here.
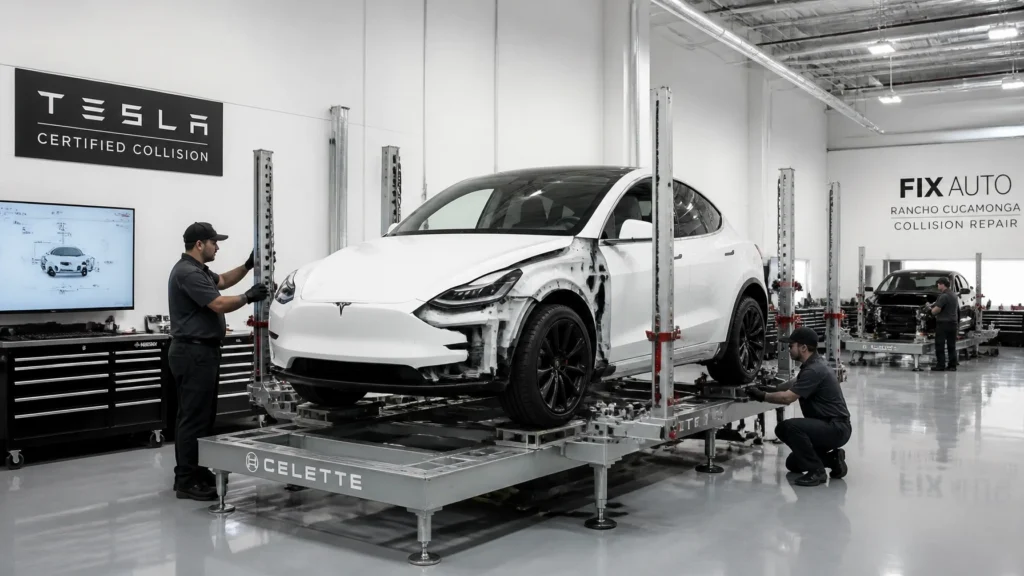
The Bench: Why 8-Point Fixturing is Mandatory
One of the biggest differences between a generic body shop and a Tesla-certified facility is the equipment used to hold the car during repair. Because EVs are so rigid, they must be mounted on a specialized "frame bench" using at least eight holding fixtures.
Most traditional shops use "pinch weld" clamps that grab the car in four places. For a Tesla, this isn't enough. Without the 8-point fixturing system, the weight of the battery pack could actually cause the frame to sag or twist while it’s being worked on, leading to a car that is "out of square."
If a car is out of square by even a few millimeters, the doors might not seal correctly, the glass might crack under stress, and most importantly, the Advanced Driver Assistance Systems (ADAS): including Autopilot and Full Self-Driving sensors: will not be able to calibrate correctly.
Fixturing also supports proper section replacement. When a rail, apron, body side area, or underbody component is removed, the rest of the shell has to remain dimensionally stable. That matters even more on a Tesla because large cast sections and bonded assemblies rely on exact positional relationships. The bench is not just a place to hold the car; it is the reference platform that keeps the repair aligned with OEM dimensions while damaged components are cut away and new parts are installed.
A serious structural repair typically includes:
- Pre-repair measuring to document displacement
- Controlled mounting on approved bench and fixture points
- Ongoing dimensional verification during removal and installation
- Confirmation that suspension and body reference points return to specification
- Post-repair checks before calibration and final assembly
If any of those steps are skipped, the shop may still produce acceptable panel gaps while missing a deeper structural problem. That is not a risk worth taking on a vehicle whose safety systems depend on exact geometry.
ADAS and Electronic Integrity: The New Frontier of Safety
A "structural" repair on a Tesla isn't finished once the metal is straight. Because Teslas are essentially computers on wheels, every camera, radar, and ultrasonic sensor is tied into the vehicle's structural geometry.
If a front rail is replaced and is off by just 2 millimeters, a camera mounted on that rail will be "looking" at a slightly different angle than the car’s software expects. At 65 mph on the I-10, that 2-millimeter error could translate into the car miscalculating the distance to the vehicle in front of you by several feet.
Tesla-certified shops must perform a full ADAS calibration after any structural work. This involves specialized targets, laser levels, and proprietary Tesla software to ensure the "eyes" of the car are perfectly aligned with its new "bones."
Tesla-Specific Diagnostics Are Not Optional
This is the part many non-specialized shops underestimate. A Tesla repair is not complete because warning lights are off or because the vehicle seems to drive normally on a short road test. Tesla vehicles require Tesla-specific diagnostics before repair, during repair as needed, and after repair to identify hidden faults, verify module communication, confirm system health, and document that affected systems are operating correctly.
That diagnostic process can include fault scans, repair mode workflows, safety checks related to high-voltage systems, calibration routines, and verification steps tied to replaced components. Depending on the collision, technicians may need to inspect not only body-related electronics, but also restraint systems, occupant sensing functions, cameras, parking aids, steering-angle related data, suspension-related inputs, and other modules that interact with crash or driver-assistance performance.

Tesla-specific diagnostics matter for another reason: modern vehicles often store crash-event related conditions or component status information that is not obvious from visual inspection alone. A repaired body structure paired with unverified electronics is an incomplete repair. The sensors, modules, and software have to agree with the physical repair.
Structural Accuracy and Sensor Accuracy Are Linked
ADAS calibration is only meaningful if the structure underneath it is correct. If a camera bracket is attached to a section that is dimensionally off, the calibration process may fail, or worse, it may not reflect the true intended geometry of the repaired vehicle. That is why structural measurement, part replacement accuracy, diagnostics, and calibrations all belong in the same workflow.
The connection to safety is direct. IIHS does not simply evaluate how well a vehicle resists crash forces; it also includes crash avoidance and mitigation technologies in its broader safety framework. That means the quality of post-repair diagnostics and calibration affects real-world safety outcomes, not just dashboard convenience. A Tesla that has not been scanned, verified, and calibrated according to proper procedure may have compromised crash avoidance performance even if the body repair looks excellent.
Why Generic Scanners and Generic Procedures Fall Short
Many aftermarket scan tools are useful for broad diagnostics, but Tesla repair often demands brand-specific workflow discipline. Generic tools may not cover every required function, every post-repair test path, or every module-specific verification step the manufacturer expects. For a vehicle this integrated, a partial diagnostic process is not the same thing as a complete one.
That is why owners should look for a shop with the training and infrastructure to handle the whole repair chain:
- Structural blueprinting
- Tesla procedure-based part replacement
- Approved bonding, riveting, and welding
- Dimensional verification
- Tesla-specific diagnostic checks
- ADAS calibration and final validation
Miss any one of those steps, and the repair is missing something important.
Navigating the Insurance Maze: Your Rights Under CA Code 2695.8
Dealing with insurance after a Tesla accident can be frustrating. Many insurance companies have "direct repair programs" (DRPs) with shops that are not Tesla-certified. These shops may offer lower labor rates, but they often lack the specialized tooling, repair information access, and brand-specific training required by Tesla.
In California, you have the law on your side. California Code of Regulations, Title 10, §2695.8 addresses insurer conduct around automobile repair claims and, in practical terms, protects your right to choose the repair shop. An insurer cannot require you to use a particular facility. They can provide information or suggestions, but they cannot force you into a non-certified path simply because that path is cheaper for them.
"Pre-Loss Condition" and Safety
The pre-loss condition issue matters even more on a Tesla because pre-loss condition is not only about appearance. It is about restoring the structural design, joining methods, electronic functionality, and safety systems that existed before the collision. If the original vehicle relied on OEM structural parts, specified adhesives, controlled sectioning points, and Tesla-directed diagnostics, then a repair that substitutes lesser methods is not truly restoring the car to pre-loss condition.
If an insurer tries to push you toward a non-certified shop or suggests the use of "equivalent" aftermarket structural parts, you can point to the technical realities of the repair. A Tesla’s castings, bonded joints, and sensor-dependent systems require OEM repair procedures and compatible parts strategy. At RVCCR, we work directly with all major insurance carriers to ensure they understand the technical necessity of following Tesla's structural repair procedures. We handle the documentation so you don't have to.
How to Use CA Code 2695.8 in a Real Claim
Most owners do not need to argue legal theory. They just need a clear way to respond when an adjuster starts steering the conversation. A practical response sounds like this:
- "I understand I can choose my repair facility."
- "My vehicle requires Tesla-specific structural and diagnostic procedures."
- "I want the vehicle restored to pre-loss condition using proper OEM methods."
- "Please document that choice in the claim file."
That approach keeps the discussion factual. It is not confrontational, and it aligns with the technical needs of the vehicle. When the shop provides a complete blueprint and explains why certain parts, procedures, and calibrations are required, insurers are in a better position to evaluate the repair correctly.
Why Insurance Documentation Matters on EV Repairs
Tesla collision claims often involve supplements because hidden damage is common once the vehicle is disassembled and measured. A damaged outer panel may reveal a compromised reinforcement, bonded flange, sensor bracket, casting-adjacent structure, or battery-protection related component behind it. Good documentation helps everyone:
- The owner understands why the repair plan changed
- The insurer sees the connection between the visible hit and the hidden structural work
- The repair team can defend OEM-required procedures with clear evidence
- The final repair file better reflects what was actually necessary to restore the vehicle safely
That is one more reason to choose a shop that understands both the technical side and the claim side. Tesla repair is difficult enough without having to educate every party from scratch.
Why Certification is the Only Path Forward
Being a family-owned shop for 21 years has taught us that trust is built on transparency. We chose to become Tesla-certified because we saw the complexity of these vehicles and realized that traditional methods were no longer sufficient.
Our facility in Redlands serves the entire Inland Empire, providing a one-stop shop for certified collision, paint, and mechanical repair. Whether it’s a minor scrape on a Model 3 or a major structural job on a Model X, our technicians use the exact same tools and parts used by the factory.
Certification matters because it sits at the intersection of training, repair information, equipment, and accountability. Tesla structural repairs are not simply difficult because the materials are different. They are difficult because each approved step depends on the last one being done correctly. A repair facility needs the right process from intake through final validation:
- Vehicle identification and repair planning
- Safe handling around high-voltage components
- Structural measuring and fixturing
- OEM-directed replacement methodology
- Approved bonding, riveting, and welding
- Tesla-specific diagnostics
- ADAS calibration and final quality control
A shop can be excellent at conventional collision work and still not be the right place for a Tesla structural repair. That is not a criticism of the shop. It is just the reality of how specialized EV collision repair has become. If the goal is to preserve safety performance, fit, function, and value, the path has to match the engineering of the vehicle.
For owners comparing options, it helps to review the shop’s Tesla and EV repair capabilities, understand its broader collision repair process, and verify its current manufacturer and industry certifications. Those three questions usually reveal very quickly whether the facility is equipped for modern EV structural work or just willing to take the job.

What Owners Should Expect After a Tesla Crash
If you drive a Tesla in Redlands or anywhere in the Inland Empire, a good post-accident plan starts with the right expectations. Not every scratch is structural, but every collision should be evaluated with the possibility of hidden damage in mind. A light-looking hit can still affect sensors, brackets, undertrays, suspension geometry, or bonded structural sections. A rear impact can extend into cast components. A side hit can travel into rocker and battery-adjacent areas. A front hit can involve cooling components, radar or camera alignment, and crush management zones that are not obvious until teardown.
A proper Tesla repair path usually includes:
- Visual inspection and initial damage capture
- Blueprinting and disassembly to expose hidden damage
- Structural measurement against OEM references
- Parts research based on Tesla repair procedures
- Insurance review and supplement support as needed
- OEM-compliant structural repair and corrosion protection
- Tesla-specific diagnostics and calibrations
- Reassembly, quality control, and final validation
That sequence takes discipline, and sometimes it takes time. But time spent doing the repair correctly is different from time wasted. On a Tesla, the real goal is not simply to get the car out the door fast. The goal is to return the car to you with the structural and electronic integrity it needs for the next drive, the next emergency maneuver, and the next unexpected event on the road.
Restoring the Spark to Your Journey
A collision is a stressful interruption to your life, but it doesn't have to be the end of your vehicle's safety or value. When you choose a certified facility, you aren't just paying for a repair; you are investing in the peace of mind that comes from knowing your car’s safety cage is as strong as the day it was built.
Our team is ready to restore your Tesla to factory specs, ensuring every rivet, every bond line, every casting-related replacement step, and every sensor verification is handled the right way. We coordinate with your insurance, document the repair thoroughly, provide a written lifetime warranty, and get you back on the road safely.
Ready to get your Tesla back to factory-perfect condition? Contact RVCCR today for a free estimate and let our certified experts handle the rest.
Reach out to our team, get your questions answered, and protect the vehicle that protects your next trip.
Need a repair estimate?
Skip the wait — send us a few photos and our team will get back to you fast.
Start a Photo Estimate →