Motorhome Roof Replacement After a Collision: Fiberglass, Aluminum, and TPO Compared
Updated September 11, 2026 | RVCCR, RVDA-Certified RV Repair Facility in Redlands
RVCCR combines RVDA-certified experience, collision repair, paint and body work, and mechanical service under one roof. For 21 years, our family-owned team has repaired motorhomes, fifth wheels, travel trailers, toy haulers, popups, and other recreational vehicles throughout Redlands and the Inland Empire.
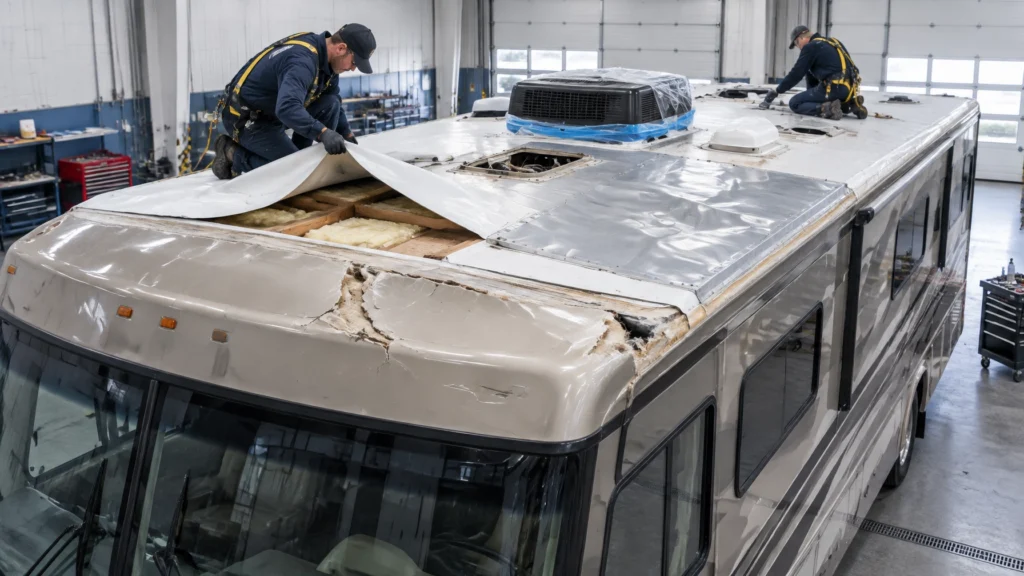
A motorhome roof replacement after a collision is rarely just a matter of removing a damaged outer layer and installing a new one. The correct repair depends on the roof construction, the direction and force of the impact, the condition of the roof deck and framing, the seals around every penetration, and the equipment mounted above and below the roof…
Fiberglass, aluminum, and TPO membrane roofs respond differently when struck, scraped, punctured, or pulled away from the sidewall. A crack in a one-piece fiberglass roof requires a different evaluation than a dented aluminum panel. A punctured TPO membrane may appear simple to patch until the technician finds wet insulation, damaged wood, failed seam adhesive, or displaced wiring beneath it.
This comparison explains how the three roof systems differ, when repair may be appropriate, when full replacement becomes more practical, how collision coverage may apply, why cost estimates vary, and what an RV collision facility can evaluate that a general roofing contractor usually cannot.
Why a collision-damaged motorhome roof needs a complete inspection
The roof is part of the motorhome’s exterior envelope, but it is also connected to the walls, ceiling, roof deck, insulation, electrical wiring, air-conditioning supports, vents, antennas, skylights, plumbing penetrations, and front and rear caps.
An impact can affect those connected systems even when the visible damage appears limited to one area. For example:
- A tree strike can crack the roof skin and shift the front cap.
- A low-clearance impact can pull the roof edge away from the sidewall.
- A rollover or severe side impact can distort roof framing and ceiling panels.
- A collision near a roof-mounted air conditioner can damage the mounting curb or wiring.
- A branch or object can puncture a membrane and allow water into the insulation.
- A bent sidewall or cap can place tension on the roof seam.
- A damaged seal can allow continued water intrusion after the vehicle leaves the shop.
That is why motorhome collision repair should begin with a documented inspection rather than an immediate decision to patch, coat, or replace the visible roof material.
The first evaluation should identify:
- The roof material and construction method.
- The location and depth of the impact.
- Whether the roof is flat, crowned, laminated, or framed in sections.
- Whether the roof-to-sidewall and roof-to-cap joints remain aligned.
- Whether the roof deck is soft, crushed, wet, or displaced.
- Whether insulation and ceiling panels show movement or moisture.
- Whether roof-mounted components remain secure.
- Whether interior wiring, ducting, and plumbing were affected.
- Whether the damage is localized or extends across a structural section.
- Whether the motorhome can be safely moved before repairs begin.
The damage should be photographed before teardown, measured where appropriate, and documented for the insurance claim. An initial estimate may change once the roof membrane, panels, sealants, fixtures, or interior ceiling sections are removed.

The three roof systems: fiberglass, aluminum, and TPO
Motorhomes do not all use the same roof construction. Identifying the actual material is the first step toward selecting the correct repair method.
One-piece fiberglass or Filon-style roof
A fiberglass roof commonly uses a laminated or molded composite skin installed over a roof deck and supporting structure. Some systems use a broad one-piece sheet across much of the roof. The exact construction varies by coach manufacturer and model year.
Fiberglass is rigid compared with a flexible membrane. That rigidity can help preserve a clean roof surface, but it also means that impact energy may produce cracking, spidering, delamination, fractures around openings, or separation between layers.
Damage can include:
- A visible crack through the fiberglass skin
- Spider cracks spreading from a point of impact
- A crushed or separated laminate
- Delamination between the fiberglass skin and substrate
- Damage around an air conditioner, vent, skylight, or antenna
- A lifted edge near the sidewall
- Water intrusion into the roof deck
- Cracked sealant around fasteners or perimeter trim
The exterior may show only a narrow crack while the bonded layers beneath it have separated over a wider area. Tapping, probing, moisture evaluation, and controlled access may be needed to understand the full damage.
Crane Composites provides manufacturer information for RV fiberglass roof panels and repair materials through its RV roof panel documentation. The applicable coach-builder and panel-manufacturer instructions should control the repair.
Aluminum roof panels
Aluminum roofs use formed or rolled metal panels installed over a roof structure. Depending on the motorhome design, the panels may be fastened, bonded, overlapped, or integrated with perimeter trim and sealants.
Aluminum commonly shows:
- Dents
- Creases
- Buckling
- Torn fastener holes
- Pulled or missing screws
- Open seams
- Cracked or separated lap seals
- Distortion around roof fixtures
- Corrosion near damaged coatings or fasteners
- Separation at the roof-to-sidewall edge
Aluminum can sometimes be repaired when the damage is shallow, accessible, and does not compromise the panel’s shape, attachment, or weather seal. A deep crease, torn panel, sharp fold, stretched fastener hole, or distorted edge may make replacement more appropriate.
A metal panel that has been forced back into an approximate shape may still have weakened areas, uneven tension, or gaps that allow water to enter. The repair decision should account for the panel, fasteners, sealants, roof framing, and adjacent sections together.
TPO membrane roofs
TPO, or thermoplastic polyolefin, is a flexible membrane used on many RV roof systems. Dicor’s DiFlex II product page describes its product as a non-fleece-backed TPO membrane designed for RV roofing. Dicor also identifies flexibility, UV resistance, and compatibility with its installation components and sealants as characteristics of that system.
The exact membrane installed on a motorhome may be Dicor or another manufacturer’s product. The material identification matters because adhesives, primers, seam methods, lap sealants, repair patches, and installation conditions must match the membrane manufacturer’s instructions.
TPO collision damage may include:
- A puncture from a sharp object
- A tear from a displaced roof fixture
- A split at a seam
- A lifted edge
- A pulled termination
- A failed adhesive bond
- A cut caused by a bent component
- A wrinkle or stretch caused by roof movement
- Damage around an air conditioner, skylight, vent, or antenna
- Separation at the roof perimeter
A small puncture in an otherwise sound membrane may be repairable. However, a tear near a seam, termination, edge, or high-load penetration requires more careful evaluation. A membrane patch cannot correct a crushed deck, wet insulation, loose framing, or a displaced roof fixture beneath it.
Dicor’s DiFlex II TPO roofing information and installation guide explains that installation uses a defined roofing system rather than an improvised coating or household roofing method.
How collision damage differs by roof type
Fiberglass: cracking, delamination, and bonded-layer separation
Fiberglass damage often extends beyond the visible crack. An impact can break the surface laminate, separate the fiberglass from the substrate, or crush the deck below it.
Delamination is particularly important because the outer surface may remain present while the bond beneath it has failed. The roof can feel soft, sound hollow when evaluated, or move differently from adjacent areas. Water can also travel through a crack and collect in the roof deck or insulation.
A technician should inspect:
- The full impact zone
- The perimeter of every visible crack
- Adjacent roof sections
- The deck below the fiberglass
- The roof-to-sidewall transition
- Roof-mounted fixtures
- Interior ceiling panels beneath the damage
- Signs of moisture or staining
A fiberglass patch may be appropriate for a limited, cleanly defined injury when the surrounding laminate and substrate remain sound. A larger section or full roof replacement may be needed when cracking is widespread, delamination extends beyond a repairable area, the roof has lost its shape, or the underlying structure is damaged.
Aluminum: denting, buckling, and fastener pull-out
Aluminum damage frequently involves shape and attachment. A panel may be dented without losing weather tightness, but a collision can also pull fasteners from the deck, open an overlap, stretch a mounting hole, or bend the edge trim.
The inspection should include:
- Panel flatness
- Creases and sharp folds
- Overlap and seam alignment
- Screw or rivet condition
- Fastener-hole shape
- Edge trim
- Lap seals
- Roof deck condition
- Corrosion or coating damage
- Adjacent panels
A shallow dent may be repairable if it does not affect the panel’s attachment or seal. A panel with a deep crease, torn edge, multiple buckles, or pulled fasteners may require replacement. If the underlying deck has shifted, a new panel alone will not resolve the problem.
The technician must also use compatible sealants and fasteners. A household metal-roof repair method may not be appropriate for an RV roof that flexes, carries roof-mounted equipment, and interfaces with composite walls and interior systems.
TPO: punctures, tears, seam failure, and membrane separation
TPO membranes can often be repaired when damage is localized and the substrate remains sound. The threshold changes when the membrane is stretched, contaminated, torn across a seam, detached at a termination, or damaged across a large section.
A proper inspection looks for:
- The outer puncture or tear
- Membrane stretching around the damage
- Adhesive separation
- Failed seams
- Open perimeter edges
- Wet or soft deck material
- Punctured insulation
- Damaged flashing
- Loose roof fixtures
- Water marks inside the coach
A membrane patch placed over a moving or wet substrate may not remain reliable. The repair must restore the roof system, not merely cover the opening.
Dicor’s manufacturer guidance emphasizes removing or preparing roof fixtures and using specified adhesives, tapes, sealants, and installation methods. A replacement membrane should not be installed over damaged framing, wet decking, or uncorrected fixture movement.
Repair versus full roof replacement
There is no single universal measurement that determines whether every motorhome roof should be repaired or replaced. The decision depends on the roof design, material, age and condition of the surrounding system, impact severity, hidden damage, and the ability to restore a durable weather seal.
When a fiberglass roof may be repairable
A fiberglass repair may be considered when:
- The damage is localized.
- The surrounding laminate remains bonded.
- The roof deck is solid and dry.
- The roof shape remains correct.
- Cracks can be fully accessed and prepared.
- The roof-to-wall joint remains aligned.
- No major fixture or framing damage is present.
- The manufacturer’s repair method supports patching.
Full or section replacement becomes more likely when:
- Cracking extends across a large area.
- Delamination is widespread.
- The roof has been crushed or distorted.
- The deck or framing is damaged.
- The front or rear cap has shifted the roof structure.
- Multiple openings and seams have failed.
- The repair would leave a large area of weakened laminate.
- A reliable color and texture match cannot be achieved with a localized repair.
When an aluminum roof may be repairable
An aluminum roof may be repairable when:
- The dent is shallow and localized.
- The panel remains attached.
- The panel has no sharp fold or tear.
- Seams and perimeter edges remain sealed.
- Fastener holes are not stretched.
- The roof deck is undamaged.
- The panel can be restored without excessive thinning or distortion.
Panel replacement may be preferred when:
- The aluminum is torn or sharply creased.
- Fasteners have pulled from the structure.
- Seams have opened.
- The roof edge has separated from the sidewall.
- Multiple panels are buckled.
- The panel no longer lies flat.
- The deck or framing beneath it is damaged.
- The existing seal cannot be reliably restored.
When a TPO membrane may be repairable
A TPO repair may be appropriate when:
- The puncture or tear is small and localized.
- The membrane is not broadly stretched.
- The substrate is dry and structurally sound.
- The damage is away from critical terminations or seams.
- The surrounding membrane remains properly bonded.
- The manufacturer’s repair method supports the proposed materials.
A larger membrane replacement may be necessary when:
- The membrane is torn across a long section.
- Several penetrations are damaged.
- The membrane has separated from the deck.
- The roof edge or termination has pulled loose.
- The deck is wet, soft, or crushed.
- The collision displaced the roof structure.
- Seam or adhesive failure extends beyond a small repair.
- The membrane cannot be installed flat and properly bonded.
A roof replacement can involve much more than the outer material. It may require removal and reinstallation of air-conditioning units, vents, antennas, skylights, plumbing vents, satellite equipment, roof racks, edge moldings, and other fixtures.

Why damage is often more extensive than the roof surface suggests
The roof skin is only one layer of the assembly. Beneath it may be:
- A fiberglass or aluminum outer layer
- Adhesive or bonding material
- Plywood or composite roof decking
- Wood or aluminum framing
- Rigid or batt insulation
- Electrical wiring
- Air-conditioning ducts
- Ceiling panels
- Interior trim
- Plumbing vent connections
- Structural attachments to the sidewalls and caps
A collision can damage several of these layers without making every problem visible from the outside.
Roof framing
Roof framing may be cracked, shifted, or separated at an attachment point. A roof that appears flat can still have movement beneath the skin. If the structure is not restored before the outer material is installed, the replacement roof may develop new stress, wrinkles, cracks, or seal failures.
Insulation
Wet or displaced insulation can retain moisture and contribute to continuing interior damage. Insulation may also be compressed by a roof impact, leaving voids or changing the way the ceiling panel is supported.
Ceiling panels
A ceiling panel can show staining, sagging, cracking, or separation after a roof strike. Even without obvious stains, the panel may have moved away from the framing or been affected by moisture that traveled from the roof penetration.
Wiring
Roof-mounted equipment may use wiring routed through the ceiling or roof structure. An impact can pinch, stretch, or pull conductors. Wiring near an air conditioner, antenna, solar equipment, or vent should be inspected before the roof is closed.
Air-conditioning units and roof fixtures
A roof-mounted air conditioner is heavy and connected through a roof opening, gasket, electrical circuit, ducting, and supporting structure. A collision that affects the roof around the unit may also disturb the gasket, mounting hardware, duct connection, wiring, or support frame.
The same principle applies to skylights, vents, antennas, satellite dishes, solar panels, plumbing vents, and roof ladders. Replacing the roof around a fixture without inspecting the fixture and its attachment can leave a leak or electrical problem unresolved.
Insurance considerations: collision versus comprehensive coverage
Coverage depends on the motorhome policy, the cause of loss, the deductible, exclusions, valuation method, and the insurer’s claim determination. The owner should review the policy and communicate with the carrier rather than assume that every roof problem is covered in the same way.
Collision coverage
Collision coverage generally addresses physical damage caused by impact with another vehicle or object, subject to the policy terms. A roof damaged when the motorhome strikes a tree, building, bridge structure, pole, or another vehicle may be evaluated under collision coverage if that coverage applies.
The claim may include related damage when the evidence connects it to the covered event, such as:
- A cracked fiberglass roof
- A dented or torn aluminum panel
- A punctured TPO membrane
- A damaged roof edge
- Displaced roof framing
- Damaged roof-mounted equipment
- Interior ceiling and insulation damage
- Wiring or duct damage caused by the impact
Comprehensive coverage
Comprehensive coverage may apply to certain non-collision events, depending on the policy. Examples may include hail, wind, falling objects, fire, vandalism, or other covered causes.
A roof damaged by a fallen branch may be treated differently depending on whether the event is classified as a falling-object loss or a collision. A storm-related puncture may be evaluated under comprehensive coverage, while a roof struck by a fixed object during vehicle movement may be evaluated under collision coverage.
The policy and facts control. The same roof material can be involved in either type of claim.
Wear, maintenance, and pre-existing damage
Insurance generally distinguishes sudden covered damage from ordinary maintenance, aging, deterioration, and pre-existing conditions. Old sealant failure, long-term delamination, weathering, and unrepaired water intrusion may not be treated the same way as collision damage.
This is why photographs from immediately after the event, repair history, inspection notes, and teardown documentation matter. A professional estimate should separate collision-related damage from unrelated maintenance findings whenever both are present.
Supplements and hidden damage
Roof claims often change after fixtures and exterior layers are removed. A supplement may be appropriate when teardown reveals:
- Wet or crushed decking
- Damaged framing
- Broken wiring
- Compromised insulation
- A displaced AC mounting area
- Interior ceiling damage
- Additional failed seams
- Roof-edge separation
- Damage beneath a cap or trim section
The supplement should explain what was not visible during the initial inspection, document the finding with photographs, and identify the repair operation required to restore the motorhome.
RVCCR’s article on RV insurance supplements and hidden collision damage provides additional context on why the original estimate may change after disassembly.
Cost ranges by roof type: why a universal dollar figure is misleading
Motorhome roof replacement costs vary substantially by coach length, roof width, roof type, number of penetrations, access, material availability, interior damage, labor requirements, and insurance scope.
Manufacturer installation guides and RVIA standards do not provide a universal retail price schedule for collision roof replacement. Publishing a single dollar range without the vehicle and damage details would create false precision.
A more reliable planning comparison is the relative scope:
| Roof type | Lower-scope repair possibility | Replacement cost drivers |
|---|---|---|
| Fiberglass | Localized crack or limited laminate repair when the deck and surrounding bond are sound | Large-area delamination, crushed deck, cap damage, custom finishing, fixture removal |
| Aluminum | Shallow dent or localized seal repair when the panel and attachment remain secure | Panel replacement, pulled fasteners, distorted trim, multiple seams, deck or framing repair |
| TPO membrane | Localized puncture or small tear repair when the membrane and substrate remain sound | Full membrane removal, wet decking, adhesive work, edge termination, fixture removal, interior damage |
The final estimate should separate:
- Diagnostic inspection
- Teardown and fixture removal
- Structural and deck repair
- Insulation and ceiling work
- Roof material or membrane replacement
- Sealants, tapes, adhesives, and fasteners
- AC, vent, antenna, and skylight reinstallation
- Paint, fiberglass finishing, or trim work
- Leak testing
- Electrical and mechanical testing
- Insurance supplement administration
A free estimate can establish an initial direction, but a complete roof replacement estimate may require an in-person inspection and controlled disassembly. A photo estimate is useful for triage and planning; it cannot confirm hidden framing or moisture damage that remains behind the roof surface.
What a certified RV collision facility does that a general contractor cannot
A general roofing contractor may understand membranes, flashing, and sealants. That experience does not automatically include motorhome chassis movement, RV wall construction, roof-mounted appliances, interior systems, collision documentation, or insurance supplements.
A certified RV collision facility can coordinate several areas of the repair:
Collision damage analysis
The shop evaluates the direction of impact, body damage, roof movement, caps, sidewalls, frame, suspension, and attached components. The question is not only how to cover the roof, but what the impact changed throughout the vehicle.
RV-specific construction knowledge
Motorhomes use lightweight assemblies that combine composite panels, wood or aluminum framing, foam insulation, thin interior panels, adhesives, and specialized trim. The repair must restore those relationships without adding unnecessary weight or interfering with other systems.
Mechanical and electrical inspection
An RV collision may affect air-conditioning equipment, generators, wiring, lighting, antennas, solar components, plumbing vents, and interior controls. A general contractor is not typically responsible for returning the complete motorhome to road-ready condition.
Insurance documentation
A collision facility can document the damage before and during teardown, separate visible and hidden damage, prepare supplements, communicate with major insurers, and explain why a particular repair operation is necessary.
Paint and finish restoration
Roof work often meets painted caps, sidewalls, trim, and molded components. A complete repair may require fiberglass finishing, paint blending, graphics replacement, and exterior trim restoration.
Final testing
A professional RV repair process should include leak testing, inspection of roof-mounted equipment, verification of seals and fasteners, interior review, and confirmation that the motorhome is safe to move and use.

RVCCR brings those services together in one facility. Our team handles rv roof replacement, motorhome collision repair, mechanical work, and rv paint and body shop services with a written lifetime warranty on qualifying completed repairs.
Questions to ask before authorizing a roof replacement
Before approving work, ask the repair facility:
- What roof material is installed on my motorhome?
- Is the damage limited to the outer skin or membrane?
- Has the roof deck and framing been inspected?
- Is there evidence of moisture or soft material?
- Were the interior ceiling and wall edges checked?
- Were roof-mounted AC units, vents, antennas, and skylights inspected?
- Does the roof-to-sidewall joint remain aligned?
- Is the proposed repair based on the coach manufacturer’s information?
- Which membrane, fiberglass, aluminum, adhesive, sealant, and fasteners will be used?
- Will the existing material be repaired, partially replaced, or fully replaced?
- What hidden damage could appear during teardown?
- Will the insurer receive photographs and a supplement if the scope changes?
- How will wiring and interior components be protected?
- Will the roof receive a controlled leak test?
- What testing will be performed on roof-mounted electrical or mechanical equipment?
- Which portions of the estimate are approved, pending, or potentially owner-paid?
- What parts are OEM, manufacturer-approved, or aftermarket?
- What warranty applies to materials and labor?
- How will the finished roof be documented?
- When is the motorhome safe to move and use?
A trustworthy facility should explain the repair path in plain language and distinguish what is known from what can only be confirmed after disassembly.
RVIA standards and manufacturer instructions
The RV Industry Association states that member manufacturers pledge to build RVs in conformance with adopted standards, including NFPA 1192 and other applicable RV standards. RVIA’s Association and ANSI Adopted Standards page identifies standards covering RV fuel systems, fire and life safety, plumbing, vehicular requirements, low-voltage systems, generator safety, plan approval, and exterior components.
These standards do not function as a universal step-by-step roof replacement manual for collision shops. The coach builder’s construction information and the roofing-material manufacturer’s installation instructions remain important sources for the specific repair.
For TPO work, the installer should follow the applicable membrane manufacturer’s guide for surface preparation, adhesive, temperature, bonding, termination, tapes, sealants, and fixture reinstallation.
For fiberglass work, the technician should use the appropriate panel manufacturer and coach-builder guidance for cleaning, preparation, patch materials, resin or adhesive compatibility, curing, finishing, and repair limits.
For aluminum work, the repair should follow the original roof design and appropriate instructions for panel overlap, fasteners, corrosion protection, edge trim, and sealants.
The objective is to restore the roof assembly and the systems around it: not simply to make the surface appear smooth from the ground.
Protect the roof before the next adventure
A collision-damaged motorhome roof should not be judged by appearance alone. Fiberglass can crack and delaminate beneath an apparently limited fracture. Aluminum can dent, buckle, and pull fasteners from the roof deck. TPO can puncture, tear, or separate at seams while water reaches the insulation and ceiling below.
The appropriate process is deliberate:
- Identify the roof construction.
- Document the collision damage.
- Inspect the roof, deck, framing, sidewalls, caps, and interior.
- Remove fixtures carefully when access is required.
- Separate repairable surface damage from structural or widespread damage.
- Follow manufacturer instructions for the actual materials.
- Coordinate collision, mechanical, electrical, and finish work.
- Document supplements for hidden damage.
- Test seals, fixtures, wiring, and the finished roof.
- Confirm that the motorhome is ready for the road.
RVCCR’s RVDA-certified team can inspect your motorhome, coordinate with your insurer, repair hidden and visible damage, restore the roof system, and handle the body, paint, and mechanical work required after a collision.
Start with a free RV collision repair estimate and provide photographs of the motorhome, roof, impact area, interior ceiling, roof fixtures, and VIN.
Repair the roof correctly. Restore the structure beneath it. Seal every vulnerable edge. Then get back to the highway, the campsite, and the adventure ahead with confidence.
Primary technical resources
- Crane Composites RV roof panel information
- Dicor DiFlex II TPO roofing and installation information
- Dicor DiFlex II retrofit installation guide
- RV Industry Association adopted RV construction and safety standards
- California Department of Insurance guidance on non-OEM replacement crash parts
Need a repair estimate?
Send RVCCR a few photos and our Redlands team will help you determine the next step.
Need a repair estimate?
Skip the wait — send us a few photos and our team will get back to you fast.
Start a Photo Estimate →