RV Insurance Supplements and Hidden Damage: Why Your Initial Estimate Rarely Tells the Full Story
Updated August 11, 2026 | RVCCR, RVDA Certified Repair Facility in Redlands
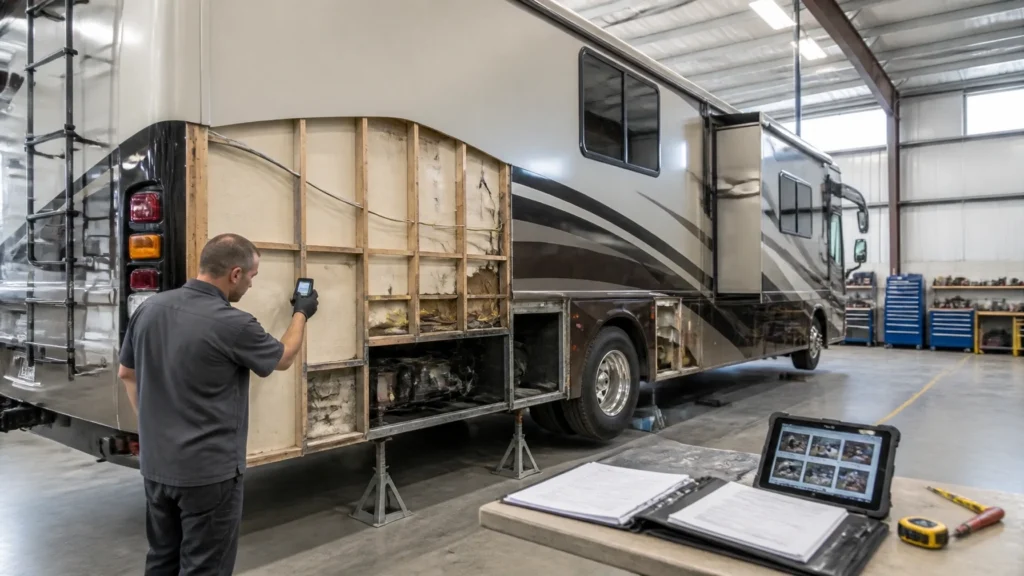
RVCCR combines RVDA-certified experience, collision repair capability, paint and body work, and complete mechanical service under one roof. That combination matters because an RV collision claim is not limited to the visible scrape, cracked fiberglass, or bent trim that appears during an initial inspection. A motorhome or travel trailer may also have damage inside a laminated wall, beneath an underbelly panel, around a slide-out opening, along the frame, or at the roof structure: and those areas often cannot be evaluated accurately until the affected section is disassembled…
For many owners, this creates a confusing insurance process. The first estimate may show one repair amount. Then the shop begins a controlled teardown, finds additional collision-related damage, and submits a supplement. The total changes, the timeline changes, and the insurer may ask for more documentation before approving the next stage.
That process is not automatically a sign that the estimate was careless or that the repair shop is adding unnecessary work. On a large, multi-system vehicle, it is often the responsible way to identify damage that was not visible during the first inspection.
What an RV insurance supplement actually means
An insurance supplement is a documented request to add necessary repair operations, parts, labor, or materials that were not included in the original estimate. The additional items may become apparent after disassembly, measurement, testing, or access to concealed areas.
The initial estimate is usually based on what an adjuster or appraiser can see at the time of inspection. It may include damaged exterior panels, trim, lights, doors, paint work, and visible mechanical components. It is a starting point: not necessarily the final repair plan.
The California Department of Insurance explains that an adjuster or appraiser generally writes an estimate based on an initial inspection. If further damage is found during the repair process, the repair shop contacts the insurer to request approval for the additional repair cost. The insurer may send an adjuster to reinspect the newly documented damage or may request additional estimates, depending on the claim.
For an RV, that additional inspection is especially important because the vehicle combines several types of construction:
- An automotive chassis or trailer frame
- Fiberglass, aluminum, or composite exterior panels
- Laminated or hung-wall construction
- Slide-out rooms and mechanisms
- Roof membranes and structural framing
- Electrical wiring and control systems
- Plumbing, tanks, and underfloor components
- Appliances, cabinetry, and interior finishes
A visible impact may involve several of these systems at once. The first estimate cannot reliably account for anything that has not yet been exposed or tested.
An insurance supplement does not guarantee that every requested item will be approved. Coverage, policy language, repair procedures, causation, parts availability, and the vehicle’s value can all affect the claim. The supplement is the formal process for presenting additional damage and explaining why the work is necessary.
Why a drive-by or photo estimate can miss RV collision damage
A quick exterior inspection has a legitimate purpose. It can document the apparent point of impact, identify obvious damage, help open the claim, and provide an initial repair direction. It is useful for getting the process started.
However, it has limits.
A photograph can show a cracked cap, but not necessarily the condition of the cap supports behind it. It can show a dented sidewall, but not whether the wall framing, insulation, adhesive bond, or interior finish has shifted. It can show that a slide-out is closed, but not whether its rails are bent or whether the room binds when it cycles.
The difference is similar to inspecting a house after a collision with a vehicle. The exterior wall may show a dent, but the framing, wiring, insulation, plumbing, and foundation still require separate evaluation.
An initial RV estimate may not reveal:
- A frame rail that is slightly out of position
- A twisted trailer tongue or crossmember
- A slide-out opening that is no longer square
- A damaged slide rail or drive mechanism
- A separated fiberglass-to-substrate bond
- Moisture that entered through a collision-opened seam
- A damaged roof truss, deck, membrane, or seal transition
- Crushed wiring, plumbing, or tank supports under the floor
- Distorted mounting points behind an exterior panel
- Damage to cabinets, appliances, or interior systems caused by impact movement
This is why a responsible shop should explain the difference between an initial estimate and a teardown-based repair plan before work begins.
For additional context about the broader restoration process, see RVCCR’s article on RV collision repair in the Inland Empire.
The main hidden-damage areas in an RV collision claim
1. Frame rails, crossmembers, and chassis geometry
The frame carries the load of the coach or trailer. A collision can bend, twist, or shift a frame rail without producing a dramatic exterior clue.
On a motorhome, technicians may need to inspect the chassis frame, suspension mounting points, steering-related components, crossmembers, and body-to-chassis attachment areas. On a travel trailer or fifth wheel, the inspection may include the A-frame or tongue, coupler, spring hangers, axle mounts, crossmembers, landing gear, and pin box.
A frame does not have to look severely crushed to deserve measurement. Small changes in geometry can affect:
- Tracking and alignment
- Tire wear
- Steering response
- Slide-out operation
- Door and compartment fit
- Suspension loading
- Hitch or coupler alignment
- The way the coach or trailer carries weight
A qualified shop may use manufacturer dimensions, mechanical measuring systems, laser equipment, or other approved methods to compare the vehicle’s current geometry with available specifications. The exact method depends on the chassis, the coach or trailer manufacturer, the damage location, and the information available for that model.
The supplement should identify the measured condition, the affected component, the proposed repair or replacement, and the documentation supporting the operation. A line that simply says “straighten frame” does not explain enough. The file should make clear what was measured, what was found, and why the proposed repair restores the unit to the applicable manufacturer or industry standard.

2. Slide-out rooms and mechanisms
A slide-out is a moving room built into a vehicle that already flexes, twists, and travels over uneven roads. After a collision, the exterior panel may be the most obvious concern, but the slide opening and operating mechanism can be just as important.
Hidden slide-out damage may include:
- Bent rails
- Damaged gears or drive components
- Shifted mounting brackets
- A distorted slide-room frame
- A wall opening that is no longer square
- Torn or compressed seals
- Damage to wiring or hydraulic lines
- Cabinet or flooring movement inside the room
A slide-out that still moves is not necessarily undamaged. It may operate with excessive noise, bind at one point in its travel, sit unevenly when extended, or fail to compress the seals consistently when closed.
A shop should inspect the room in its normal operating positions and document the condition before and after relevant repairs. Depending on the design, that may include measuring the opening, checking clearances, inspecting mounting points, cycling the mechanism, and reviewing the manufacturer’s service information.
The supplement should connect the observed symptom to the collision evidence. For example, a photograph of a bent mounting bracket, a measurement showing a shifted opening, or a test record showing binding provides more useful support than a general statement that “the slide is damaged.”

3. Laminated sidewall damage and delamination
Many RV sidewalls are built as layered assemblies. Depending on the manufacturer and model, the wall may include an exterior fiberglass skin, adhesive, a wood or composite substrate, insulation, framing, interior paneling, and attachment hardware.
A collision can damage the wall in more than one way. It may crack the exterior skin, crush the substrate, break the adhesive bond, shift the internal framing, or open a seam that allows water to enter later.
Delamination refers broadly to separation between layers of a laminated assembly. It can have multiple possible causes, including moisture intrusion, adhesive failure, impact, age, manufacturing conditions, or a combination of factors. That makes documentation important. A repair file should not automatically label every bubble or soft area as collision damage without examining the evidence.
To evaluate a suspected collision-related sidewall problem, a shop may:
- Photograph the exterior impact area before and during disassembly
- Inspect cracks, deformation, openings, and fastener movement
- Use moisture-testing equipment in affected and adjacent areas
- Compare the damaged section with undamaged areas
- Open the wall where necessary to inspect the substrate and framing
- Look for fresh breaks, crushed materials, shifted components, and open seams
- Document whether moisture appears localized, widespread, new, or consistent with older intrusion
The evidence may show that the collision created a new opening that allowed moisture into an otherwise sound wall. It may also show that pre-existing moisture damage or delamination existed before the accident. In some claims, both conditions are present. The repair plan then needs to separate the collision-related work from unrelated deterioration as accurately as possible.
That distinction protects the owner, the shop, and the insurer. It also helps prevent a later dispute over whether a supplement is repairing the loss or correcting an older condition.
4. Roof structure, membranes, and transitions
The roof is connected to the sidewalls, caps, vents, skylights, antennas, air-conditioning units, solar equipment, and other penetrations. Collision forces can travel into the roof assembly even when the most visible damage is lower on the body.
Potential hidden roof damage includes:
- Opened roof-to-sidewall seams
- Cracked or displaced sealant
- Damaged termination rails
- Torn or punctured membrane
- Broken roof framing or blocking
- Distorted vent or skylight openings
- Water-damaged decking
- Damaged wiring at rooftop accessories
- Interior ceiling or cabinet movement
A roof inspection after a collision should not be limited to looking for a hole. The technician should consider how the impact moved the body and whether that movement affected the roof envelope.
If moisture is found, the documentation should distinguish between evidence of new intrusion and evidence of long-term deterioration where possible. Moisture readings, photographs, material condition, and the location of the damage can help establish the repair scope. No single test automatically proves when moisture entered the vehicle, so the conclusion should be based on the full inspection.
RVCCR’s article on professional RV roof replacement and sealing explains why roof repairs require more than applying sealant over a visible opening.
5. Underbelly, subfloor, plumbing, and electrical systems
The underbelly can conceal tanks, wiring, plumbing, insulation, floor structure, suspension components, and chassis attachments. A damaged underbelly panel may be only the visible portion of a larger problem.
During a controlled inspection, a shop may need to remove part of the underbelly material to check:
- Fresh tears or punctures
- Damaged tank supports
- Cracked plumbing or fittings
- Pinched or severed wiring
- Displaced insulation
- Damaged floor structure
- Bent outriggers or crossmembers
- Brake wiring on a travel trailer
- Generator, exhaust, or fuel-system mounting areas on a motorhome
Mechanical and electrical checks should be appropriate to the damage. A collision claim involving a travel trailer’s front frame may require inspection of the breakaway system, battery connection, 7-way wiring, safety-chain attachments, coupler, and brake operation. A motorhome impact may require additional chassis, steering, suspension, generator, leveling, or body-system checks.
The supplement should identify each affected system separately. Combining several unrelated issues into one vague line makes the claim harder to evaluate and can create confusion about what the shop actually repaired.
What a certified RV shop’s teardown process should look like
The exact process varies by RV type, manufacturer, impact location, and claim requirements. However, a thorough teardown generally follows a controlled sequence.
Step 1: Initial documentation
Before disassembly, the shop should record the vehicle identification information, condition, mileage where applicable, point of impact, visible damage, existing damage, and owner-reported symptoms.
The owner’s photos from immediately after the accident can be valuable. They may show the vehicle before parts were removed, before weather affected an opening, and before temporary towing or storage changed the condition.
Step 2: Safe preparation
The shop determines whether the RV can be moved safely and identifies systems that must be isolated before work begins. Depending on the vehicle, that may involve electrical power, batteries, propane, water systems, slide-outs, leveling equipment, generators, or other components.
The owner should ask how the shop will protect the RV during disassembly and whether the unit will remain secure if the repair is declined after teardown.
Step 3: Written teardown authorization
California’s Bureau of Automotive Repair states that a teardown estimate should identify the general area to be disassembled and include information such as the cost and maximum time to reassemble, the cost of parts normally destroyed during teardown, and notice that disassembly may prevent restoration to the condition in which the vehicle was delivered.
The BAR’s 2025 teardown guidance also explains that a teardown can help identify the extent of hidden damage, provide a more realistic repair timeframe, and reduce the risk of reaching a total-loss decision only after extensive repairs have already been performed.
Because an RV is not a standard passenger car, ask the shop to explain how its written teardown estimate applies to your specific unit and claim.
Step 4: Controlled disassembly
The shop removes only the panels, trim, components, and interior access areas necessary to determine the extent of damage. Removed parts should be organized and protected. The shop should photograph findings as they are exposed, not only after everything has been removed.
The process may include:
- Removing exterior trim and moldings
- Opening damaged sidewall sections
- Removing compartment doors or affected accessories
- Accessing slide-out mechanisms
- Removing underbelly material
- Opening interior panels or cabinetry where necessary
- Inspecting roof edges and penetrations
- Measuring chassis or trailer-frame geometry
- Testing electrical, plumbing, and mechanical systems
Step 5: Evidence collection
Each newly discovered item should be tied to evidence. Useful documentation may include:
- Wide photographs showing location
- Close-up photographs showing the condition
- Measurements
- Moisture readings
- Diagnostic scan results where applicable
- Functional test results
- Part numbers
- Manufacturer service information
- Material and sealant requirements
- Notes explaining why the damage is consistent with the collision

Step 6: Supplement preparation
The shop prepares a revised estimate that separates the original scope from the additional scope. It should identify new parts, labor, materials, sublet operations, testing, and reassembly work.
Where applicable, the estimate should reference the repair procedure or manufacturer information used to support the operation. A manufacturer’s owner manual may not contain detailed collision instructions, so the shop may need to use chassis service information, coach-builder information, component manuals, supplier procedures, or other applicable technical resources.
NHTSA’s public materials consistently direct owners and technicians toward manufacturer instructions for safety-related vehicle work. The exact source used will depend on the RV’s chassis, coach manufacturer, slide system, roof material, and damaged component.
Step 7: Insurer review and owner communication
The insurer reviews the supplement. The carrier may approve it, request photographs or measurements, ask for a reinspection, question a repair method, request a comparable part, or determine that the repair cost is approaching the vehicle’s actual cash value.
The owner should receive an updated explanation of:
- What was found
- What the shop recommends
- What the insurer has approved
- What remains under review
- Whether any amount could be owed by the owner
- How the supplement affects the timeline
- Whether the repair remains economically feasible
How to document and submit a strong RV supplement
A well-supported supplement answers four questions:
- What was discovered?
- Where is it located?
- How do we know it is damaged?
- Why is the proposed operation necessary?
A useful documentation package may include:
Photographs
Take photographs at several distances. A wide image identifies the location on the RV. A medium image shows the component relationship. A close-up shows the crack, bend, separation, torn seal, crushed structure, or damaged wiring.
Photographs should be clear, dated when possible, and organized by area. Avoid sending hundreds of unlabelled images with no explanation. A smaller set of well-organized images is easier for an adjuster to review.
Measurements
Measurements help turn a general concern into a verifiable condition. Depending on the repair, these may include:
- Frame or chassis dimensions
- Slide opening dimensions
- Door or compartment opening measurements
- Panel thickness
- Alignment observations
- Moisture readings
- Component clearances
- Before-and-after measurements
A measurement should identify what was measured, where it was measured, and what reference it is being compared against.
Repair procedure references
The estimate should identify the applicable manufacturer or component procedure when one exists. This may involve:
- Chassis manufacturer repair information
- Coach-builder body or structural information
- Slide mechanism documentation
- Roof-material instructions
- Sealant or adhesive technical data
- Component manufacturer service instructions
- OEM parts information
The goal is not to fill the estimate with technical jargon. The goal is to show that the proposed repair follows a defined method rather than an improvised shortcut.
Causation notes
A supplement should explain why the newly found condition is related to the loss. Useful notes may describe:
- The location directly behind the impact
- Fresh deformation or fracture
- A newly opened seam
- A broken mounting point
- A changed operating symptom reported after the collision
- A clear path from visible damage to concealed damage
- The absence of similar damage in adjacent undamaged areas
If a condition appears pre-existing, the shop should say so rather than fold it into the collision scope. Honest separation of unrelated damage makes the collision-related supplement more credible.
Why insurers question RV supplements
An insurer may question an RV supplement for several legitimate reasons:
- The damage is not visible in the initial photographs
- The estimate does not show how the condition relates to the collision
- The proposed operation is not explained
- A repair procedure or parts source is missing
- The shop has not separated old damage from new damage
- The requested labor includes work outside the documented impact area
- The insurer believes repair is possible instead of replacement
- The part is unavailable or the quoted price is not supported
- The total repair cost may approach the RV’s actual cash value
- The shop and insurer disagree about labor, materials, or responsibility
The best response is evidence, not emotion.
If an adjuster asks why a wall must be opened, provide the photographs showing the impact path, the moisture or structural findings, and the reason access is necessary. If the insurer questions a slide-out replacement, provide the measurements, operating test results, damaged mounting points, and relevant component information.
If the insurer proposes a lower-cost repair, ask the shop to explain whether that method restores the structure, waterproofing, function, and appearance to the applicable standard. California’s Auto Body Repair Consumer Bill of Rights also requires parts to be identified as new, used, aftermarket, reconditioned, or rebuilt on estimates and invoices for covered auto body repairs. For an RV claim, the specific policy and applicable repair rules should be reviewed with the insurer and repair facility.
RVCCR also explains the parts question in OEM parts versus aftermarket motorhome collision repair.
What slows supplement approvals
Supplement approvals can take longer when:
- The vehicle is difficult to move or access
- The shop needs manufacturer information
- The insurer requires a reinspection
- The photographs do not clearly show the damage
- The proposed repair is near a total-loss decision
- A component is backordered
- The shop and insurer disagree about repair versus replacement
- Multiple carriers or policies are involved
- The RV contains custom finishes or obsolete components
- The damage extends across structural, mechanical, electrical, and living-space systems
- The owner has not authorized the next stage
- The repair involves specialty testing or sublet services
Parts delays can continue after a supplement is approved. A repair cannot always proceed simply because the estimate has been authorized. The required cap, sidewall panel, slide component, door, trim, light, seal, or chassis part may still need to be sourced.
A trustworthy shop should update you when the status changes. Ask whether the delay is caused by supplement review, parts availability, teardown findings, scheduling, or final testing. Those are different problems with different solutions.
Questions to ask before authorizing RV collision repairs
Before signing a repair authorization, ask:
- Is this an initial estimate or a teardown-based estimate?
- Which areas will be disassembled?
- What is the teardown charge?
- What will reassembly cost if I decline the repair after teardown?
- What is the maximum reassembly timeframe?
- Which seals, gaskets, adhesives, and fasteners may be destroyed during teardown?
- Will the shop photograph hidden damage before repairing it?
- How will the shop separate collision damage from pre-existing moisture or delamination?
- Will the frame, trailer tongue, slide opening, or suspension be measured?
- Will the roof, sidewall transitions, and underbelly be inspected?
- Will slide-outs be cycled and tested?
- Which OEM or component procedures will guide the repair?
- Which parts are OEM, used, aftermarket, reconditioned, or rebuilt?
- Who submits supplements to the insurer?
- Will I receive copies of each revised estimate and approval?
- What happens if the insurer does not approve a necessary operation?
- Could the repair cost approach the RV’s actual cash value?
- What costs could become my responsibility?
- How will plumbing, electrical, brake, generator, leveling, and other systems be tested?
- What warranty will apply to the completed repair?
In California, a repair shop should obtain authorization before performing additional work beyond the approved estimate. The Bureau of Automotive Repair explains that owners must be informed about estimate changes and must authorize additional repairs. Keep copies of authorizations, supplements, photographs, invoices, and insurer communications.
The difference between a higher estimate and a better repair
A higher estimate is not automatically better. More line items do not prove that every operation is necessary.
A better repair estimate is specific. It explains the damage, the evidence, the repair method, the parts, the labor, the testing, and the reason each step is needed. It distinguishes collision damage from pre-existing conditions. It shows where the vehicle was opened and what was found inside.
Likewise, a lower estimate is not automatically a better value. If it leaves out structural measurement, moisture evaluation, slide-out testing, underbelly inspection, or required reassembly materials, the apparent savings may simply represent work that has not yet been evaluated.
The goal of an RV insurance supplement is not to increase a claim. The goal is to make the repair scope match the actual condition of the vehicle.
Choosing an RV collision repair shop near Redlands and the Inland Empire
When you search for travel trailer repair near me, compare more than distance and the first quoted amount. Ask whether the facility understands the differences among motorhomes, fifth wheels, travel trailers, toy haulers, and pop-up campers.
Look for a shop that can explain:
- How it handles teardown authorization
- How it documents supplements
- How it checks frame or trailer geometry
- How it evaluates laminated walls and moisture
- How it tests slide-outs
- How it inspects roof transitions and underbelly components
- How it coordinates with insurance carriers
- How it sources appropriate parts
- How it handles collision, paint, and mechanical work together
- What warranty is provided in writing
RVCCR is family-owned and has served the Redlands area for 21 years. Our team combines RV collision repair, motorhome collision repair, paint and body work, and mechanical service so owners do not have to coordinate every part of a complex claim between unrelated facilities.
The practical outcome is greater clarity. You know what was found, why it matters, what the insurer has approved, and what still needs a decision.
Get the hidden damage documented before it becomes a second problem
An RV that looks repairable from the outside may still have damage behind the wall, under the floor, around the slide-out, along the roof, or inside the frame. That is why an initial estimate should be treated as the beginning of the claim: not the final word.
A professional teardown exposes the affected areas carefully. Measurements, photographs, moisture readings, diagnostic results, component information, and repair procedures give the insurer a clear basis for reviewing the supplement. Written authorizations and updated estimates help protect the owner from unexpected charges.
If your motorhome, fifth wheel, travel trailer, or toy hauler has been involved in a collision, do not authorize cosmetic work without asking how hidden damage will be evaluated. Bring the repair questions forward before the unit is disassembled, and choose a shop equipped to explain the entire process.
At RVCCR, we help coordinate the estimate, inspection, documentation, insurance communication, structural repair, paint work, mechanical service, and final testing. We restore more than the visible finish: we work to return your RV to a safe, road-ready condition so you can tow, travel, camp, and enjoy the adventure ahead with confidence.
Request a free RV repair estimate and let our Redlands team help identify what your initial estimate may not show.
Need a repair estimate?
Skip the wait — send us a few photos and our team will get back to you fast.
Start a Photo Estimate →