RV Awning Damage After a Collision: Fabric vs. Mechanism Repair and What Insurance Covers
Updated September 9, 2026 | RVCCR, RVDA Certified RV Repair Facility in Redlands
RVDA-certified staff and technicians at RVCCR have spent 21 years repairing motorhomes, fifth wheels, travel trailers, toy haulers, popups, and other recreational vehicles in Redlands and the Inland Empire. Our team handles RV collision repair, paint and body work, awning service, structural inspection, and mechanical repairs under one roof.
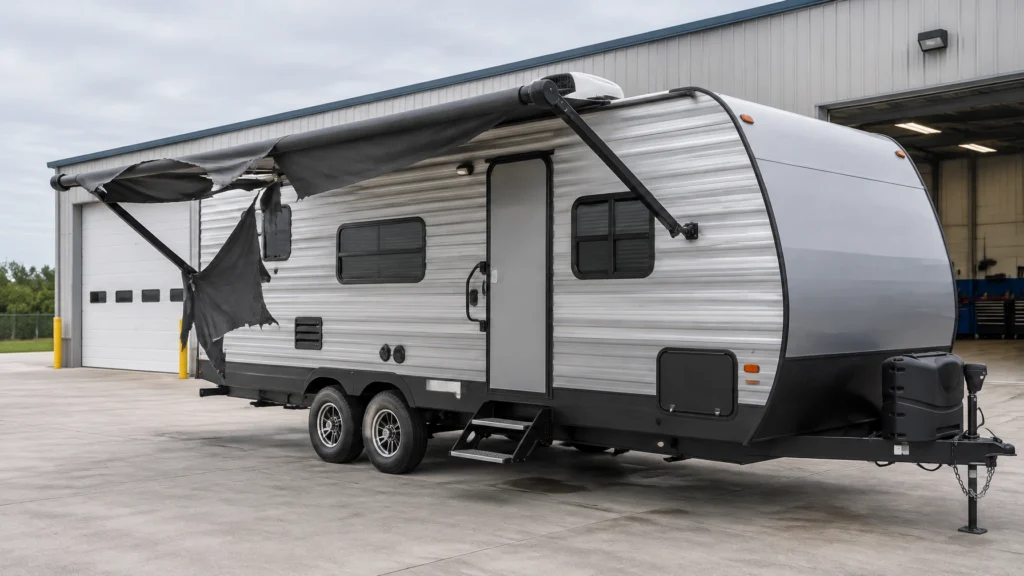
An awning can look like a simple accessory, but a collision may damage several connected components at once: the fabric, roller tube, support arms, brackets, mounting rail, sidewall attachment points, and weather seals. A torn canopy may be the most obvious symptom, while a twisted roller or loosened sidewall mount remains hidden until the awning is extended and tested…
That is why the correct repair begins with separating fabric damage from mechanism damage. The repair decision affects safety, water protection, insurance documentation, parts selection, and the awning’s ability to open and retract correctly.
This article explains what to inspect after an accident, when fabric can be repaired or should be replaced, why bent arms and mounting damage often require component replacement, how collision coverage may apply, and what to ask before authorizing work.
Fabric damage and mechanism damage are different problems
RV awnings generally combine a flexible fabric canopy with a mechanical support system. The fabric provides shade and weather protection. The mechanism controls how the fabric rolls, extends, retracts, and stays tensioned.
A collision can affect either side of that system: or both.
Fabric damage may include:
- Clean tears caused by contact with another object
- Punctures from broken trim, branches, or displaced hardware
- Abrasion from rubbing against a bent arm or roller
- Frayed edges
- Torn stitching
- Stretching or distortion
- Heat or friction damage
- Separation from the awning rail
- Damage around the roller-tube slot
- Water staining or contamination after the fabric was left exposed
Mechanism damage may include:
- A bent or kinked support arm
- A twisted roller tube
- Failed spring tension on a manual awning
- A damaged motor or motor head on a powered awning
- Broken end caps
- Bent mounting brackets
- Elongated or torn fastener holes
- A twisted awning rail
- A mounting rail pulled away from the sidewall
- Crushed or separated sidewall material
- Missing or loosened fasteners
- Damaged weather seals
- A sidewall mounting point that no longer holds securely
The distinction matters because replacing fabric will not correct a bent roller tube. Likewise, replacing an arm will not repair fabric that has stretched, torn, or lost its original shape.
A professional inspection must evaluate the complete assembly rather than simply quoting a replacement canopy.
How a collision can twist the awning system
A collision does not have to strike the fabric directly to damage the awning. Impact energy can travel through the RV body and distort the parts that support the awning.
For example, a sideswipe near the upper sidewall may push the exterior panel inward. The awning rail attached to that panel can twist or move with it. If the rail shifts, the fabric may pull unevenly across its width. That uneven load can bend an arm, distort the roller tube, or tear the fabric bead from the track.
A low-clearance impact can produce a different pattern. The fabric may catch on an overhead object while the RV continues moving. That can place a sudden load on the roller tube and arms, pull the mounting rail away from the wall, or damage the sidewall substrate behind the fasteners.
A backing collision near the rear of a travel trailer can also affect an awning if the side of the coach contacts a post, tree, building, or another vehicle. The visible scrape may be lower on the body while the awning rail above it is twisted by the movement of the sidewall.
The inspection should therefore consider:
- The direction of the impact
- The height of the contact
- The location of paint transfer or fresh abrasion
- Whether the awning was extended or retracted
- Whether the fabric was under tension
- Whether the RV sidewall moved or buckled
- Whether the awning rail remains straight
- Whether fasteners still grip sound material
- Whether the system operates evenly after the event
A collision-related awning claim should be supported by evidence connecting the damage to the accident. Photos from immediately after the collision can help show the original position of the fabric, arms, rail, and brackets before the vehicle is moved or partially disassembled.
Inspect the awning before opening or forcing it
Do not force a damaged awning open simply to see whether it works. A bent arm can bind suddenly. A damaged manual awning may contain stored spring energy. A powered unit may continue trying to operate against a jammed mechanism, damaging the motor, gears, wiring, or control system.
If the fabric is hanging, the roller is visibly bowed, an arm is displaced, or the awning rail has pulled away from the sidewall, keep people clear of the assembly until it can be evaluated safely.
A preliminary inspection should document the awning in its current condition. Useful photographs include:
- A wide view showing the awning’s location on the RV
- A view of the collision area and surrounding sidewall
- Close-ups of fabric tears, punctures, and abrasion
- Photos of both support arms
- Photos of the roller tube from several angles
- Photos of each bracket and end cap
- Photos of the awning rail along its full length
- Photos of fasteners and sidewall attachment points
- Photos of torn or displaced weather seals
- Photos of any paint transfer or fresh scrape marks
The shop should also record whether the awning was extended, partially extended, or retracted when inspected. Position can affect the apparent shape of the fabric and the load on the hardware.
The main awning inspection points
A complete awning evaluation should be systematic. The following areas help determine whether the damage is limited to fabric or extends into the mechanism and RV structure.
1. Roller tube straightness
The roller tube should rotate evenly and remain straight across its length. A collision can bend or twist the tube even when the fabric is the most visible damaged part.
Possible signs of roller-tube damage include:
- A visible bow
- Uneven fabric winding
- One end rolling faster than the other
- Fabric bunching on one side
- A tight spot during rotation
- A tube that wobbles as it turns
- End caps that no longer sit squarely
- A roller that cannot retract the fabric evenly
A slightly uneven roll may not be obvious when the awning is only partially extended. The system should be checked through an appropriate operating range, provided it can be moved safely.
A damaged roller tube is generally not corrected by pulling it straight in place. The proper decision depends on the awning model, the material, the location of the distortion, and the manufacturer’s service information. If the tube no longer supports even rolling or places uneven stress on the fabric, replacement may be more appropriate than attempting to reshape it.
2. Support-arm movement
Support arms guide the awning as it extends and retracts. They also help hold the fabric at the intended pitch and tension.
Inspect each arm for:
- Bends or kinks
- Cracks near pivot points
- Scrapes that indicate contact
- Loose or missing fasteners
- Binding at hinges
- Uneven movement
- Arms that do not lock or fold correctly
- A difference in position between the two sides
- Damage near the upper or lower mounting brackets
A bent arm can force the roller tube out of alignment. It can also make the fabric appear to be the problem when the underlying cause is mechanical.
Many awning arms contain formed metal sections, springs, pivot hardware, or other components that are not intended to be straightened after a collision. A qualified technician should identify whether the specific manufacturer permits service of an individual part or calls for assembly replacement.
3. Fabric tension and tracking
Fabric should roll evenly and remain properly aligned in the awning rail and roller-tube channel. Collision damage may create uneven tension from one side to the other.
Watch for:
- Wrinkles that remain after the fabric is extended
- A diagonal pull across the canopy
- One edge becoming tighter than the other
- Fabric walking sideways on the roller
- A bead pulling out of the rail
- Sagging that was not present before the collision
- New stress marks near seams or pockets
- A canopy that does not lie flat
A fabric panel that has stretched may not return to its original dimensions. Even if a tear is sewn, the surrounding material may continue to pull unevenly during operation.
4. Sidewall mounting integrity
The awning’s brackets and rail transfer load into the RV sidewall. This makes the mounting area one of the most important inspection points after a collision.
The technician should check:
- Whether the mounting rail remains straight
- Whether screws or bolts are still tight
- Whether fastener holes are elongated
- Whether the rail has lifted away from the wall
- Whether the exterior skin is cracked or crushed
- Whether the wall substrate behind the fasteners is sound
- Whether the bracket has shifted
- Whether the sidewall shows signs of delamination or separation
- Whether the mounting points align with the original locations
A new awning installed into damaged wall material may not remain secure. If a collision has compromised the sidewall, the wall repair may need to happen before the awning is reinstalled.
5. Weather seal condition
The seal between the awning rail and the RV sidewall helps limit water entry. A collision can split, compress, peel, or displace that seal.
Inspect for:
- Open gaps
- Torn sealant
- Separated trim
- Sealant pulled away from the sidewall
- Cracks near fasteners
- Areas where the rail no longer sits flat
- Evidence of moisture behind the rail
- Water staining inside the wall or adjacent interior
Replacing the visible awning component without restoring the weather seal can leave the RV vulnerable to water intrusion. The repair should address the complete attachment system, not only the part that looks damaged from outside.

When damaged awning fabric can be repaired
Fabric repair may be possible when the damage is limited, localized, and does not affect the canopy’s attachment points, seams, shape, or overall tension.
A repair may be considered for:
- A small puncture
- A short, localized tear
- Minor abrasion that has not weakened a large area
- Damage away from the fabric bead and major seams
- A condition where the surrounding material remains flexible and strong
- A temporary measure while replacement material is sourced
The exact repair method depends on the fabric type. Vinyl, acrylic, and other awning materials have different characteristics. A patch or stitched repair must be compatible with the material and positioned so it does not interfere with rolling.
The repair must also be evaluated in context. A small hole in an otherwise sound canopy is different from a small hole surrounded by stretched, brittle, sun-damaged, or collision-distorted material.
A patch should not be treated as proof that the canopy has returned to its original condition. It may stop a localized opening from spreading, but it does not reverse stretching or restore the original strength of fabric that has been pulled across a damaged mechanism.
Why stretched or torn fabric usually needs replacement
A torn awning canopy often needs replacement rather than patching when the damage affects a seam, edge, bead, pocket, or large tension-bearing area.
Replacement is more likely when:
- The fabric has stretched out of shape
- The tear follows a seam or attachment edge
- Multiple tears or punctures are present
- The material is frayed around the damage
- The fabric has been abraded across a broad section
- The canopy no longer rolls evenly
- The fabric has pulled out of the roller-tube channel
- The fabric has separated from the awning rail
- The material is brittle or weakened
- The damage resulted from a bent arm or twisted roller
- A patch would create an uneven thickness in the roll
- The fabric no longer maintains proper tension
The reason is functional as well as cosmetic. An awning fabric must move through the rail and roll onto the tube without bunching. It must also distribute tension across the support arms. A patch may cover a hole but leave the canopy unable to perform those functions correctly.
Before ordering replacement fabric, the shop should identify the awning model, length, projection, fabric type, orientation, roller-tube configuration, and attachment method. A canopy that appears similar may not fit the original rail or roller channel.
When roller, arms, brackets, or rail components should be replaced
Roller tube
Replacement is commonly considered when the roller tube is visibly bent, does not rotate evenly, has damaged channels, or causes the new fabric to wind unevenly.
A new canopy should not be installed on a roller that will immediately distort it.
Support arms
An arm should be closely evaluated if it is bent, cracked, binding, displaced, or unable to hold the intended position. The specific repair or replacement decision depends on the awning manufacturer and component design.
Replacing only one arm may not always be appropriate. The shop should verify compatibility, symmetry, tension, and the manufacturer’s recommended service procedure.
Brackets
Brackets may be replaceable when the bracket itself is bent or cracked but the sidewall mounting structure remains sound. The new bracket must be installed into secure material with the correct fasteners and sealant.
If the bracket damage has pulled fasteners through the wall, the underlying sidewall must be assessed before installation.
Awning rail
A twisted or lifted rail can prevent the fabric from tracking correctly and can create a water-sealing problem. Rail replacement may be required when it is distorted, cracked, or no longer sits flat against the RV.
Straightening a visibly twisted rail may not restore its original channel shape or mounting integrity. The decision should be based on the condition of the extrusion and the wall behind it.
Sidewall mounting points
This is often the most important threshold. If the sidewall material is crushed, separated, delaminated, or unable to hold fasteners, the awning should not simply be bolted back into place.
The repair may involve:
- Removing damaged trim or rail
- Opening the affected wall area
- Inspecting the substrate and framing
- Repairing or replacing damaged material
- Restoring the mounting surface
- Reinstalling the rail with appropriate sealant
- Testing the awning after the wall repair

Manual and powered awnings require different precautions
Manual awnings often use a spring-loaded roller assembly. That spring stores energy and can release suddenly if the roller or end cap is handled incorrectly.
Powered awnings may use a motor, gear assembly, wiring, control switch, limit control, or manual override. A collision can damage the mechanism mechanically while leaving the electrical system apparently functional. The motor may still run but bind against a bent arm or twisted tube.
For either type:
- Follow the exact manual for the awning model
- Disconnect power before working on a powered system
- Do not defeat safety locks or retaining hardware
- Do not operate an awning that is visibly bent or unstable
- Do not release spring tension without the correct procedure and tools
- Do not assume that a working motor means the mechanism is undamaged
- Test extension and retraction only after the assembly is secure
Carefree of Colorado’s manufacturer guidance explains that fabric replacement involves securing the arms, removing the roller tube, sliding fabric from the rail and roller channel, reinstalling the assembly, and checking alignment. The company also warns that manual awnings require special attention to the tension spring. Review the Carefree RV awning fabric replacement instructions for general manufacturer information, while recognizing that the manual for the exact awning model controls the repair procedure.
How insurance may cover collision-related awning damage
Insurance coverage depends on the policy, the cause of loss, the awning’s status as an attached component, the deductible, and any exclusions or endorsements.
Progressive’s consumer guidance states that RV comprehensive and collision coverage may pay to repair or replace awning damage caused by a covered event, subject to the policy and deductible. Collision examples include impact with another vehicle or an object such as a tree, fence, guardrail, or overhanging structure. Comprehensive coverage may apply to non-collision events such as wind, hail, fire, vandalism, or an animal strike.
For an awning damaged in a vehicle collision, the claim is generally evaluated as part of the physical damage caused by that collision. However, coverage is not automatic. The policy may address:
- Permanently attached equipment
- Optional equipment
- Accessories
- Special deductibles
- Awning-specific exclusions
- Wear and tear
- Pre-existing deterioration
- Negligence or misuse
- Actual cash value or replacement cost
- Policy limits
A collision claim may cover a torn canopy, bent arm, damaged roller, broken bracket, or related mounting repair when the evidence supports that the damage resulted from the covered accident. It may not cover older fading, long-term fabric deterioration, corrosion, prior tears, or unrelated sidewall delamination.
The most reliable answer comes from the policy and the insurer handling the claim. Ask whether the awning is included as permanently attached equipment, whether a separate deductible applies, and how the insurer will evaluate repair versus replacement.
For a more detailed explanation of hidden damage and supplemental estimates, review RVCCR’s article on RV insurance supplements and hidden collision damage.
What to document for the claim
A strong claim file should show both the original collision and the condition of the awning.
Keep:
- Photos taken immediately after the incident
- The collision report, if one was created
- The RV’s year, make, model, and VIN
- The awning brand and model, if available
- Photos of manufacturer labels
- Photos of the full RV and impact area
- Close-ups of every damaged awning component
- Photos showing the rail’s relationship to the sidewall
- Photos of torn or separated sealant
- Photos of damage behind removed trim or brackets
- The written repair estimate
- Any teardown authorization
- Supplement documentation
- Insurer correspondence
- Parts approvals
- Final invoices and warranty information
The repair facility should document why a fabric repair is sufficient or why replacement is necessary. If a mechanism is being replaced, the estimate should identify the damaged component and explain how its condition affects safe operation or proper alignment.
A clear estimate may separate:
- Canopy removal
- Roller-tube inspection
- Fabric replacement
- Arm replacement
- Bracket replacement
- Rail removal and installation
- Sidewall repair
- Sealant and weatherproofing
- Motor or wiring diagnosis
- Functional testing
- Paint and finish work
That level of detail helps the owner and insurer understand what is being repaired and why.

Questions to ask before authorizing awning repairs
Before approving work, ask the shop:
- Is the damage limited to fabric, or are the roller, arms, brackets, or rail affected?
- Was the awning inspected in its current condition before being operated?
- Is the roller tube straight and rotating evenly?
- Do both arms move and lock correctly?
- Are the sidewall fasteners still secure?
- Is the mounting substrate sound?
- Has the weather seal been checked for gaps or separation?
- Is the fabric stretched, or is the damage limited to a repairable puncture?
- Does the manufacturer provide a repair procedure for this component?
- Will replacement fabric match the original size, material, orientation, and attachment method?
- If the awning is powered, has the motor and wiring been tested?
- Will the rail be removed to inspect the wall behind it?
- Could the collision have caused hidden sidewall or delamination damage?
- Will the shop submit a supplement if additional damage is found?
- Which items has the insurer approved?
- Which items remain under review?
- What amount, if any, could become the owner’s responsibility?
- What testing will be completed before the RV is released?
- What written warranty applies to the repair?
- Can the shop provide photographs of hidden damage and completed work?
A responsible rv paint and body shop should be willing to explain the repair path in plain language. You should understand whether you are approving a fabric replacement, a mechanism repair, a sidewall repair, or a complete awning assembly replacement.
Choosing an RV collision repair facility near Redlands
When searching for travel trailer repair near me, distance is only one factor. An awning is attached to the RV’s exterior structure, so the repair facility should understand how body panels, sidewalls, sealants, brackets, and accessories work together.
Look for a shop that can:
- Work on your type of RV
- Inspect both body and mechanical damage
- Handle fabric, frame, and powered awning systems
- Evaluate sidewall mounting points
- Document hidden damage
- Coordinate with your insurance carrier
- Prepare supplements when the scope changes
- Restore paint and exterior finishes
- Provide a written estimate
- Explain parts and repair options
- Back the completed work with a written warranty
RVCCR repairs Class A, B, and C motorhomes, fifth wheels, travel trailers, toy haulers, popups, and other RVs. Our RV repair and collision service includes awning repair and replacement, exterior body work, full repaints, roof and sidewall repairs, interior restoration, and insurance coordination.
An awning repair may be small compared with a full motorhome restoration, but it still deserves a complete inspection. The awning must work with the sidewall, trim, seal, and surrounding body: not merely look acceptable when the RV is parked.
Restore the awning so the next trip can begin
A collision-damaged awning should not be judged by the fabric alone. A tear may be repairable, or it may indicate that the canopy has stretched beyond reliable service. A bent arm may be visible, while a twisted roller or damaged mounting point remains hidden. A rail that looks attached may no longer be secured to sound sidewall material.
The right repair starts by documenting the collision, inspecting the full assembly, separating fabric damage from mechanism damage, and determining whether the sidewall and weather seal remain sound. Insurance may cover covered collision-related awning damage, but the final decision depends on the policy, deductible, exclusions, evidence, and insurer review.
If your motorhome, fifth wheel, travel trailer, toy hauler, or popup has suffered awning damage, do not force the assembly open or authorize a fabric-only repair before the hardware is inspected. Bring the RV to a facility that can evaluate the awning, sidewall, paint, body, and related mechanical systems together.
RVCCR’s RVDA-certified team can document the damage, prepare a written estimate, coordinate with your insurer, repair the underlying structure, and restore the awning to dependable operation. We do more than replace a torn canopy. We help rebuild the protection, function, and confidence you need to tow, camp, and enjoy the road ahead.
Request a free RV collision repair estimate and let our Redlands team inspect the complete awning system before a small exterior problem becomes a larger one.
Need a repair estimate?
Skip the wait — send us a few photos and our team will get back to you fast.
Start a Photo Estimate →