RV Windshield Replacement After a Collision: Why Glass, Seals, and Front-Cap Alignment All Matter
Review date: August 21, 2026
RVCCR is an RVDA-certified repair facility serving Redlands and the Inland Empire, with 21 years of RV-specific collision, paint, body, and mechanical repair experience. Our team works on Class A, B, and C motorhomes, fifth wheels, travel trailers, toy haulers, popups, and other recreational vehicles.
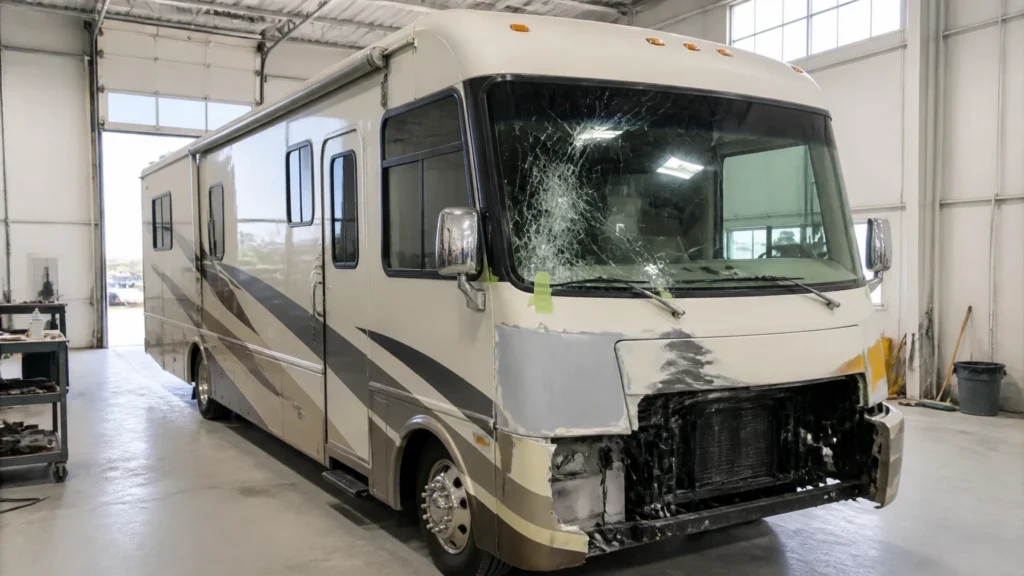
After a crash, replacing an RV windshield is rarely just a matter of removing broken glass and installing a new pane. The repair may involve the front cap, windshield opening, mounting surfaces, sealants, adjacent body panels, interior trim, and: on applicable motorhomes: forward-facing cameras or sensors. Each part must work together before the coach is returned to the road…
For owners searching for motorhome collision repair, RV collision repair, or a travel trailer repair near me in the Redlands area, understanding this process can help you ask better questions and avoid a repair that only looks complete from the outside.
Why an RV Windshield Replacement Is More Than a Glass Swap
A motorhome windshield is installed into a carefully designed opening in the front cap and surrounding body structure. Depending on the coach, the glass may be bonded with automotive urethane, retained with a gasket system, or installed as part of a manufacturer-specific assembly.
The exact construction varies by make, model, and year. That is why a repair facility should consult the RV manufacturer’s service information rather than rely on a universal installation method.
The National Highway Traffic Safety Administration directs manufacturers and repair professionals to the Federal Motor Vehicle Safety Standards in 49 CFR Part 571. Those standards include requirements related to glazing and windshield mounting performance. The practical takeaway is straightforward: the glass must be the correct type, installed correctly, and retained as designed.
A collision can compromise that design even when the windshield does not appear completely shattered. An impact may:
- Shift the front cap or windshield opening
- Crack fiberglass around the glass
- Distort the mounting flange or pinch-weld area
- Damage the adhesive bed
- Break adjacent trim or molding
- Separate roof-to-cap or cap-to-sidewall seams
- Create a path for water to reach the interior
- Disturb a camera or sensor mounted near the glass
A new windshield cannot correct a deformed opening by itself. If the structure is misaligned, forcing the replacement glass into place can create uneven contact, inconsistent adhesive thickness, trim problems, or future leaks.

The Front Cap and Windshield Opening Must Be Inspected First
Before glass installation begins, technicians should inspect the front cap and the opening surrounding the windshield. The inspection should account for both visible and hidden damage.
Fiberglass may show cracks, stress marks, chipped gel coat, or displaced graphics. However, the absence of obvious cracking does not prove that the opening is still correctly aligned. A collision can change the shape of the opening or move the surrounding framework without producing a dramatic exterior fracture.
A professional evaluation may include:
-
Visual inspection of the front cap
Technicians look for cracks, distortion, impact marks, loose trim, displaced molding, and damage at corners or cap seams. -
Inspection of the mounting surface
The body surface must be stable, clean, and suitable for the specified adhesive or gasket system. Damaged material may need repair before the glass is installed. -
Measurement of the opening
The opening should be checked for alignment and squareness according to the vehicle manufacturer’s procedures. A replacement windshield should not be used to pull a twisted opening back into shape. -
Inspection of adjacent components
Damage near the A-pillars, roof transition, dashboard, wiper area, mirrors, lighting, and front body panels may affect the installation or water-tightness of the finished repair. -
Evaluation of interior evidence
Water staining, damp insulation, softened trim, or moisture near the dashboard and A-pillars can indicate that the collision disturbed more than the glass.
The right measurement process depends on the coach. Some repairs may require manufacturer-specific fixtures or reference points. The important point is that alignment should be verified before the new glass is permanently bonded.
Sealants Are Part of the Repair System
RV manufacturers use different materials for different joints. A structural glass adhesive is not automatically interchangeable with a flexible sealant used on a roof seam or front-cap molding.
Winnebago’s official sealant call-out information explains that sealant selection depends on the joint design, substrates, application method, curing time, and performance requirements. It also cautions that products should not be assumed compatible simply because they are in the same general sealant category.
That distinction matters after a collision.
The windshield bond may require:
- A specified automotive glass urethane
- Compatible glass and body primers
- Proper cleaning and surface preparation
- The correct bead size and placement
- Controlled installation timing
- Manufacturer-specific curing conditions
The surrounding front cap may require different materials for:
- Roof-to-cap seams
- Cap-to-sidewall joints
- Exterior moldings
- Trim and fastener heads
- Window or front-cap openings
- Decorative or protective overlays
Applying generic caulk over damaged or contaminated material may temporarily hide a leak without restoring the underlying seal. If water has already entered, the technician may also need to inspect the substrate for corrosion, deterioration, or other moisture-related damage before resealing.

Water Intrusion Can Continue After the Glass Looks Correct
Water does not always enter through the most obvious point. A leak near the windshield may begin at the glass perimeter, a cap seam, roof transition, molding, fastener, or adjacent damaged panel. Once inside, moisture can travel along framing, insulation, trim, or the dashboard before becoming visible.
That is why a proper RV paint and body shop should treat water intrusion as a diagnostic issue, not simply a caulking issue.
After collision damage, technicians may need to:
- Remove loose or damaged exterior trim
- Clean away failed sealant and adhesive
- Inspect the surrounding fiberglass and framework
- Repair cracked or displaced mounting surfaces
- Install the correct replacement seal or adhesive
- Reseal connected joints and transitions
- Check the interior for signs of moisture
- Perform a controlled water test after curing
RVCCR’s guidance on RV slide-out mechanism and seal repair after a collision follows the same basic principle: exposed areas must be inspected, compromised materials repaired, and seals restored continuously rather than patched only where water is visible.
Camera and Sensor Checks May Apply
Not every RV has a camera or sensor attached to the windshield. Some motorhomes may have forward-facing cameras, rain or light sensors, lane-support equipment, or other systems positioned near the glass. The requirements vary by chassis, manufacturer, model year, and equipment package.
If a camera or sensor is mounted to or aligned through the windshield, replacement can affect its position or optical path. The vehicle manufacturer’s service information should determine whether inspection, initialization, aiming, calibration, or a diagnostic scan is required.
A road test alone does not automatically replace a manufacturer-defined calibration procedure. Similarly, a dashboard without warning lights does not prove that every system is operating within specification.
A repair plan should identify:
- Whether the coach is equipped with windshield-mounted sensors or cameras
- Whether the mounting bracket was disturbed
- Whether the system requires post-replacement calibration
- Whether a pre-repair or post-repair diagnostic scan is appropriate
- Whether calibration must wait until the adhesive reaches the specified safe handling condition
These checks are especially important when a collision involves the front cap, windshield frame, dashboard, wiring, mirrors, or chassis components.
Motorhome Windshields and Towable Front Windows Are Not the Same
Owners of fifth wheels and travel trailers should also clarify what they are replacing. Some towables have a front-cap window rather than a bonded motorhome windshield. That window may use a frame, butyl or bulb seal, fasteners, and exterior sealant.
Lippert’s RV window installation guidance emphasizes accurate opening measurements, surface preparation, continuous perimeter sealing, correct fit, and even fastening. Lippert also warns that using the wrong materials or installing a window unevenly can contribute to leaks, rattling, or wall damage.
The repair approach therefore depends on the actual assembly:
- Bonded motorhome windshield: Requires the correct glass adhesive system and careful handling of the structural opening.
- Framed front-cap window: Requires proper fit, gasket or tape continuity, correct fastener installation, and compatible exterior sealing.
- Damaged front cap around either type: May require fiberglass, framing, trim, or seam repair before glass or window installation.
For a fifth wheel or travel trailer collision, the front cap and frame should be evaluated together. Our article on fifth wheel vs. travel trailer collision repair explains why the coupling system and frame geometry influence the inspection strategy.
What Post-Repair Verification Should Include
Before accepting an RV after windshield or front-cap repair, ask the shop how it verifies the finished work. The exact checklist will vary, but a careful process may include:
- Confirming that the glass is seated evenly
- Inspecting the adhesive or gasket perimeter
- Checking trim and molding fit
- Verifying that front-cap seams are sealed
- Confirming that no interior trim or dashboard components were left loose
- Testing for water intrusion after the appropriate cure period
- Checking cameras or sensors when the coach is equipped with them
- Performing applicable diagnostic scans or calibration procedures
- Inspecting for wind noise, glass movement, or visible gaps
- Documenting the repair and any manufacturer procedures used
The shop should also explain when the coach can be moved or driven. Cure time depends on the specific adhesive, temperature, humidity, bead geometry, and manufacturer instructions. There is no single universal number that applies to every RV windshield installation.
Choosing an RV Collision Repair Shop Near Redlands
A glass-only replacement may be appropriate when the front cap and mounting surfaces are undamaged. After a collision, however, an RV-experienced collision facility is often better positioned to evaluate the complete repair.
Look for a shop that can coordinate:
- RV collision and body repair
- Fiberglass and front-cap repair
- Paint matching and refinishing
- Mechanical inspection when chassis damage is possible
- Insurance supplements and documentation
- Water-intrusion diagnosis
- Sensor or camera verification when applicable
RVCCR is family-owned, RVDA certified, and serves owners throughout Redlands and the Inland Empire. We provide free estimates, coordinate with major insurance carriers, and back our repair work with a written lifetime warranty.
A damaged windshield should not be treated as an isolated piece of glass when the collision may have shifted the structure around it. Inspect the opening, restore the correct adhesive or seal system, verify the front cap, account for applicable electronics, and test the finished repair before returning to the highway…

Get Back to the Road With Confidence
Your RV is more than a vehicle. It may be the way your family reaches the mountains, visits relatives, attends races, or takes the long route home. The goal of windshield replacement is not merely to install new glass. It is to restore the coach so you can travel with confidence and focus on the next destination.
If your motorhome, fifth wheel, travel trailer, toy hauler, or popup was damaged in Redlands or anywhere in the Inland Empire, request a free RV collision repair estimate. Send photos or bring the coach to RVCCR, and our team will inspect the damage, explain the repair path, coordinate with your insurer, and help move you toward your next adventure.
Need a repair estimate?
Skip the wait — send us a few photos and our team will get back to you fast.
Start a Photo Estimate →