RV Tire Blowout Damage Repair: How a Blown Tire Becomes a Body, Frame, and Suspension Repair
Updated August 31, 2026 | RVCCR, RVDA Certified Repair Facility in Redlands
RVCCR is an RVDA-certified repair facility with 21 years of experience serving Redlands and the Inland Empire. Our team handles RV collision repair, paint and body work, mechanical service, and structural restoration for motorhomes, fifth wheels, travel trailers, toy haulers, popups, and other recreational vehicles.
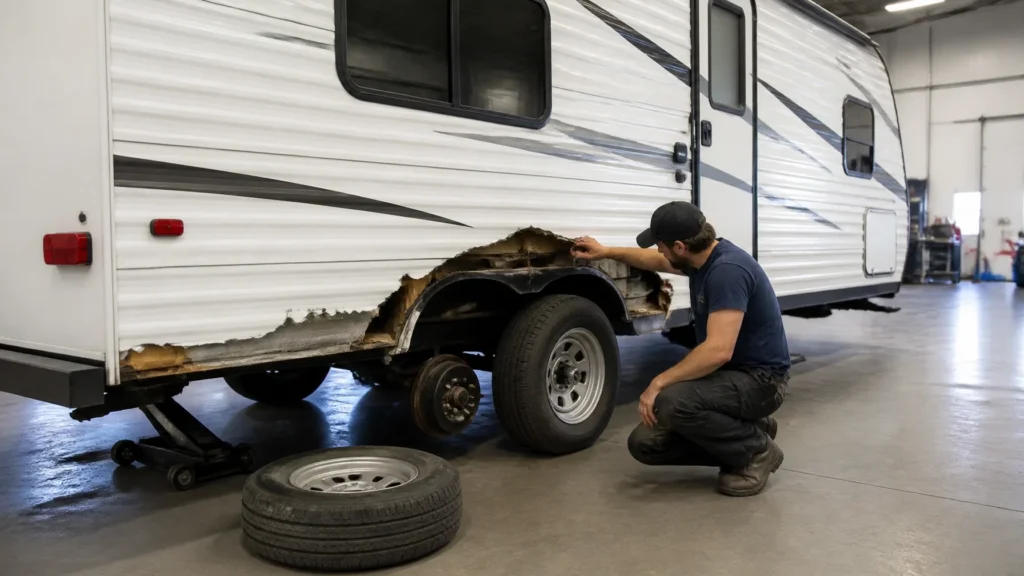
A tire blowout can happen in seconds. The repair may take considerably longer because the tire is often only the beginning of the damage. When a tire separates at highway speed, the remaining rubber and steel can strike the wheel-well fender, tear the liner, rip through the underbelly, damage brake wiring, bend suspension components, affect axle alignment, and sometimes transfer force into the trailer frame. The visible damage may look like a shredded tire and a missing fender skirt, but the safety-related inspection extends farther underneath…
Before you replace the tire and tow away, the wheel, hub, brake system, suspension, axle, frame, wiring, underbelly, and surrounding body structure should be evaluated. The correct repair depends on what the inspection finds, which components were damaged, and whether the affected parts can be safely repaired or must be replaced.
What happens during an RV tire blowout?
When an RV tire loses its structure, the tread or sidewall may separate from the casing. The loose material can rotate with the wheel and strike nearby components repeatedly until the vehicle stops. The force and damage pattern vary according to speed, tire position, wheel-well design, trailer loading, road conditions, and whether the tire is on a motorhome, travel trailer, fifth wheel, or another RV configuration.
A blowout can damage:
- The tire and wheel
- The fender skirt or wheel-well fender
- The wheel-well liner
- The exterior sidewall
- The underbelly fabric or plastic
- Insulation beneath the floor
- The subfloor or floor framing
- Electric brake wiring
- Hydraulic brake lines, where equipped
- Brake magnets, backing plates, hubs, or drums
- Leaf springs, shackles, equalizers, hangers, or U-bolts
- Torsion-axle components
- The axle tube or spindle
- The frame near suspension mounts
- Plumbing, tanks, or wiring routed near the tire
- Interior flooring, cabinetry, or wall material
The first responsibility is safety. Pull off the road as far as possible, activate hazard lights, use roadside warning equipment when it is safe, and stay out of traffic. Do not crawl beneath an RV supported only by a jack. A jack may lift an RV, but it is not a substitute for properly rated support equipment and safe shop procedures.
After the unit is secure, photograph the damage before removing debris or moving the vehicle farther than necessary. These photographs can help explain the original condition to an insurer and give an RV repair facility an early view of the likely repair scope.
The first inspection: tire, wheel, and immediate impact area
A replacement tire is not the same thing as a completed repair. The wheel and the components around it must be checked before the RV returns to service.
Inspect the tire and wheel
The blown tire should be replaced rather than patched. A tire that has experienced a destructive blowout has suffered a serious structural failure, and the remaining casing may not be suitable for continued use.
The wheel should be inspected for:
- Bends at the rim lip
- Cracks
- Deep gouges
- Distortion around the lug holes
- Damage to the valve stem
- Evidence of contact with the suspension or body
- Abnormal runout when rotated
- Corrosion or damage that was exposed when the tire failed
A wheel can appear usable when viewed from the outside but still have a bent bead area or mounting problem. If the wheel is questionable, replacement is generally more appropriate than attempting to straighten a safety-critical wheel without an approved procedure.
The lug nuts and studs also deserve attention. A tire event can damage studs, loosen hardware, or place unusual loads on the wheel. The replacement wheel and tire must match the RV’s required size, load rating, bolt pattern, offset, and inflation requirements.
Inspect the wheel-well fender and liner
The fender skirt is often the most obvious body damage. It may be cracked, pulled loose, shredded, or missing completely. Behind it, the wheel-well liner or enclosure may also be damaged.
The wheel well serves more than an appearance function. It helps separate the rotating tire from the floor, wall, insulation, wiring, plumbing, and interior spaces. If it has been torn open, debris and water can enter areas that were previously protected.
A technician should examine:
- The fender skirt and mounting brackets
- The inner wheel-well enclosure
- Fasteners and attachment points
- The edge of the floor
- The exterior sidewall behind the fender
- Exposed wood, aluminum, or composite framing
- Insulation that has been shredded or displaced
- Openings that lead toward the living area
- Sealant joints around the wheel well
A fender skirt replacement may be a relatively limited body repair. A damaged wheel-well enclosure or floor edge can require structural reconstruction and sealing.

Underbelly and floor damage after a blowout
The underbelly is easy to overlook because it is beneath the RV. It may be made from fabric, plastic sheeting, corrugated material, or another protective barrier. A blowout can rip it open, pull it away from fasteners, or remove large sections entirely.
Underbelly damage can expose:
- Insulation
- Floor framing
- Electrical wiring
- Plumbing
- Water tanks
- Propane-related components
- Suspension hardware
- Brake wiring
- Chassis or trailer-frame attachments
A temporary patch may keep rain and road debris out long enough to reach a repair shop, but tape or a temporary cover should not be treated as a permanent restoration. The repair must consider how the original material was attached, how it was sealed, and what it was protecting.
A proper underbelly repair may involve:
- Removing loose and unsafe material.
- Inspecting the floor, framing, wiring, plumbing, and suspension behind the opening.
- Replacing damaged insulation.
- Repairing or replacing compromised structural material.
- Installing suitable replacement underbelly material.
- Reattaching the material to sound supports.
- Sealing edges and penetrations according to the RV’s construction and applicable product requirements.
- Confirming that the repaired area does not interfere with suspension travel, brakes, tires, or service access.
If water, dirt, or road salt entered through the opening, the technician should also look for contamination, moisture, corrosion, and damage to materials that may not be visible from below.
When a blowout damages the subfloor
A tire can strike the underside of the floor or send debris through a wheel-well opening. If the subfloor is cracked, crushed, delaminated, or pulled away from its supports, simply covering it with new underbelly material does not restore the structure.
The repair decision depends on the extent of the damage. A limited area may be cut back to sound material and rebuilt with appropriate support. More extensive damage may require removal of interior flooring, cabinets, or wall components to reach the affected structure.
The shop should document:
- Where the floor is damaged
- Whether the damage is fresh and consistent with the blowout
- Whether the supporting structure remains sound
- Whether insulation or moisture has affected the area
- How the replacement material will be supported
- How the underbelly and interior finish will be restored
This documentation can become important during an insurance review because the original damage may have been hidden beneath the underbelly.
Brake wiring and brake-system damage
Travel trailers and other towable RVs commonly use electric trailer brakes, while some units may use hydraulic systems. A tire blowout can damage either type of system depending on how the failed tire and debris move.
Electric brake wiring
Electric brake wiring may run near the axle, backing plate, frame, or underbelly. A loose wire can be pulled, cut, melted, crushed, or dragged into the tire path.
Inspect for:
- Severed wires
- Exposed copper
- Melted insulation
- Pulled connectors
- Broken wire loom
- Dangling wires
- Damaged junctions
- Wiring that has been routed too close to the replacement tire
- Chafing against the frame or suspension
A wire that still conducts electricity is not necessarily safely repaired. The insulation, routing, strain relief, connectors, and protection from future tire contact all matter.
A professional repair may require replacing a damaged section, securing the harness, restoring protective loom, using suitable connections, and testing the brake circuit at the affected wheel and across the trailer. The brake controller, breakaway system, and seven-way connector should also be checked when the damage path reaches the trailer wiring.
Hydraulic brake lines
If the RV uses hydraulic brakes, the inspection should look for leaks, crushed tubing, kinked lines, pulled fittings, damaged hoses, or contamination. A line that has been flattened or stressed may not fail immediately, so visible deformation is a reason for further evaluation.
Do not tow with questionable brake performance. A tire replacement does not resolve a damaged brake line or compromised brake assembly.
Brake assembly and hub
The wheel and tire event can affect the brake drum, hub, bearings, backing plate, magnets, shoes, or related components. The hub should be inspected for impact damage, abnormal play, roughness, and signs of overheating or contamination.
The correct inspection procedure depends on the axle and brake design. Dexter’s service resources provide model-specific guidance for axle, hub, brake, and suspension service. The applicable manual should be used rather than relying on a general internet checklist.
Suspension damage that may not be visible
The suspension carries the RV’s load and allows the wheels to follow the road. A tire blowout may damage suspension parts directly or create an impact that changes their position.
On a leaf-spring travel trailer, inspect:
- Leaf springs
- Spring eyes
- Shackles
- Equalizers
- Hanger brackets
- Bushings
- U-bolts
- Axle seats
- Shock absorbers, if equipped
- Mounting welds
- Hardware and fasteners
Look for cracks, bends, elongated holes, displaced hardware, fresh scrapes, broken welds, flattened springs, and components that no longer sit symmetrically.
A blowout can also damage a torsion axle. The exterior axle housing may not show an obvious bend even if internal suspension components or mounting areas were affected. The manufacturer’s axle identification and service information should guide the inspection.
Lippert’s official axle and suspension resources emphasize correct component identification, suspension hardware service, and manufacturer-specific alignment and tolerance information. That matters because not every trailer axle or suspension system uses the same specifications.
Why axle alignment matters after a tire blowout
Axle alignment is one of the most important parts of post-blowout inspection. A trailer can receive a new tire and still be unsafe or difficult to tow if the axle, spindle, suspension hanger, or frame has moved.
Alignment affects:
- Whether the trailer tracks behind the tow vehicle
- How the tires contact the road
- Whether the tires wear evenly
- How loads are distributed across the axle and suspension
- Whether the trailer pulls or wanders
- How much stress reaches the frame and suspension
- Whether a replacement tire is exposed to abnormal heat and scrub
A misaligned trailer may “dog-track,” meaning it travels at an angle rather than following directly behind the tow vehicle. The owner may notice that the trailer appears to sit crooked, the tow vehicle feels unusual, or one tire begins wearing faster than the others.
Alignment problems may be caused by:
- A bent axle tube
- A damaged spindle
- A shifted spring hanger
- A bent equalizer
- Damaged U-bolts
- A distorted frame rail
- A shifted crossmember
- A damaged wheel
- Incorrectly positioned suspension components
- Pre-existing wear or prior impact damage
Visual inspection alone is not always enough. Dexter’s light-duty axle service manual describes measuring axle alignment relative to the trailer kingpin or coupler and provides specifications for certain Dexter axle applications. Those measurements are not universal specifications for every RV. The correct manual and dimensions for the specific axle and trailer must be used.
Lippert likewise publishes technical information for spring-axle alignment and RV line tolerances. Its guidance reinforces a central point: alignment is a measurable condition, not something that should be judged only by looking at the wheels.

What an alignment inspection may include
Depending on the RV and axle design, a shop may:
- Identify the axle manufacturer and model.
- Confirm the trailer’s loaded or unloaded inspection condition as required by the applicable procedure.
- Check that the RV is supported safely and positioned correctly.
- Inspect the frame, hangers, springs, equalizers, hubs, wheels, and tires.
- Measure axle position relative to the coupler or trailer centerline.
- Compare axle-to-axle positioning on multi-axle trailers.
- Check wheel position and visible toe or camber concerns.
- Inspect for bent or shifted components.
- Determine whether correction requires component replacement, frame repair, axle replacement, or manufacturer-approved adjustment.
- Recheck the system after repairs.
The objective is not simply to make measurements look acceptable. The objective is to restore the running gear so the trailer tracks, carries its load, brakes, and wears its tires as intended.
Repair or replace: how the decision is made
Owners often ask whether a damaged axle, suspension part, wheel-well panel, or frame section can be repaired. The answer depends on the component, the damage, the manufacturer’s instructions, and the ability to verify the completed repair.
Tire and wheel
A blown tire should be replaced. A wheel with cracks, significant distortion, or unsafe runout should generally be replaced rather than reused.
Fender skirt and liner
A fender skirt may be replaced if its attachment points and surrounding structure are sound. If the wheel-well enclosure, floor edge, or sidewall has been damaged, the repair may include structural restoration before the new skirt is installed.
Brake wiring
Wiring may be repairable when the damage is localized and the remaining harness is sound. The repaired wiring must be protected and routed away from the tire, suspension movement, heat, and sharp edges.
Suspension hardware
Individual components such as shackles, equalizers, hangers, U-bolts, or springs may be replaced when the frame and adjacent parts remain within specification. Damaged hardware should not be reused simply because it still fits.
Axle
An axle may be replaced when the axle tube, spindle, or internal components are bent or otherwise outside the manufacturer’s specifications. In some cases, another component is the true source of the alignment problem, so replacing the axle without measuring the entire system can fail to solve the issue.
Frame
A frame repair requires careful measurement and a documented structural plan. A bent or cracked frame should not be pulled, heated, or welded casually. The repair must restore geometry and load-carrying structure while accounting for the RV body, suspension, and manufacturer requirements.
A repair-versus-replace decision should be explained in writing. The estimate should identify the damaged component, the evidence supporting the diagnosis, the proposed operation, and why the selected method is appropriate.
Insurance documentation after an RV tire blowout
Insurance coverage varies by policy, cause of loss, deductible, and the specific damage involved. The tire itself, the resulting RV damage, roadside assistance, towing, and storage may be treated differently under different policies. Ask your insurer how your policy applies rather than assuming every consequence of a blowout is covered in the same way.
Good documentation can help establish what happened and what damage resulted.
Take photographs of:
- The failed tire
- The tire’s DOT identification information, if readable
- The wheel and valve stem
- The fender skirt
- The wheel-well liner
- Torn underbelly material
- Exposed insulation
- Brake wiring and connectors
- Brake lines and fittings
- The axle, hub, and suspension
- The frame near the damaged wheel
- The sidewall and floor
- Any interior damage
- The road shoulder or debris field, when safe
- All other tires on the same axle and RV
Also record:
- Date and approximate time of the incident
- Location and direction of travel
- Whether the RV was towing or self-propelled
- Any warning from a tire-pressure monitoring system
- Tire size, load range, brand, and age
- Tire pressure before the trip, if known
- The RV’s approximate load condition
- Roadside assistance and towing invoices
- Claim number and adjuster information
- Repair estimates and supplemental estimates
A detailed inspection may reveal hidden damage after the initial estimate. RVCCR’s article on RV insurance supplements and hidden damage explains why an initial visual estimate may change after underbelly material, wheel-well components, trim, or structural parts are removed.
The shop should photograph newly discovered damage before repairing it and explain how the condition relates to the tire failure. This is particularly important when the repair extends from a visible fender skirt into the floor, suspension, brake wiring, or frame.
Why teardown may be necessary
A blowout can hide damage behind the fender skirt and underbelly. A shop may need to remove damaged trim, open the underbelly, or access the wheel well before it can determine the full repair scope.
A controlled teardown may reveal:
- Crushed or missing insulation
- A bent wheel-well enclosure
- Broken floor framing
- Damaged brake wiring
- Shifted suspension hardware
- A bent axle
- A cracked frame weld
- Plumbing or tank-support damage
- Water-entry points
- A sidewall opening or delamination concern
Before authorizing teardown, ask what the shop plans to remove, what the inspection will cost, how reassembly will be handled if the repair is declined, and whether the insurer requires approval before additional work begins.
The purpose of teardown is not to increase the estimate. It is to replace assumptions with evidence. For a large RV, that distinction can prevent a cosmetic repair from concealing a running-gear or structural problem.
Prevention: reduce the chance of another blowout
NHTSA’s TireWise resources emphasize correct inflation, tire condition, load limits, and tire age. These principles apply to motorhomes and towable RVs, but the exact pressure and load requirements must come from the RV manufacturer, tire manufacturer, certification label, and owner’s manual.
Check cold inflation pressure
Use a reliable gauge and check pressure when the tires are cold. The recommended pressure should come from the RV’s tire-and-loading information or manufacturer guidance. The pressure printed on the sidewall identifies the tire’s maximum cold inflation pressure; it is not automatically the correct operating pressure for every RV.
Do not reduce pressure from the recommended cold setting simply because the tire appears firm, and do not exceed the tire’s maximum cold inflation pressure.
Check before long trips and periodically during storage. A visual inspection alone cannot reliably identify every underinflated tire.
Confirm load ratings
The tire’s load rating must be suitable for the actual load placed on it. Check:
- The tire sidewall load information
- The RV certification label
- The axle rating
- The gross vehicle or trailer weight rating
- The actual axle loading when available
- The load distribution across the RV
An RV can be within its total gross weight while still having an uneven side-to-side or axle-to-axle load distribution. If you have concerns about loading, obtain accurate axle weights and compare them with the applicable ratings.
Check tire age and condition
NHTSA TireWise explains that aging tires are more prone to failure and notes that some vehicle and tire manufacturers recommend replacement in the six-to-ten-year range, regardless of treadwear. NHTSA does not establish one universal replacement age for every tire and RV, so follow the specific recommendations for your tires and vehicle.
The last four digits of the DOT Tire Identification Number identify the week and year of manufacture. The full code may appear on only one side of the tire, which can make it difficult to read on an RV.
Inspect for:
- Sidewall cracks
- Bulges
- Cuts
- Uneven wear
- Exposed cords
- Tread separation
- Weather checking
- Damage from curbs or road debris
- Valve-stem leaks
- Signs of heat or overload
A tire with acceptable tread can still be aged, damaged, underinflated, or unsuitable for the RV’s load.
Use a TPMS
A tire-pressure monitoring system can provide earlier warning of pressure loss or abnormal temperature, depending on the system and its features. TPMS is not a substitute for checking cold pressure, inspecting the tires, confirming load ratings, or responding safely to a warning.
Set up the system according to the manufacturer’s instructions. Make sure the sensors are compatible with the tire valves and that the monitor is visible to the driver without creating a distraction.
Inspect before and during travel
Before departure, check all tires, valve stems, wheels, lug nuts, wheel wells, and visible suspension components. During a long trip, stop periodically in a safe location and look for changes in tire appearance, heat, tread condition, or pressure readings.
Do not touch a tire immediately after driving if it may be dangerously hot. Use the monitoring system and visual observation first, and allow components to cool before a closer inspection.
Finding RV collision repair near Redlands
When you search for travel trailer repair near me, distance is only one factor. A tire blowout can cross several repair categories at once: body damage, underbelly restoration, brake wiring, suspension, axle alignment, structural repair, and insurance documentation.
Choose a shop that can explain:
- How it will inspect the wheel and tire
- How it will access the underbelly
- How it will evaluate brake wiring and brake lines
- How it will inspect the axle and suspension
- How it will measure alignment
- How it will determine repair versus replacement
- How it will document hidden damage
- How it will communicate with the insurance carrier
- What parts and materials will be used
- What written warranty applies to the completed repair
For more information about towable RV restoration, review RVCCR’s article on travel trailer collision repair in 2026. If the blowout involved a motorhome’s driven axle or body structure, our guidance on motorhome collision repair timelines in 2026 explains why mechanical, structural, parts, and insurance variables can affect the schedule.
If the tire event occurred near the front of a travel trailer or affected the connection to the tow vehicle, the coupler, tongue, safety-chain mounts, and hitch should also be inspected. See RV hitch and coupler repair after a collision for additional guidance.
Questions to ask before approving the repair
Ask the repair facility:
- Is the tire the only damaged component?
- Will you inspect behind the fender skirt?
- Will the underbelly be opened?
- Will the floor, insulation, and framing be checked?
- Will brake wiring and brake lines be tested?
- Will the hub, bearings, drum, and brake assembly be inspected?
- Will the axle and suspension be measured?
- How will you check alignment?
- Which manufacturer’s service information applies?
- Is the wheel safe to reuse?
- Are the remaining tires the correct age and load rating?
- Will the insurance carrier receive photographs of hidden damage?
- What happens if the initial estimate changes after teardown?
- Which components will be repaired and which will be replaced?
- What final checks will be completed before the RV returns to the road?
- What written warranty covers the work?
Clear answers matter. A shop should be able to explain the repair in practical terms without making unsupported promises about cost, timing, coverage, or safety.
Tier 1 reference resources
The following primary resources provide safety and service information relevant to RV tires, axles, and suspension:
- NHTSA TireWise tire safety information
- Dexter axle and suspension resource manuals
- Dexter Light Duty 600–8K Complete Service Manual
- Lippert spring axle support and technical resources
- Lippert torsion axle and suspension support
- Lippert RV suspension repair information
These resources do not replace the owner’s manual or service information for the specific RV, tire, axle, brake system, or suspension. Specifications vary by manufacturer, model, axle rating, and component design.
Get the damage inspected before the next trip
A blown RV tire can leave behind more than a damaged tire. It can compromise the wheel well, underbelly, brake wiring, suspension, axle alignment, and frame in ways that are not visible during a quick roadside inspection.
Replace the tire only after the surrounding system has been evaluated. Photograph the damage. Notify your insurer. Ask for a written inspection and a repair plan that explains what was found, what must be replaced, and how alignment and brake operation will be verified.
At RVCCR, our Redlands team brings RV collision repair, body work, paint, mechanical service, insurance coordination, and written warranty support together under one roof. We inspect the damage beyond the shredded tire so your motorhome or travel trailer can return to the road ready for towing, camping, and the next adventure.
Request a free RV repair estimate and send photos of the tire, wheel well, underbelly, axle, suspension, and frame area. We will help you understand the repair path, document the damage, and move your RV toward a safe, confident return to travel.
Need a repair estimate?
Skip the wait: send us photos and our team will get back to you fast.
Need a repair estimate?
Skip the wait — send us a few photos and our team will get back to you fast.
Start a Photo Estimate →