Tesla Front Bumper and Fascia Replacement After a Collision: Why Sensors and Camera Mounts Make It a Precision Job
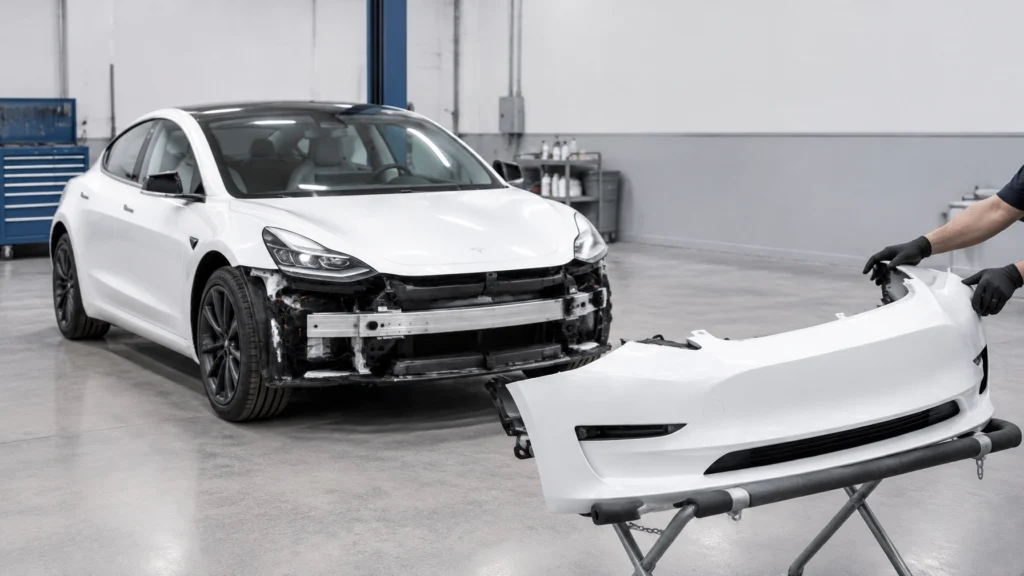
Updated September 11, 2026 | RVCCR, Tesla-certified collision repair facility serving Redlands and the Inland Empire
RVCCR is a Tesla-certified collision, paint, and mechanical repair facility serving Redlands and the Inland Empire. Our technicians work with Tesla repair information, OEM parts, high-voltage safety procedures, manufacturer-specific diagnostics, and post-repair verification. That experience matters when a collision damages the front bumper because the visible fascia is only one layer of a much larger system…
A Tesla front bumper repair may involve the painted bumper cover, absorber, reinforcement bar, energy-management components, mounting brackets, grille or trim, active air shutters, washer equipment, parking sensors, wiring, radar on applicable configurations, and nearby camera or camera-mount areas. The correct repair depends on the Tesla model, production year, build configuration, damage location, sensor equipment, and whether the impact changed the underlying structure.
For Tesla owners searching for a Tesla body shop in the Inland Empire, a Tesla-certified collision center, or an EV repair shop near me, the important question is not simply whether a replacement bumper looks acceptable. The question is whether the completed front end fits correctly, holds each sensor in its intended position, communicates without faults, and passes the required calibration and validation checks.
The front fascia is not just a painted cover
In everyday conversation, “bumper” can mean the entire front assembly. In collision repair, technicians separate the components because each one performs a different job.
The front fascia, often called the bumper cover, is the painted exterior panel visible from the front of the vehicle. It shapes the front-end appearance and provides mounting locations for trim, grilles, parking sensors, wiring clips, and other model-specific components.
Behind it may be several additional parts:
- Fascia or bumper cover
- Energy absorber
- Reinforcement bar or bumper beam
- Fascia carrier or mounting brackets
- Side retainers and guide brackets
- Lower valance or grille sections
- Active air shutters or louver assemblies
- Parking sensor mounts and retainers
- Front parking sensors, where equipped
- Wiring harnesses and connector clips
- Washer nozzles or headlamp-washer components, where equipped
- Fog-light or auxiliary-light components, where equipped
- Air-temperature or air-quality sensors, depending on model
- Pedestrian warning speaker or related front-valance components on applicable vehicles
- Radar equipment on configurations that use front radar
Not every Tesla contains every item on this list. The arrangement can change by model, year, trim, build date, and driver-assistance configuration. That is why a part ordered from a generic catalog may look similar while still being the wrong version for the vehicle.
A fascia with the wrong sensor openings, missing retainers, incorrect brackets, or a different mounting geometry can create problems before the vehicle leaves the shop. The panel may not align with the fenders, the parking sensors may sit at the wrong angle, or the harness may be forced into a route that does not match Tesla’s repair procedure.
Tesla’s official Model S service information demonstrates how much can be attached to the fascia. Its front-fascia procedure includes disconnecting the fascia harness, removing parking sensors when equipped, releasing harness clips, removing louver assemblies, and transferring related components to the replacement fascia. The procedure also directs the technician to perform radar calibration when the front radar may have moved outside its calibration tolerance.
The visible panel is therefore only the starting point.

Which sensors and driver-assistance components may be involved?
Ultrasonic parking sensors, where equipped
Some Tesla vehicles use ultrasonic sensors for parking-distance functions. These sensors are mounted through designated openings or retainers in the fascia. Their position, angle, depth, and surrounding material affect how they detect nearby objects.
A collision can damage more than the sensor itself. The sensor may still power on while its bracket is cracked, its mount is distorted, or its face is no longer flush with the fascia. A replacement fascia must match the vehicle’s original sensor configuration.
The technician should confirm:
- Whether the vehicle was built with ultrasonic sensors
- How many front sensors are installed
- Whether the replacement fascia has the correct openings
- Whether the original retainers are reusable
- Whether any sensor was cracked, dented, or contaminated
- Whether the wiring and connectors were stretched or pulled
- Whether the sensors are seated at the correct depth
- Whether the vehicle reports parking-assist faults after reassembly
A fascia designed for a vehicle without ultrasonic sensor holes is not an acceptable substitute for a sensor-equipped vehicle. Conversely, adding openings or improvised mounts to the wrong fascia does not reproduce the factory design.
Tesla configurations have changed over time, including changes to parking-assist equipment. The VIN and build configuration should control the parts decision: not a photograph of a similar Tesla online.
Autopilot and forward-facing cameras
The front fascia and the forward-facing Autopilot cameras are often discussed together, but they are not always physically located in the same component.
On many Tesla models, forward-facing cameras are positioned near the upper windshield area. A front bumper fascia replacement by itself may not disturb those cameras. However, a collision that damages the bumper can also affect the front structure, hood, fenders, windshield, A-pillars, camera housing, or mounting points.
That distinction matters:
- A fascia-only repair with no camera, windshield, or related structure disturbance may not require camera recalibration solely because the fascia was replaced.
- A collision that shifts a camera or camera mount requires the applicable calibration process.
- A windshield replacement or camera replacement can require calibration to be cleared and completed again.
- A front-end impact may require the shop to inspect camera-related structure even when the camera is not attached to the bumper cover.
Tesla owner documentation states that camera calibration must be cleared if a camera has shifted from its calibrated position, including situations such as camera or windshield replacement. The vehicle then completes its calibration process under the required driving conditions.
The repair facility should not simply say, “The car will calibrate itself,” without first determining whether the camera, windshield, camera bracket, or related structure was disturbed. Dynamic calibration is not a substitute for correcting a bent mount or improperly installed windshield.
Radar, if equipped
Some Tesla configurations use a front radar sensor. The exact equipment and mounting arrangement depend on the model and production configuration.
On applicable vehicles, radar may be located behind or near the front fascia assembly. A low-speed impact, contact while removing the fascia, or movement of the radar mounting area can place the radar outside its calibration tolerance even when the fascia appears to fit.
Tesla’s Model S service procedure specifically states that radar calibration is performed when the front radar sensor may have moved outside its calibration tolerance because of a front-end collision or contact during fascia removal.
That is a model-specific instruction, not a universal claim that every Tesla uses front radar. The technician should identify the vehicle’s actual equipment and follow the applicable Tesla procedure.
The parts stack behind the painted fascia
A front bumper estimate can change after disassembly because the outer cover may hide damage to several supporting components.
Bumper cover or fascia
The fascia may be cracked, torn, crushed, gouged, or pulled away from its retainers. A minor scrape may be repairable in some circumstances, but replacement becomes more likely when the panel cannot hold its original shape, mounting points are damaged, or sensor openings are distorted.
Paint damage also matters. A repair may require refinishing, blending adjacent panels, or installing a pre-painted service part if the correct part and finish are available for the vehicle.
Energy absorber
The absorber sits behind the fascia and is designed to manage certain types of impact energy. It may be made from foam, molded material, or another model-specific construction.
An absorber can be compressed or damaged without obvious exterior cracking. Reusing a damaged absorber may leave the front assembly without the intended support and spacing. The repair decision should follow Tesla’s applicable procedure and the condition of the part.
Reinforcement bar
The reinforcement bar or bumper beam provides a separate layer of front-end protection. It may be bent, shifted, cracked, or damaged at its mounting points after a collision.
A fascia that looks straight does not prove that the reinforcement bar is straight. If the bar or its mounts moved, the shop may need to measure the area, remove additional components, or inspect adjacent structure before installing the outer cover.
Brackets, retainers, and carriers
The fascia depends on side brackets, carrier components, guides, clips, and retainers to maintain its position relative to the fenders, hood, grille, and lamps.
A broken clip may seem minor, but several missing or distorted attachment points can produce:
- Uneven gaps
- Fascia movement
- Wind noise
- Panel vibration
- Sensor misalignment
- Loose trim
- Repeated cracking around the fastener area
Tesla collision repair procedures distinguish between approved fasteners and damaged or one-time-use hardware. Hardware that is bent, broken, deformed, or no longer able to achieve the required attachment should not simply be forced back into service.
Active air shutters and louvers
Some Tesla models use active air shutters or louver assemblies behind the fascia. These components can help manage airflow through the front cooling area according to the vehicle’s design.
A front impact may bend a louver, damage an actuator, pull a connector, or block the assembly with a displaced bracket. The shutters may not be visible from outside, and the vehicle may not display an obvious warning immediately.
If the fascia procedure requires removing or transferring louver assemblies, the technician should confirm that the components move correctly and that the electrical connectors are secured after reassembly.
Washer nozzles and related equipment
Some Tesla configurations include washer nozzles or headlamp-washer components in the front bumper area. A collision can break a nozzle, kink a hose, damage a retainer, or create a leak behind the fascia.
The shop should verify:
- Nozzle position
- Hose routing
- Retainer condition
- Fluid leakage
- Spray pattern
- Clearance from the fascia and nearby components
A replacement fascia may have different openings or retainers depending on the vehicle’s equipment. The part must match the car rather than requiring improvised drilling or modification.

Why OEM Tesla fascia parts matter
Tesla’s collision repair manuals state that collision repairs should use new, undamaged OEM Tesla parts together with Tesla-approved fasteners, adhesives, and repair methods. The manuals also state that Tesla does not allow used, recycled, alternative, aftermarket, or third-party replacement parts for repairs performed to Tesla standards.
For a front fascia, OEM fit matters for more than appearance.
Correct geometry
The fascia has to meet the hood, fenders, headlights, lower trim, and wheel-opening areas with consistent gaps. A panel with slightly different geometry can create a visible mismatch even if it can be attached to the vehicle.
Correct sensor openings
Parking sensor holes and mounts must be located exactly where the vehicle expects them. A sensor that is too deep, too shallow, tilted, or surrounded by the wrong material may not operate as designed.
Correct bracket and harness attachment
Tesla’s procedures show that harnesses are secured to the fascia with clips and retainers. The replacement panel must provide the intended attachment points so the harness cannot rub against moving parts, contact a hot component, or hang below the vehicle.
Correct material and finish
The material thickness, flexibility, surface finish, and paint quality affect how the panel responds during installation and how it holds its shape afterward. An aftermarket part may require extra modification or may not replicate the original sensor and bracket interfaces.
Correct fasteners and torque
A part can be correct while the hardware is wrong. Tesla procedures specify fastener types and torque values for applicable operations. Reusing a damaged screw, substituting an incorrect clip, or tightening hardware by feel can affect panel retention and alignment.
The lowest parts price is not necessarily the lowest repair cost. A non-matching fascia can create additional labor, fitment delays, sensor faults, supplement disputes, and rework.
What the replacement process involves
A qualified Tesla repair process is controlled from the initial scan through the final validation.
1. Pre-repair documentation and scan
Before disassembly, the shop should document the vehicle condition and relevant warning messages. A pre-repair diagnostic scan can identify existing faults and help separate pre-existing conditions from collision-related faults.
The file should include:
- VIN and vehicle configuration
- Visible damage photographs
- Warning messages
- Scan results, where applicable
- Sensor or camera concerns
- Part and equipment identification
- Initial estimate and repair assumptions
A scan does not replace a physical inspection. It is one part of the repair record.
2. Vehicle-specific parts identification
The technician confirms the correct fascia version by VIN, model, production configuration, sensor equipment, and required options.
The estimate should identify whether the fascia is:
- Sensor-equipped or non-sensor-equipped
- Primed or painted
- Intended for a specific model and production range
- Supplied with retainers or requiring component transfer
- Compatible with active shutters, washer equipment, lamps, and trim
3. Safe disassembly
Tesla’s Model S fascia procedure includes disconnecting 12-volt power, protecting adjacent fenders, disconnecting the fascia harness, releasing clips, removing fasteners, and carefully releasing the fascia from its carrier and fender brackets.
The exact steps differ by model. The point is that disassembly should follow the applicable procedure rather than relying on generic bumper-removal habits.
During removal, the technician may inspect:
- Hidden impact transfer
- Reinforcement and absorber condition
- Harness routing
- Sensor mounts
- Radar brackets, if equipped
- Active-shutter components
- Washer hoses and nozzles
- Cooling-area debris
- Bent carriers and side brackets
- Damaged fasteners and clips
4. Parts transfer or replacement
Some parts may be transferred from the original fascia if they pass inspection and Tesla’s procedure permits reuse. Other components may need replacement.
The technician should not assume that every sensor, bracket, or harness survived simply because it can be removed from the damaged panel. Each part must be checked for cracks, deformation, connector damage, contamination, and correct operation.
5. Correct installation
The new fascia is installed with the correct brackets, clips, fasteners, harness routing, and torque specifications. Gaps and flushness are checked against the hood, fenders, lamps, grille, and lower panels.
The panel should not be pulled into position with excessive force. If it does not align, the technician should identify whether the issue is a wrong part, hidden structural movement, damaged bracket, missing hardware, or an installation error.
6. Paint and finish inspection
If the fascia is unpainted, it must be prepared, refinished, and cured using an appropriate process. The color, texture, gloss, and panel transition should be checked under proper lighting.
Paint work is not complete if the fascia is mechanically aligned but the finish differs noticeably from adjacent panels.
Calibration and validation after replacement
A bumper replacement is not finished when the fascia is bolted on.
The required checks depend on the vehicle’s equipment and what was disturbed. They may include parking-sensor testing, radar calibration, camera calibration, diagnostic scans, active-shutter operation, washer operation, lighting checks, and a road test.
Parking-sensor validation
For vehicles equipped with ultrasonic parking sensors, the technician should confirm:
- Each sensor is seated correctly
- The connector is fully engaged
- The wiring is secured
- The vehicle does not report a parking-system fault
- The system responds appropriately to nearby objects under safe test conditions
A scan may identify a fault that is not obvious during a short driveway test.
Radar calibration, when applicable
If the vehicle uses front radar and the sensor or its mounting position may have moved, the applicable Tesla calibration procedure should be completed. The calibration requirement depends on the model, sensor location, impact, and repair operation.
The repair file should state whether radar calibration was required, completed, or not applicable: and why.
Camera inspection and calibration
If the front collision disturbed a camera, camera mount, windshield, A-pillar, roof structure, or related reference point, the camera calibration process must be addressed.
Tesla owner documentation explains that calibration is cleared when the camera has shifted from its calibrated position. Dynamic calibration then takes place while driving under suitable conditions. Tesla’s owner information describes clear lane markings and appropriate road conditions as part of the process.
A shop should verify:
- Camera housing condition
- Camera bracket position
- Windshield condition and installation, if involved
- Warning messages
- Calibration status
- Static procedure requirements, if applicable
- Dynamic calibration completion, if applicable
The customer should receive clear instructions if a required drive is still needed after delivery. The vehicle should not be represented as fully calibrated if the required process has not been completed.

Pre-repair and post-repair scans
The repair file should contain both pre-repair and post-repair scan information when scans are appropriate to the damage and procedure.
A post-repair scan can help confirm:
- Collision-related faults were addressed
- Sensor communication is restored
- No unresolved warning remains
- Camera or radar systems report the expected status
- The vehicle is ready for the required calibration or road test
A scan report is not the same as a calibration report. Owners should ask for both when both are relevant.
Functional and road testing
Final validation may include:
- Parking-assist operation, where equipped
- Radar-related driver-assistance status, where applicable
- Camera-calibration status
- Active-shutter operation
- Washer-nozzle operation
- Lighting and turn-signal operation
- Hood and fascia clearance
- Wheel-well liner clearance
- Wind noise or vibration check
- Road test under safe conditions
- Final warning-message verification
The exact checks depend on the repair scope. A shop should be able to explain which tests applied to the vehicle.
How certified-shop and generic-shop labor can differ
A generic bumper quote may appear lower because it includes only visible panel replacement and paint. That estimate may not include:
- Vehicle-specific Tesla procedure research
- High-voltage and 12-volt safety steps
- Pre-repair and post-repair scans
- Sensor transfer and testing
- Radar calibration, if applicable
- Camera inspection or calibration
- Active-shutter diagnosis
- Hidden reinforcement or absorber damage
- OEM fasteners and clips
- Supplement documentation
- Final driver-assistance validation
A Tesla-certified collision center may show more labor operations because the estimate accounts for the full repair process. That does not mean every certified quote is automatically correct, and it does not mean every generic shop performs poor work. It means owners should compare the scope of the estimates rather than comparing only the headline price.
Ask whether each quote includes the same:
- Fascia part
- Sensor configuration
- Paint operations
- Hidden-part inspection
- Diagnostic scans
- Calibration
- Road testing
- OEM hardware
- Warranty
- Documentation
A lower quote that omits calibration or post-repair scanning is not a direct comparison to a complete repair plan.
Cost ranges: why a VIN-specific estimate is necessary
Tesla front bumper costs vary by model, year, parts configuration, paint, labor rate, sensor equipment, parts availability, and hidden damage. Tesla’s primary repair manuals explain procedures and parts requirements; they do not publish a universal consumer price range for every fascia replacement.
The practical cost range can extend from a relatively contained fascia-and-refinish operation to a substantially larger front-end repair involving the absorber, reinforcement bar, brackets, sensors, active shutters, radar, structural work, calibration, and insurance supplements.
For that reason, a responsible shop should provide at least two planning scenarios when hidden damage is possible:
Lower-scope scenario
This may include:
- Fascia removal and installation
- OEM fascia
- Paint and finish operations
- Clips or fasteners
- Limited component transfer
- Final fit inspection
Expanded-scope scenario
This may add:
- Absorber replacement
- Reinforcement-bar inspection or replacement
- Sensor replacement
- Sensor brackets and wiring
- Active-shutter or louver repair
- Washer equipment
- Radar calibration, if applicable
- Camera or windshield-related operations
- Structural measurement or repair
- Pre- and post-repair scans
- Supplement and additional quality-control operations
The actual dollar amount should be based on the vehicle identification number, physical inspection, current parts pricing, local labor rates, insurance requirements, and the applicable Tesla procedures. RVCCR offers free estimates and coordinates with major insurance carriers, but the estimate may change after teardown reveals damage that was not visible from the outside.
Be cautious of any shop that promises a fixed price before confirming the Tesla’s exact configuration and inspecting behind the fascia.
Documentation Tesla owners should demand
A complete repair file should make the work understandable months or years later. Request the following documentation.
OEM part numbers
The estimate or final invoice should identify the part numbers for major replaced components, including:
- Front fascia
- Absorber
- Reinforcement bar
- Sensor brackets
- Parking sensors
- Radar components, if applicable
- Active-shutter assembly
- Washer nozzles or related parts
- Replacement fasteners where relevant
The part number should match the vehicle’s model, year, build, and sensor configuration.
Scan reports
Ask for:
- Pre-repair scan report
- Post-repair scan report
- Relevant diagnostic trouble codes
- Notes explaining any remaining codes
- Confirmation that collision-related warnings were addressed
Calibration reports
If radar or cameras were involved, ask for documentation showing:
- The system affected
- The calibration procedure performed
- Static calibration status, if applicable
- Dynamic calibration status, if applicable
- Any required customer-driving portion
- Final warning-message status
Photos
Useful photos include:
- Original damage
- Fascia removed
- Absorber and reinforcement area
- Sensor mounts
- Wiring routing
- Damaged brackets or fasteners
- New OEM components
- Final panel gaps
- Completed front-end installation
Photos support insurance supplements, future service, resale questions, and warranty discussions.
Final invoice and warranty
The final invoice should distinguish parts, labor, paint, scanning, calibration, and additional operations. The written warranty should explain what the shop warrants and for how long.
At RVCCR, completed qualifying repairs are backed by a written lifetime warranty. Ask for the applicable warranty terms before authorizing the work.
Three questions to ask a Tesla collision center
Before choosing a shop, ask:
- Which Tesla fascia part number matches my VIN and sensor configuration?
- Will you provide pre- and post-repair scans, and will you document any radar or camera calibration?
- Will the final invoice identify the OEM parts, calibration status, and any components transferred from the damaged fascia?
A qualified facility should answer those questions clearly and explain what is known before teardown, what must be inspected after disassembly, and what could require an insurance supplement.
For additional context on why Tesla collision repairs require model-specific procedures, read RVCCR’s article on Tesla underbody aero shield and battery inspection after a collision. A damaged bumper and a damaged underbody panel are different repairs, but both demonstrate why visible plastic is not the entire inspection.
If a collision involves the windshield or forward camera area, RVCCR’s article on Tesla glass roof repair, OEM glass, and camera recalibration explains why glass position, camera mounts, adhesive, and calibration must be considered together.
The same principle applies across vehicle types: the visible panel is not always the complete damage. RVCCR’s article on RV leveling-system repair after a collision shows how a collision can affect connected mechanical, electrical, and structural systems that are easy to miss during a quick exterior inspection.
What a complete Tesla front-end repair should accomplish
When the work is finished, the goal is not merely a painted fascia with acceptable gaps. The completed repair should restore:
- Correct OEM panel fit
- Proper hood, fender, grille, and lamp alignment
- Correct sensor openings and mounting depth
- Secure harness routing
- Functional parking sensors, where equipped
- Radar alignment, where applicable
- Camera alignment and calibration, when required
- Active-shutter operation, where equipped
- Washer and lighting operation
- Appropriate fasteners and torque
- Clear diagnostic status
- Complete repair documentation
That outcome requires coordination among the estimator, body technician, painter, diagnostic technician, calibration equipment, insurance carrier, and vehicle owner.
Restore the front end: and the confidence behind the wheel
A Tesla front bumper can look like a single painted shell, but the repair may involve a fascia, absorber, reinforcement bar, brackets, sensors, harnesses, louvers, washer equipment, radar, cameras, and calibration. The correct repair starts with identifying the exact vehicle configuration and continues through disassembly, OEM parts verification, precise reinstallation, scanning, calibration, and final validation…
RVCCR combines Tesla-certified collision repair, EV safety knowledge, paint and mechanical work, OEM-directed procedures, insurance coordination, and documented final checks under one roof in Redlands. Our team will inspect the visible and hidden damage, explain the repair scope, identify the parts required, and keep you informed if teardown changes the estimate.
If your Tesla needs front bumper or fascia replacement after a collision, request a free estimate from RVCCR. We will help restore the fit, function, and safety systems that support every mile ahead.
Replace the damaged fascia. Verify every sensor. Complete the calibration. Then get back to the drive, the family plans, and the road ahead with confidence.
Primary Tesla references
- Tesla Model S Service Manual: Fascia Assembly: Front Remove and Replace
- Tesla Model Y Service Manual: Valance: Front Fascia Remove and Replace
- Tesla Model Y Owner’s Manual: Calibrating Cameras
- Tesla Model Y Service Information: Camera Calibration
- Tesla Collision Support
- Tesla Model 3 Body Repair Procedures
- Tesla Model Y Body Repair Procedures
Need a repair estimate?
Skip the wait — send us a few photos and our team will get back to you fast.
Start a Photo Estimate →